As-Built As-Built - Revit As-Built - AutoCAD VirtuSurv - VirtuSurv 2018 As-Built - Modeler VirtuSurv - VirtuSurv 2019          
BuildIT BuildIT - Projector BuildIT - Construction BuildIT - Metrology              
CAM2 CAM2 - SmartInspect CAM2 - 2024 CAM2 - 2023 CAM2 - 2018 CAM2 - Measure 10 CAM2 - Measure Q CAM2 - Measure X CAM2 - Measure 3/4 CAM2 - AnthroCAM CAM2 - 2019
CAM2 CAM2 - 2020 CAM2 - 2021                
Cobalt 3D Imager 3D Imager - Cobalt                  
Cobalt Design Cobalt Design - M Cobalt Design - S Cobalt Design - Dual              
Computers Computers - All Computers                  
FARO Aras 360 & CAD Zone FARO CAD Zone - Fire & Insurance FARO CAD Zone - Crime & Crash FARO CAD Zone - CZ Point Cloud FARO CAD Zone - First Look Pro FARO 360 - Reality FARO 360 - HD FARO 360 - Blitz FARO 360 - Genius    
FARO Connect FARO Connect - Connect                  
FARO Zone present4D - present4D                  
FARO Zone 2D FARO Zone 2D - 2018 FARO Zone 2D - 2019 FARO Zone 2D - 2020 FARO Zone 2D - 2021 FARO Zone 2D - 2022 FARO Zone 2D - 2023 FARO Zone 2D - 2024      
FARO Zone 3D FARO Zone 3D - 2018 FARO Zone 3D - 2019 FARO Zone 3D - 2020 FARO Zone 3D - 2021 FARO Zone 3D - 2022 FARO Zone 3D - 2023 FARO Zone 3D - 2024      
FARO Zone 3D Advanced FARO Zone 3D Advanced - 2018 FARO Zone 3D Advanced - 2019 FARO Zone 3D Advanced - 2020 FARO Zone 3D Advanced - 2021 FARO Zone 3D Advanced - 2022          
FaroArm/ScanArm FaroArm/ScanArm - Quantum S FaroArm/ScanArm - Quantum M FaroArm/ScanArm - Quantum E FaroArm/ScanArm - Edge FaroArm/ScanArm - Fusion FaroArm/ScanArm - Prime FaroArm/ScanArm - Platinum FaroArm/ScanArm - Legacy Quantum FaroArm/ScanArm - Titanium FaroArm/ScanArm - Advantage
FaroArm/ScanArm FaroArm/ScanArm - Digital Template FaroArm/ScanArm - Gage FaroArm/ScanArm - Quantum S Max FaroArm/ScanArm - Quantum M Max FaroArm/ScanArm - Quantum E Max FaroArm/ScanArm - Gage Max FaroArm/ScanArm - Quantum X.S FaroArm/ScanArm - Quantum X.M FaroArm/ScanArm - Quantum X.E  
GeoSLAM Software GeoSLAM Software - Connect GeoSLAM Software - Draw GeoSLAM Software - Hub GeoSLAM Software - Volumes            
GeoSLAM ZEB GeoSLAM ZEB - Horizon GeoSLAM ZEB - Horizon RT GeoSLAM ZEB - Revo GeoSLAM ZEB - Revo RT GeoSLAM ZEB - Go          
Hand Held Scanner 2D Hand Held Scanner - ScanPlan 3D Hand Held Scanner - Freestyle3D 3D Hand Held Scanner - Freestyle3D X 3D Hand Held Scanner - Freestyle3D Objects 3D Hand Held Scanner - Freestyle 2          
Language Quality HT MT AT NT INT - Internal Sales - Internal Resources Sales - Order and Quote Sales - Product Info Sales - Sales Readiness Sales - Training
Language Quality Sales - Product Launch Sales - Promotions CS - Quote to Invoice CS - Phone System CS - New Hire Training CS - General CS - Product Info CS - Licensing CS - Onboarding CS - Procedures General
Language Quality CS - Procedures Salesforce CS - Procedures Loaner CS - Procedures SAP              
Languages Language - English Language - Japanese Language - German Language - Chinese Language - Spanish Language - Italian Language - Portuguese Language - French Language - Korean  
Laser Projector RayTracer - RayTracer Laser Projector - Tracer M Laser Projector - Tracer SI              
Laser Radar Imaging Laser Radar - VectorRI                  
Laser Scanner 3D Laser Scanner - Focus S 3D Laser Scanner - Focus M 3D Laser Scanner - Focus3D 3D Laser Scanner - Focus3D X 3D Laser Scanner - Focus3D X HDR 3D Laser Scanner - Focus3D S 3D Laser Scanner - Photon 3D Laser Scanner - Focus S Plus 3D Laser Scanner - Swift 3D Laser Scanner - Focus Premium
Laser Scanner 3D Laser Scanner - Focus Core 3D Laser Scanner - Focus Premium Max                
Laser Tracker Laser Tracker - Vantage Laser Tracker - ION Laser Tracker - Vantage S Laser Tracker - Si Laser Tracker - X Laser Tracker - Xi Laser Tracker - Vantage E Laser Tracker - Vantage S6 Laser Tracker - Vantage E6  
Legacy Gage Legacy Gage - Bluetooth Legacy Gage - Plus Legacy Gage - Standard Legacy Gage - Power            
Legacy Software Legacy Software - CAM2 Gage Legacy Software - Gage Software Legacy Software - Insight              
Mobile Scanner Mobile Scanner - Orbis                  
PointSense PointSense - Basic PointSense - Pro PointSense - Building PointSense - Plant PointSense - Heritage PointSense - Revit CAD Plugin - TachyCAD Building CAD Plugin - TachyCAD Archeology CAD Plugin - TachyCAD Interior CAD Plugin - PhoToPlan Basic
PointSense CAD Plugin - PhoToPlan CAD Plugin - PhoToPlan Pro CAD Plugin - PhoToPlan Ultimate CAD Plugin - DisToPlan CAD Plugin - MonuMap CAD Plugin - hylasFM CAD Plugin - VirtuSurv      
RevEng RevEng - RevEng                  
ScanArm ScanArm - Design ScanArm 2.0 ScanArm - Design ScanArm ScanArm - Forensic ScanArm ScanArm - Design ScanArm 2.5C            
SCENE SCENE - Capture and Process SCENE - WebShare Server and 2Go SCENE - WebShare 2Go App SCENE - 2024 SCENE - 2018 SCENE - 7.x SCENE - 6.x SCENE - 5.x SCENE - 4.x SCENE - LT
SCENE SCENE - 2019 SCENE - 2go App SCENE - 2020 SCENE - 2021 SCENE - 2022 SCENE - 2023        
Serial FaroArm Serial FaroArm - Silver Serial FaroArm - Gold Serial FaroArm - Bronze              
Sphere FARO Sphere - Sphere                  
Visual Inspect Visual Inspect - App Visual Inspect - CAD Translator                
WebShare WebShare - Enterprise WebShare - WebShare Cloud                
FARO® Knowledge Base

Glass Sensor Cover Clip Installation for the Focus M and Focus S Series

Overview

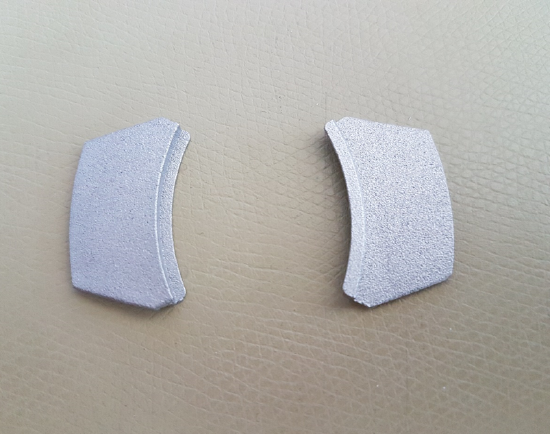
On some FARO® Laser Scanner FocusM 70 and FocusS 70/150/350 units, the glass sensor cover may be loosened if there are considerable temperature and humidity fluctuations in the work environment or during rough transport. To ensure that this does not happen, FARO provides clips that hold and lock the sensor cover in place. Using the FARO Sensor Cover Clip Set package, you can install specially designed clips on the outside of your Focus casing. When installed properly, these clips protect the sensor cover from becoming loose without impeding the mirror rotation.  
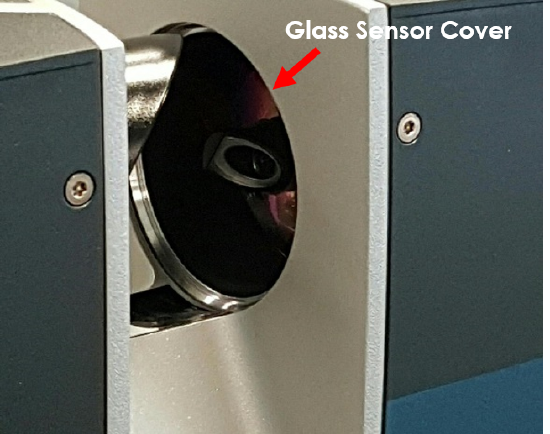
FocusSMSensorCover.png

If you own a FocusS or FocusM, a FARO Representative will contact you to determine the best option for installing the clips. When possible, we prefer to install these clips for you. If it is not possible, the Representative will arrange to send you the Clip Set package so you can easily install the clips yourself using the videos and instructions in this article. 

Videos

In this 1-minute presentation, learn how to test your FocusS or FocusM to see if the glass sensor cover comes loose. Cannot view the video? Click here to download this video.

In this 2-minute tutorial, learn how you can install the Clip Set. These clips protect the sensor cover from becoming loose under severe work conditions or during transport. Cannot view the video? Click here to download this video.

Prepare

Time to Complete 15 minutes
Skills Needed
  • No special skills needed
Prerequisites
  • Access to the FARO Laser Scanner Focus
  • A clean place to work
  • Sensor Cover Clip Set package from FARO
Supported Hardware
  • FARO® Laser Scanner FocusS 70/150/350
  • FARO® Laser Scanner FocusM 70

Gather Parts

Here is a list of the items contained in the Clip Set package.

  • Clips used to secure the sensor cover
    FocusSMSensorCoverClips.png
  • Lens cleaning wipe used to clean the laser scanner case before applying the clips
    LensCleaningWipes.jpg
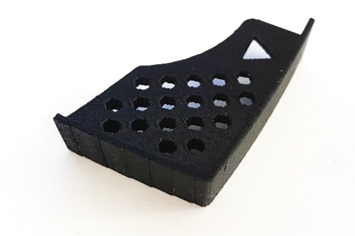
  • Clip alignment template
    FocusSMSensorCoverAlignmentTool.png

You also need these items.

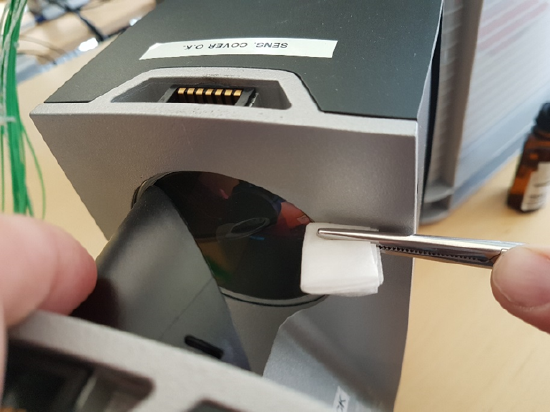
  • Tweezers to hold the lens cleaning wipe so that your hands do not touch the wipe
  • A flash light to check the evenness of the slit where the clips meet the scanner 

Make sure you have all these items handy before beginning the procedures below.

Test Clip and Mirror Clearance

  1. Turn the laser scanner off and put it on a clean surface where you can protect the outer case from scratching.
  2. Position the scanner at 90° from its upright position, such that the touch screen points upwards.
  3. In the Clip Set package, find the left and right clips. Test the clips by positioning them on the case on either side of the sensor cover as shown in this image. Leave the protective red foil in place on the back of the clips.
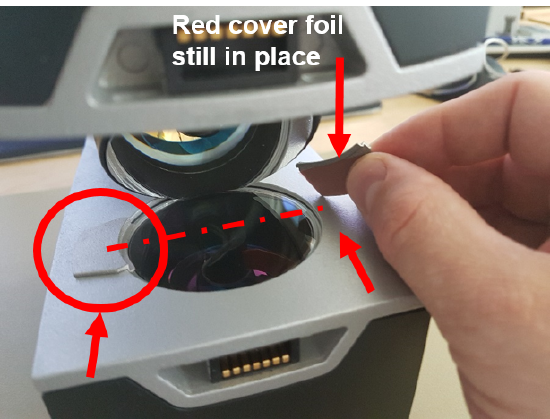
    FocusSMSensorCoverClipPlacement.png
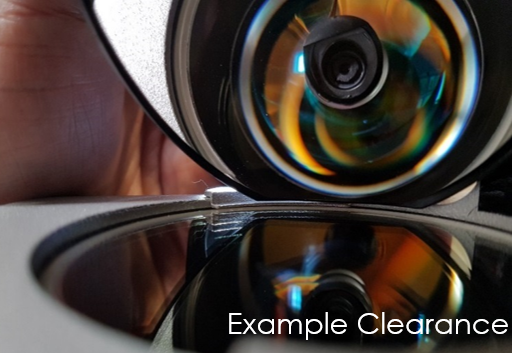
  4. Test the mechanical clearance between the tip of the rotating mirror and the clips. Slowly rotate the mirror by hand, checking how freely it moves. While the red protection foil is still on the clips, the mirror may rub on the edge of the clips slightly. This is acceptable as long as the clips do not block the progress of the mirror. Later, when you remove the red foil, the mirror will not rub on the clips. 
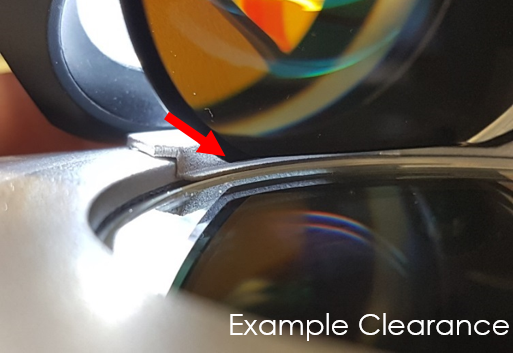
     FocusSMSensorCoverGruve1.png     FocusSMSensorCoverGruve2.png
    NOTE: If the mirror rotation is blocked by one or both clips, discard the clips and contact FARO support to get a new Clip Set package.
  5. Use a flash-light to illuminate the mirror from the back side of the scanner. You should see a small even slit of light where the clips meets the scanner case.
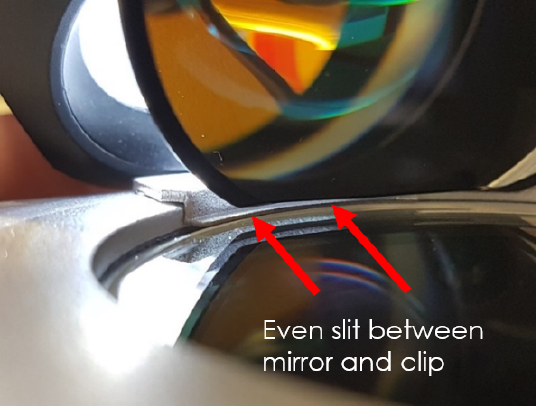
     FocusSMSensorEvenSlit1.png      FocusSMSensorEvenSlit2.png
    NOTE: If you do not see a even slit of light, discard the clips and contact FARO support to get a new Clip Set package.
  6. When you are sure that the clips meet the mechanical clearance as described in steps 4 and 5, set them safely aside, but keep them accessible.

Apply Clips to Scanner Case

  1. Clean the area on the case where clips will be installed with Isopropyl alcohol. Clean the areas left and right of the sensor cover so that it is free of dust and grease.
    FocusSMSensorCleaning.png
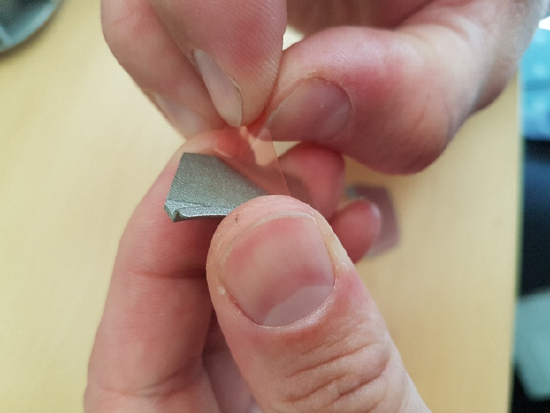
  2. Pick up one of the selected clips and carefully remove the protective red foil without touching the glue on the clip back. Set it aside. Do the same for the second clip.
    FocusSMSensorCoverClipTapeCarrierFoilRemoval.png
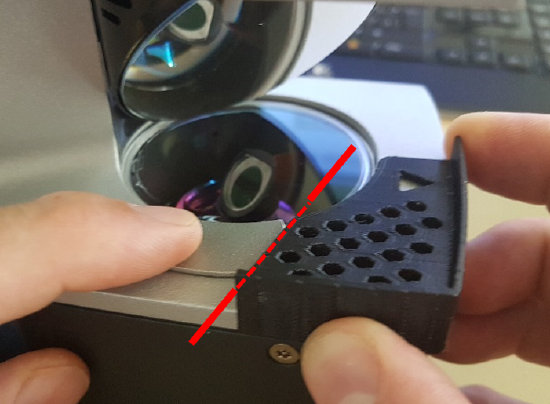
  3. From the Clip Set package, pick up the alignment tool and place it on the edge of the Focus casing near the sensor cover. 
  4. Pick up one clip, taking care not to touch the glue on the back, and place it along the edge of the alignment tool as shown in this image.
    FocusSMSensorCoverClipAllignTool.png
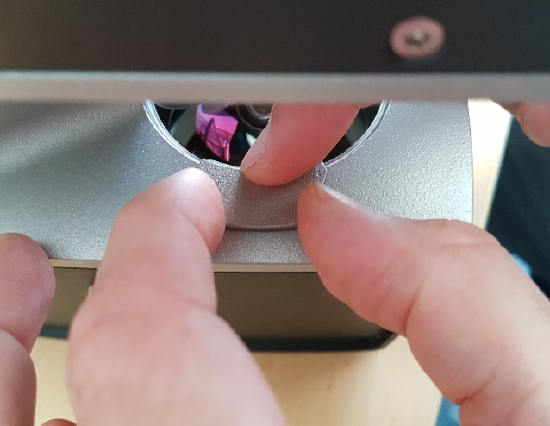
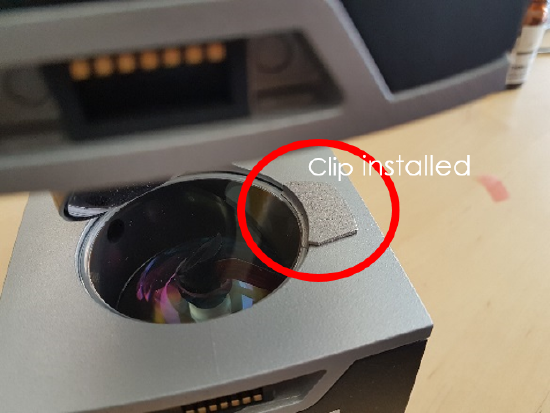
  5. When the clip is properly aligned, gently press on the clip. Check the placement and the mirror rotation. When assured the placement is correct, press down hard to affix it to the clip to the Focus casing.
    FocusSMSensorCoverAdhearClip.png      FocusSMSensorCoverClipRedCircleInstalled.png
  6. Repeat steps 2 and 5 for the second clip.

Test Mirror Rotation

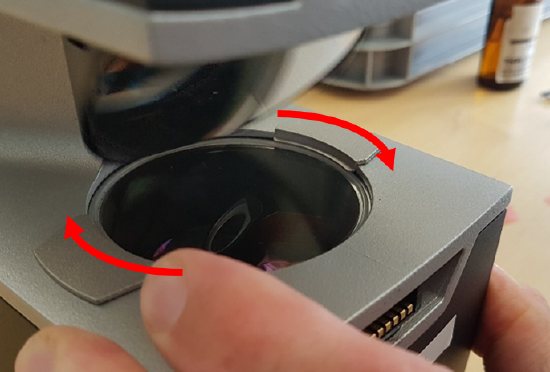
  1. Slowly rotate the mirror by hand, checking that the mirror does not touch the clips in any way. The mirror must move freely without making any grinding noises.
    FocusSMSensorCoverClipTestl.png
  2. Use a flash-light to illuminate the mirror from the back side of the scanner. You should see a small even slit of light where the clips meets the scanner case.
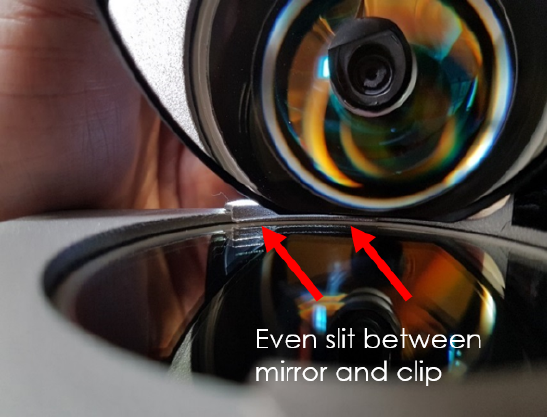
  3. If the mirror touches the clips in any way, remove the clips, contact FARO support to get a new Clip Set package, and repeat the process with new clips starting at the Test Clip and Mirror Clearance section, step 3. 

See Also

Keywords:

rework box, repair box, repair set, sensor cover lock, sensor cover fix