Using Anchor Points with Freestyle2 Scans
Overview
Anchor Points help to optimize the results of larger scans. It may be helpful to place an anchor point at the beginning of a scan and scan the same area again at the end of the scan. If you open a scan that was captured including anchor points, even without processing, the alignment of the scan will be optimized by the anchor points.
By default, the functionality of setting anchor points is connected to the right hardware button of the device. You can press the button while scanning, and the software searches for a virtual anchor point approximately in the direction that the device is pointing.
Anchor Points
An anchor point can be found at regions where 3 planes intersect, e.g., the corner of a room. Make sure that the planes are at least as big as the reference plate. If a corner point is recognized after pushing the button, a green icon will be displayed. If no anchor point was found, a red icon will appear. If an anchor point is found successfully, after a few seconds a green sphere will be visible in the 3D view at this area.
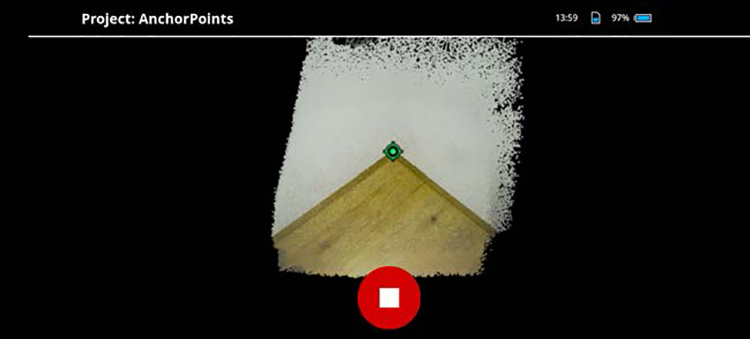
If you come back during your scan to that area, the software will automatically search for the anchor point in the 3D point cloud and it will switch from blue color to green if it is detected and aligned properly.”

Texture Anchor Points
In the previous section, anchor points were described as points where 3 planes intersect. In addition to these anchor points, you can also use texture anchor points to optimize the scan results. For texture anchor points, it is not necessary to find a location where 3 planes intersect, but instead, a texture on a flat surface. Texture in this case refers to color-textures, that is, areas with different, contrasting colors. It does not refer variations in the surface that one could feel. Examples for good textures are posters, carpets, or books on a shelf. An example of a bad texture is a white wall.
During scanning, point the device to an area where a good texture is visible and push the hardware button on the right. A green symbol will appear next to the textured area. If you scan other areas for a while and then point the Freestyle 2 device back to the textured area, you may find that the green symbol is now blue, indicating cumulative inaccuracies during a scan. If you remain at that textured area that you marked, the software tries to locate the texture anchor points that you set, and will change to green if it finds the texture again.
We recommend the use of texture anchor points, because they are easy to use and will give you confidence that the post-processing of the scan will be successful.