As-Built As-Built - Revit As-Built - AutoCAD VirtuSurv - VirtuSurv 2018 As-Built - Modeler VirtuSurv - VirtuSurv 2019          
BuildIT BuildIT - Projector BuildIT - Construction BuildIT - Metrology              
CAM2 CAM2 - SmartInspect CAM2 - 2023 CAM2 - 2018 CAM2 - Measure 10 CAM2 - Measure Q CAM2 - Measure X CAM2 - Measure 3/4 CAM2 - AnthroCAM CAM2 - 2019 CAM2 - 2020
CAM2 CAM2 - 2021                  
Cobalt 3D Imager 3D Imager - Cobalt                  
Cobalt Design Cobalt Design - M Cobalt Design - S Cobalt Design - Dual              
Computers Computers - All Computers                  
FARO Aras 360 & CAD Zone FARO CAD Zone - Fire & Insurance FARO CAD Zone - Crime & Crash FARO CAD Zone - CZ Point Cloud FARO CAD Zone - First Look Pro FARO 360 - Reality FARO 360 - HD FARO 360 - Blitz FARO 360 - Genius    
FARO Connect FARO Connect - Connect                  
FARO Zone present4D - present4D                  
FARO Zone 2D FARO Zone 2D - 2018 FARO Zone 2D - 2019 FARO Zone 2D - 2020 FARO Zone 2D - 2021 FARO Zone 2D - 2022 FARO Zone 2D - 2023        
FARO Zone 3D FARO Zone 3D - 2018 FARO Zone 3D - 2019 FARO Zone 3D - 2020 FARO Zone 3D - 2021 FARO Zone 3D - 2022 FARO Zone 3D - 2023 FARO Zone 3D - 2024      
FARO Zone 3D Advanced FARO Zone 3D Advanced - 2018 FARO Zone 3D Advanced - 2019 FARO Zone 3D Advanced - 2020 FARO Zone 3D Advanced - 2021 FARO Zone 3D Advanced - 2022          
FaroArm/ScanArm FaroArm/ScanArm - Quantum S FaroArm/ScanArm - Quantum M FaroArm/ScanArm - Quantum E FaroArm/ScanArm - Edge FaroArm/ScanArm - Fusion FaroArm/ScanArm - Prime FaroArm/ScanArm - Platinum FaroArm/ScanArm - Legacy Quantum FaroArm/ScanArm - Titanium FaroArm/ScanArm - Advantage
FaroArm/ScanArm FaroArm/ScanArm - Digital Template FaroArm/ScanArm - Gage FaroArm/ScanArm - Quantum S Max FaroArm/ScanArm - Quantum M Max FaroArm/ScanArm - Quantum E Max FaroArm/ScanArm - Gage Max        
GeoSLAM Software GeoSLAM Software - Connect GeoSLAM Software - Draw GeoSLAM Software - Hub GeoSLAM Software - Volumes            
GeoSLAM ZEB GeoSLAM ZEB - Horizon GeoSLAM ZEB - Horizon RT GeoSLAM ZEB - Revo GeoSLAM ZEB - Revo RT GeoSLAM ZEB - Go          
Hand Held Scanner 2D Hand Held Scanner - ScanPlan 3D Hand Held Scanner - Freestyle3D 3D Hand Held Scanner - Freestyle3D X 3D Hand Held Scanner - Freestyle3D Objects 3D Hand Held Scanner - Freestyle 2          
Language Quality HT MT AT NT INT - Internal Sales - Internal Resources Sales - Order and Quote Sales - Product Info Sales - Sales Readiness Sales - Training
Language Quality Sales - Product Launch Sales - Promotions CS - Quote to Invoice CS - Phone System CS - New Hire Training CS - General CS - Product Info CS - Licensing CS - Procedures General CS - Procedures Salesforce
Language Quality CS - Procedures Loaner CS - Procedures SAP                
Languages Language - English Language - Japanese Language - German Language - Chinese Language - Spanish Language - Italian Language - Portuguese Language - French Language - Korean  
Laser Projector RayTracer - RayTracer Laser Projector - Tracer M Laser Projector - Tracer SI              
Laser Radar Imaging Laser Radar - VectorRI                  
Laser Scanner 3D Laser Scanner - Focus S 3D Laser Scanner - Focus M 3D Laser Scanner - Focus3D 3D Laser Scanner - Focus3D X 3D Laser Scanner - Focus3D X HDR 3D Laser Scanner - Focus3D S 3D Laser Scanner - Photon 3D Laser Scanner - Focus S Plus 3D Laser Scanner - Swift 3D Laser Scanner - Focus Premium
Laser Scanner 3D Laser Scanner - Focus Core                  
Laser Tracker Laser Tracker - Vantage Laser Tracker - ION Laser Tracker - Vantage S Laser Tracker - Si Laser Tracker - X Laser Tracker - Xi Laser Tracker - Vantage E Laser Tracker - Vantage S6 Laser Tracker - Vantage E6  
Legacy Gage Legacy Gage - Bluetooth Legacy Gage - Plus Legacy Gage - Standard Legacy Gage - Power            
Legacy Software Legacy Software - CAM2 Gage Legacy Software - Gage Software Legacy Software - Insight              
Mobile Scanner Mobile Scanner - Orbis                  
PointSense PointSense - Basic PointSense - Pro PointSense - Building PointSense - Plant PointSense - Heritage PointSense - Revit CAD Plugin - TachyCAD Building CAD Plugin - TachyCAD Archeology CAD Plugin - TachyCAD Interior CAD Plugin - PhoToPlan Basic
PointSense CAD Plugin - PhoToPlan CAD Plugin - PhoToPlan Pro CAD Plugin - PhoToPlan Ultimate CAD Plugin - DisToPlan CAD Plugin - MonuMap CAD Plugin - hylasFM CAD Plugin - VirtuSurv      
RevEng RevEng - RevEng                  
ScanArm ScanArm - Design ScanArm 2.0 ScanArm - Design ScanArm ScanArm - Forensic ScanArm ScanArm - Design ScanArm 2.5C            
SCENE SCENE - Capture and Process SCENE - WebShare Server and 2Go SCENE - WebShare 2Go App SCENE - 2018 SCENE - 7.x SCENE - 6.x SCENE - 5.x SCENE - 4.x SCENE - LT SCENE - 2019
SCENE SCENE - 2go App SCENE - 2020 SCENE - 2021 SCENE - 2022 SCENE - 2023          
Serial FaroArm Serial FaroArm - Silver Serial FaroArm - Gold Serial FaroArm - Bronze              
Sphere FARO Sphere - Sphere                  
Visual Inspect Visual Inspect - App Visual Inspect - CAD Translator                
WebShare WebShare - Enterprise WebShare - WebShare Cloud                

3D Laser Scanner

Focus S

Focus S Plus

Focus M

Focus3D

Focus3D X

Focus3D X HDR

Focus3D S

FARO® Knowledge Base

Copy a 2D Floor Plan Scan Localizer Project to a Computer

kA239000000L5hqCAC_en_US_1_1.png

Quick Steps

  1. The fastest way to learn how to setup a wireless connection between a your computer and the FARO® Scan Localizer is to watch a video tutorial in the Videos section.   
  2. Locate the Scan Localizer project files and copy them to your computer. 

See below for details.

Videos

Microsoft Windows

Cannot view the video? Click here to download it. 

Apple Mac OS

Cannot view the video? Click here to download it. 

Overview

Once a 2D Floor Plan Scan Localizer project has been saved to the Scan Localizer network, the project file can be copy to a desktop or laptop computer where you can use specialized software, such as FARO® Zone, to take measurements or augment the visual floor plan with pictures, icons, notes, or instructions. FARO Zone is fully compatible with the Scan Localizer and can directly open its native file format.

To copy the 2D project file, setup a wireless connection between a your computer and the FARO® Scan Localizer. You connect your computer to the Scan Localizer wireless network the same way you would connect to any other wireless network. Use the computer's network sharing or network setup to find the Scan Localizer network and connect. Then copy the project folder from the network to the computer. 

Prepare

Time to Complete 15 minutes.
Skills Needed
  • Knowledge of Microsoft Windows
  • General computer skills
Prerequisites
  • Computer you use with FARO Zone
  • Admin rights on that computer
Supported Hardware Scan Localizer with the most recent firmware installed
Supported Software
  • FARO® Zone 2D
  • FARO® Zone 3D
  • FARO® Zone 3D Advanced
Back to top

Connect the Computer to the Scan Localizer

  1. On the Scan Localizer, press and hold the power button until it blinks blue a few times. This activates its wireless network. 
  2. On the computer you want to connect to the Scan Localizer, go to where you set network wireless connections. 
  3. In the available network list, select the network name beginning with LSL.
  4. Enter this password: 0123456789
  5. Select the network type if applicable. If using the Mac OS or Microsoft Windows 10, skip this step. If Microsoft Windows 7 select Public Network.  
  6. Open the File Manager and enter \\scanlocalizer.faro.com in the address bar. Alternatively you can enter 192.168.101.2/control.
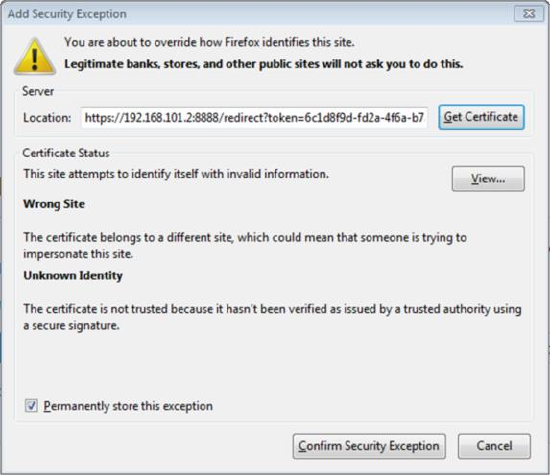
  7. The first time you make the connection, a request to accept an SSL certificate may appear. The steps to accept the certificate vary depending your computing environment. Generally, click Accept Certificate. 
    SSLCertificateRequestForComputer.png
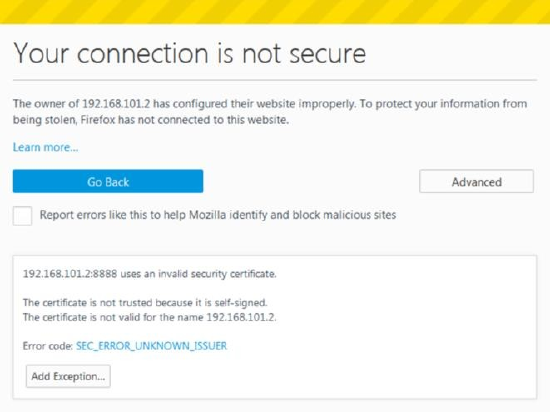
  8. If you get a Security Alert, the steps to clear this also vary. You may have to click Proceed to 192.168.101.2 Unsafe, then click Advanced  > Add Exception, and finally click Confirm Security Exception or something like this. If you have have questions about this, contact your IT administrator.
    Security AlertAdvanced2.PNG
    AddSecurityAcception.png
    ConfirmSecurityException.png
  9. If a login request appears, use the standard user name and password for your computer.
  10. The Scan Localizer Network folder appears in the File Manager.
    ScanLocalizerNetworkDrive.PNG

Copy the Scan Files to a Computer

  1. In the File Manager, double-click the Share network folder. This is where the Scan Localizer stores the 2D project files on its network. 
  2. Navigate to the folder named for the Scan Localizer 2D project you want to copy to your computer.
  3. On your keyboard, press Ctrl + C to copy the folder. 
  4. On your computer create a folder where you want to store the 2D project file and open it. 
  5. On the keyboard, press Ctrl+ V to paste the copied 2D project file folder. Depending on how big the Scan Localizer project file is, this may take a while.

Once the 2D project folder appears, you are ready to open the project file and work with it.  


Keywords:

download ScanLocalizer files, point cloud, gps, floor plan