Create a Scan Localizer Project and Scan an Interior Space

Quick Steps
The fastest way to learn how to begin a project with the FARO® Scan Localizer is to watch the tutorial in the Videos section. See below for details.
Videos
In this 2-minute tutorial, see how to create a 2D mapping project using the FARO® Scan Localizer and your mobile phone. Cannot view the video? Click here to download this video.
In this 2-minute tutorial, see how to create 3D scan project with the FARO® Scan Localizer, a FARO® Laser Scanner Focus, and your mobile device. Cannot view the video? Click here to download this video.
Overview
Before you create a scan project, consider the interior space you want to scan. Divide the space into the logical sections, decide how to move through each section with the Scan Localizer, and where you want to pause to take pictures of interesting features. It is easier to capture all the details you need if you have a predefined plan.
Prepare
Please review this table before you begin to ensure your success.
| Time to Complete | Time is dependent on the size of the internal space and the number of sections you plan to scan. |
| Skills Needed |
|
| Prerequisites |
|
| Supported Hardware |
Scan Localizer with the most recent firmware installed |
Details
These instructions assume your Scan Localizer is connected to your mobile device.
- From the Scan Localizer home page, select a project type.
- Select 2D Floor Plan if you are using the Scan Localizer by itself, without a Laser Scanner attached to create 2D maps or plans.
- Select 3D Scan if you are using the Scan Localizer with a Laser Scanner attached to create highly detailed 3D scene documentation.
- Enter a project name and click Create Project.

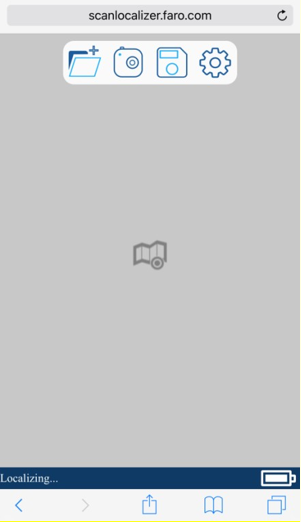
- The Localizing window appears, scanning begins, and the scan image appears in the Localizing window. The image extends and builds up as you move with the Scan Localizer. This indicates the Scan Localizer is capturing data. If a scan image does not appear, on the mobile device tap the Folder icon to stop scanning and create a new project. You should immediately see a scan image.
- Move the Scan Localizer to the first scan section in your interior space.
- Pause and use the mobile device camera to take pictures of interesting features in the section as needed. On the mobile device in the Localizing window, tap the Camera icon and then tap on the scan image to mark the places where you took pictures.
- When you have all the details you need in the first section, move to next, take pictures where necessary, and mark them on the scan image.
- Repeat steps 5 and 6 until you have scanned all the sections of the space.
- When your scan project is complete, on the mobile device in the Localizing window tap the Floppy Disk icon to save the scan project. The project is stored on the Scan Localizer network.
See Also
- Copy a 2D Floor Plan Scan Localizer Project to a Computer
- Quick Start Guide for the Scan Localizer
- User Manual for the Scan Localizer
Keywords:
point cloud, gps, floor plan, scan data