                     
As-Built As-Built - Revit As-Built - AutoCAD VirtuSurv - VirtuSurv 2018 As-Built - Modeler VirtuSurv - VirtuSurv 2019          
BuildIT BuildIT - Projector BuildIT - Construction BuildIT - Metrology              
CAM2 CAM2 - SmartInspect CAM2 - 2023 CAM2 - 2018 CAM2 - Measure 10 CAM2 - Measure Q CAM2 - Measure X CAM2 - Measure 3/4 CAM2 - AnthroCAM CAM2 - 2019 CAM2 - 2020
CAM2 CAM2 - 2021                  
Cobalt 3D Imager 3D Imager - Cobalt                  
Cobalt Design Cobalt Design - M Cobalt Design - S Cobalt Design - Dual              
Computers Computers - All Computers                  
FARO Aras 360 & CAD Zone FARO CAD Zone - Fire & Insurance FARO CAD Zone - Crime & Crash FARO CAD Zone - CZ Point Cloud FARO CAD Zone - First Look Pro FARO 360 - Reality FARO 360 - HD FARO 360 - Blitz FARO 360 - Genius    
FARO Connect FARO Connect - Connect                  
FARO Zone present4D - present4D                  
FARO Zone 2D FARO Zone 2D - 2018 FARO Zone 2D - 2019 FARO Zone 2D - 2020 FARO Zone 2D - 2021 FARO Zone 2D - 2022 FARO Zone 2D - 2023        
FARO Zone 3D FARO Zone 3D - 2018 FARO Zone 3D - 2019 FARO Zone 3D - 2020 FARO Zone 3D - 2021 FARO Zone 3D - 2022 FARO Zone 3D - 2023 FARO Zone 3D - 2024      
FARO Zone 3D Advanced FARO Zone 3D Advanced - 2018 FARO Zone 3D Advanced - 2019 FARO Zone 3D Advanced - 2020 FARO Zone 3D Advanced - 2021 FARO Zone 3D Advanced - 2022          
FaroArm/ScanArm FaroArm/ScanArm - Quantum S FaroArm/ScanArm - Quantum M FaroArm/ScanArm - Quantum E FaroArm/ScanArm - Edge FaroArm/ScanArm - Fusion FaroArm/ScanArm - Prime FaroArm/ScanArm - Platinum FaroArm/ScanArm - Legacy Quantum FaroArm/ScanArm - Titanium FaroArm/ScanArm - Advantage
FaroArm/ScanArm FaroArm/ScanArm - Digital Template FaroArm/ScanArm - Gage FaroArm/ScanArm - Quantum S Max FaroArm/ScanArm - Quantum M Max FaroArm/ScanArm - Quantum E Max FaroArm/ScanArm - Gage Max        
GeoSLAM Software GeoSLAM Software - Connect GeoSLAM Software - Draw GeoSLAM Software - Hub GeoSLAM Software - Volumes            
GeoSLAM ZEB GeoSLAM ZEB - Horizon GeoSLAM ZEB - Horizon RT GeoSLAM ZEB - Revo GeoSLAM ZEB - Revo RT GeoSLAM ZEB - Go          
Hand Held Scanner 2D Hand Held Scanner - ScanPlan 3D Hand Held Scanner - Freestyle3D 3D Hand Held Scanner - Freestyle3D X 3D Hand Held Scanner - Freestyle3D Objects 3D Hand Held Scanner - Freestyle 2          
Language Quality HT MT AT NT INT - Internal Sales - Internal Resources Sales - Order and Quote Sales - Product Info Sales - Sales Readiness Sales - Training
Language Quality Sales - Product Launch Sales - Promotions CS - Quote to Invoice CS - Phone System CS - New Hire Training CS - General CS - Product Info CS - Licensing CS - Procedures General CS - Procedures Salesforce
Language Quality CS - Procedures Loaner CS - Procedures SAP                
Languages Language - English Language - Japanese Language - German Language - Chinese Language - Spanish Language - Italian Language - Portuguese Language - French Language - Korean  
Laser Projector RayTracer - RayTracer Laser Projector - Tracer M Laser Projector - Tracer SI              
Laser Radar Imaging Laser Radar - VectorRI                  
Laser Scanner 3D Laser Scanner - Focus S 3D Laser Scanner - Focus M 3D Laser Scanner - Focus3D 3D Laser Scanner - Focus3D X 3D Laser Scanner - Focus3D X HDR 3D Laser Scanner - Focus3D S 3D Laser Scanner - Photon 3D Laser Scanner - Focus S Plus 3D Laser Scanner - Swift 3D Laser Scanner - Focus Premium
Laser Scanner 3D Laser Scanner - Focus Core                  
Laser Tracker Laser Tracker - Vantage Laser Tracker - ION Laser Tracker - Vantage S Laser Tracker - Si Laser Tracker - X Laser Tracker - Xi Laser Tracker - Vantage E Laser Tracker - Vantage S6 Laser Tracker - Vantage E6  
Legacy Gage Legacy Gage - Bluetooth Legacy Gage - Plus Legacy Gage - Standard Legacy Gage - Power            
Legacy Software Legacy Software - CAM2 Gage Legacy Software - Gage Software Legacy Software - Insight              
Mobile Scanner Mobile Scanner - Orbis                  
PointSense PointSense - Basic PointSense - Pro PointSense - Building PointSense - Plant PointSense - Heritage PointSense - Revit CAD Plugin - TachyCAD Building CAD Plugin - TachyCAD Archeology CAD Plugin - TachyCAD Interior CAD Plugin - PhoToPlan Basic
PointSense CAD Plugin - PhoToPlan CAD Plugin - PhoToPlan Pro CAD Plugin - PhoToPlan Ultimate CAD Plugin - DisToPlan CAD Plugin - MonuMap CAD Plugin - hylasFM CAD Plugin - VirtuSurv      
RevEng RevEng - RevEng                  
ScanArm ScanArm - Design ScanArm 2.0 ScanArm - Design ScanArm ScanArm - Forensic ScanArm ScanArm - Design ScanArm 2.5C            
SCENE SCENE - Capture and Process SCENE - WebShare Server and 2Go SCENE - WebShare 2Go App SCENE - 2018 SCENE - 7.x SCENE - 6.x SCENE - 5.x SCENE - 4.x SCENE - LT SCENE - 2019
SCENE SCENE - 2go App SCENE - 2020 SCENE - 2021 SCENE - 2022 SCENE - 2023          
Serial FaroArm Serial FaroArm - Silver Serial FaroArm - Gold Serial FaroArm - Bronze              
Sphere FARO Sphere - Sphere                  
Visual Inspect Visual Inspect - App Visual Inspect - CAD Translator                
WebShare WebShare - Enterprise WebShare - WebShare Cloud                

FARO Zone 2D

2023

2022

2021

2020

2019

2018

FARO® Knowledge Base

Create Symbols in FARO Zone 2D

FAROZone2D-bty.png

Overview

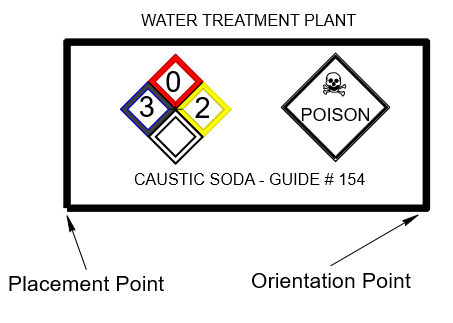
Here is how to create your own 2D symbols and save them to the Custom symbol folder for future use. To create a symbol, you must define two points:

  1. Placement Point – This is the handle of the symbol. When you place the symbol in a diagram, the symbol is attached to your mouse cursor at this placement point. To place it, you will click or snap in the diagram where you want to place this handle.
  2. Orientation Point - This is used to rotate the symbol into the desired position once the placement point is set.

Symbols are often constructed so the placement point is in the lower-left of the symbol and the orientation point is a point horizontally to the right. This may not be logical for all symbols, so use your best judgment. For example, for a round symbol, it may be best to put the placement point exactly at the center of the symbol.

watertreatment_1.png

Create Your Own Symbol

  1. Draw your symbol and place a window around it to select it. The Multi-Select tool panel displays. The objects are displayed as pink to show they are selected.

    symbolcreate_2.png
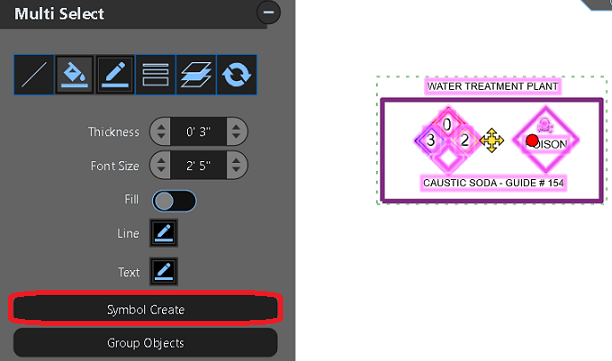
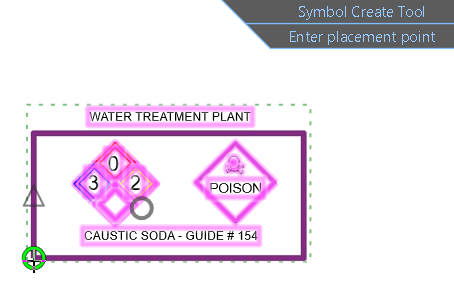
  2. Click Symbol Create on the Multi-Select tool panel.
     
  3. The prompt at the top of the screen says “Enter Placement Point.” Click or snap where you want the handle point for the symbol.

    (Make sure Auto-Snaps is turned on if you want the handle to be snapped to an exact point.)

    placementpoint_3.png
  4. Next, click or snap to select the Orientation Point. 
     
  5. A file browser window opens where you enter the name for this symbol. By default, custom symbols are located under your user account:
     
    Documents\FARO Zone\Custom\Symbols

    savecustom_4.png


Placing New Symbol in a Diagram

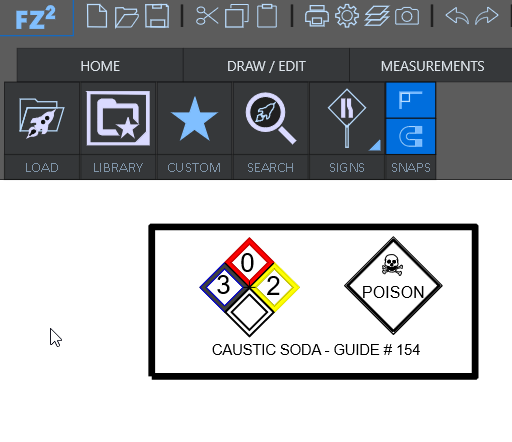
Load the Custom library, select the Custom folder, then select your symbol:customfoldericon_5.png

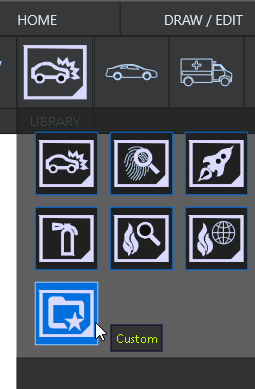
  1. Select Symbols from the ribbon at the top of the screen and then click on the icon above the word Library
     
  2. Select the Custom Folder icon (file folder with a star)
     
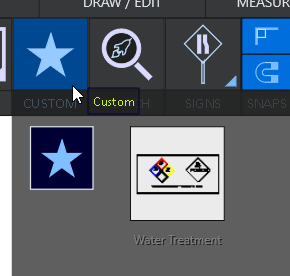
  3. Select the Custom symbol category (the star). All the custom symbols you have created will appear in this group.
     
  4. Select the desired symbol and place it in the diagram. You will use the Placement Point and Orientation Point you defined when you created the symbol
     
    customwatertreatment_6.png poison_7.png

Add to Your Custom Library

You can also copy any of the symbol files included with FARO Zone from the other folders into your Custom folder. This lets you create a custom library that is a combination of the existing symbols and custom symbols you create.

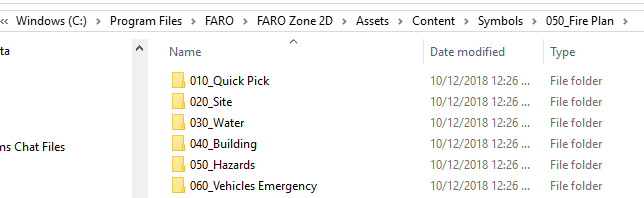
All the symbols included in the program are found under the Assets subfolder of the FARO Zone 3D (or 2D) program folder.

If you installed FARO Zone in its default location, look for the symbols under a subfolder of \Program Files\FARO\FARO Zone 3D (or 2D), as shown in this example:

filescustomsymbols_8.png

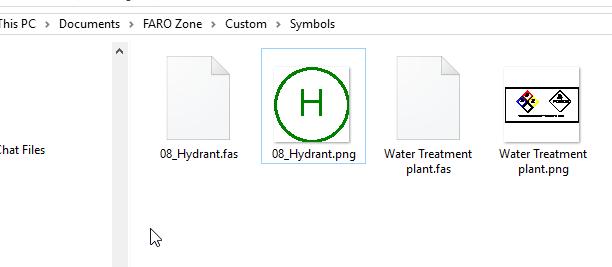
All the FARO Zone symbols consist of two files:

  1. The geometry is stored in a .fas file.
  2. The image preview is stored as a .png file.


In this example, the two files for the 08_Hydrant symbol were copied from the program’s Quick Pick folder into the Custom Folder. Now the hydrant is part of this custom library. Copies of any of the symbols included in FARO Zone could added to your Custom library with this process.

hydrant_9.png