Tips and Troubleshooting for Visual Inspect
Overview
In this article you will find various tips and troubleshooting instructions to improve your user experience with FARO® Visual Inspect Software. To jump to a specific section, click a link below.
Visual Inspect / Visual Inspect AR App
1) Q: File is not visible in LOCAL FILES after copying to the FILE SHARING area of Visual Inspect in iTunes.
A: iTunes will only copy the file to the documents directory of Visual Inspect, you must import the file into the app by selecting the COPY FROM ITUNES menu item under the IMPORT menu. Here you will see the file in a list view, tap the desired file to load to the LOCAL FILES area of the app.
2) Q: Menu command COPY FROM FTP SERVER is not available.
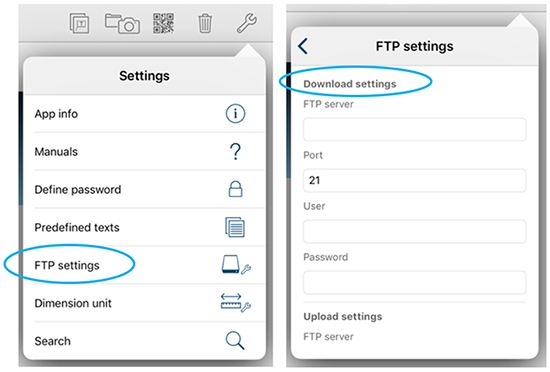
A: You must specify valid FTP download information. Tap the SETTINGS command in the upper toolbar of the LOCAL FILES. Select FTP SETTINGS and specify the information for your server under DOWNLOAD SETTINGS.
3) Q: Menu command FTP is not available on file export after selecting the command SEND FILE.
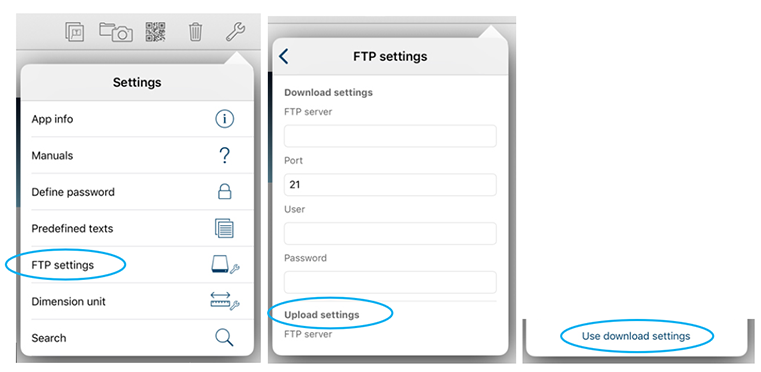
A: You must specify valid FTP upload information. Tap the SETTINGS command in the upper toolbar of the LOCAL FILES. Select FTP SETTINGS and specify the information for your server under UPLOAD SETTINGS. If you use the same settings for download and upload server, you can adopt the settings you entered in the DOWNLOAD SETTINGS section by tapping the USE DOWNLOAD SETTINGS command. You can find this command at the bottom of the UPLOAD SETTINGS section.
4) Q: The check or filter buttons are not visible.
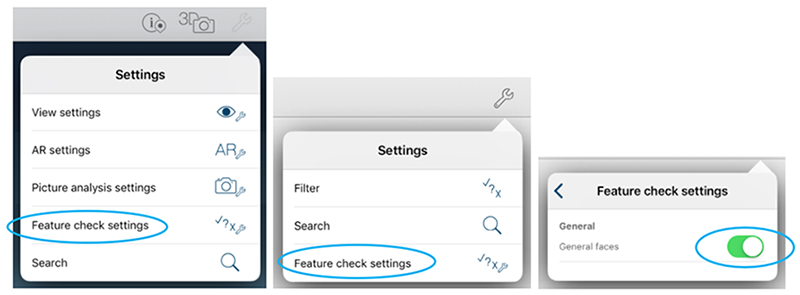
A: You must activate the features you need to check in the FEATURE CHECK SETTINGS. Tap the SETTINGS command in the TREE or in the 3D VIEW of a model, select FEATURE CHECK SETTINGS and activate the desired features..
5) Q: The button PREDEFINED TEXT in annotation creation is not active.
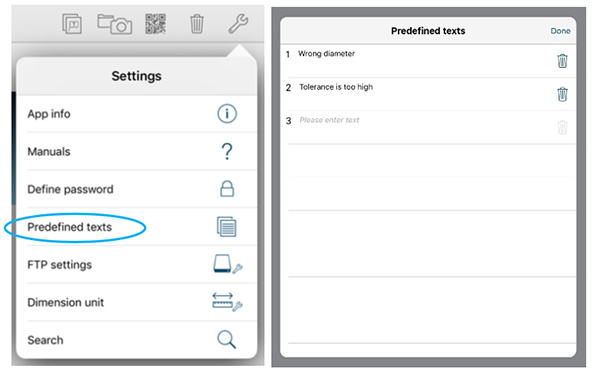
A: You must insert texts in the PREDEFINED TEXTS settings. Tap the SETTINGS command in the upper toolbar of the LOCAL FILES. Select PREDEFINED TEXTS and enter your desired texts there..
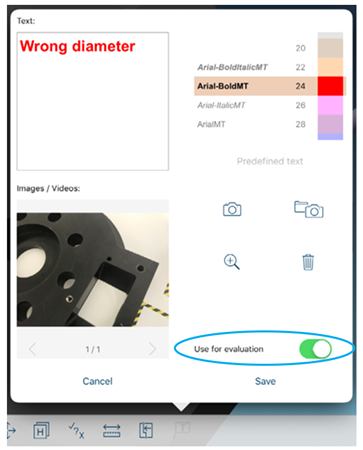
6) Q: Annotation not available in evaluation or ANNOTATIONS REPORT button not available in the tree.
A: For the single annotation, activate the USE FOR EVALUATION switch while creating the annotation. If you don’t see the button, there are no annotations with this tag under the selected tree level.
7) Q: Option EXPORT TO ONE not visible on file export after selecting SEND FILE TO OTHER APP.
A: App ONE (needed to use Photofast Memories Cable) is not installed or the wrong version of the app is installed (search for PHOTOFAST ONE in the AppStore).
8) Q: How can I generate QR codes?
A: You can create QR codes with any QR code generator. A popular QR code generator is located here: http://www.qrcode-generator.com/
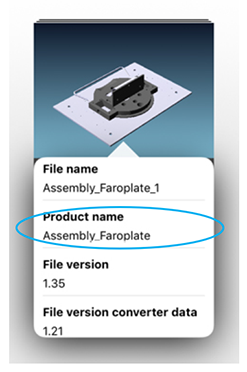
On the above website, Select the TEXT option and give the PRODUCT NAME of your *.mwpak file to generate the code.
9) Q: A QR code is not recognized when using the QR scan functionality.
A: You have to create your QR code from the PRODUCT NAME. You can see the complete product name in the tree or by double tapping the name label under the file.
10) Q: App is crashing every time on startup.
A: Close all other open Apps (double click on home button and swipe-up on the respective App) and restart the iPad (long press on On/Off-Button).
11) Q: On marker translation if I use the WKS (world coordinate system) option, where is the point 0,0,0?
A: The point 0,0,0 is related to the 0,0,0 of your CAD data, that means this value comes from the axis system defined in the CAD model, this can be different from file to file.
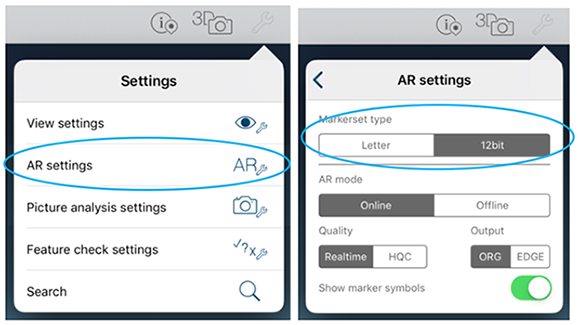
12) Q: All marker sets are grayed out and cannot be activated
A: Tap the SETTINGS command in the upper toolbar of the 3D view. Tap AR SETTINGS in the menu and change the marker set type from Letter to 12-bit or vice versa under MARKERSET TYPE.
13) Q: Marker detection is weak.
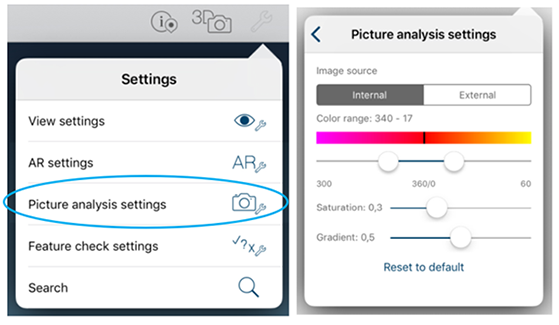
A: Tap the SETTINGS command in the upper toolbar of the 3D view. Tap SETTINGS PICTURE ANALYSIS in the settings popover and spread the red area under COLOR RANGE for better detecting. You can also change SATURATION and GRADIENT values. Use of the EDGE output mode can help to find the best settings (see Q: What is the use of Output option EDGE in AR SETTINGS? below).
14) Q: What is the use of Output option EDGE in AR SETTINGS?
A: This option is more for analyzing, for example if you have issues to detect markers in bad light conditions. If you activate this option, you will see the edge detection output directly.
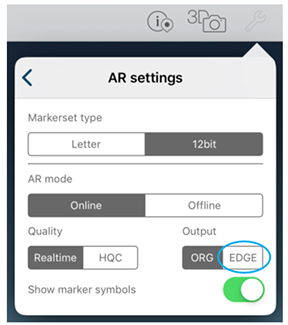
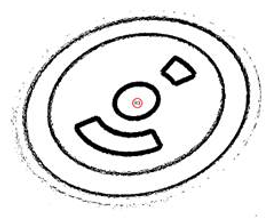
You can use this output to check if you see the red ring of a marker as two ellipses with solid black lines or not. If not, the marker detection will not work for this marker. In good light conditions, this output option is usually not needed and you can use the default option ORG which shows the normal camera image output. Below are examples of how the EDGE output can help finding the correct GRADIENT value. These examples were taken in bright sunlight.
This is the EDGE output with default gradient (0,5). As it is too bright, you can see that outer and inner ring are not detected and so the marker cannot be found.

This is the EDGE output with changed gradient (0,2) in the same light conditions. Rings are detected, marker is recognized.
15) Q: Invisible part doesn’t appear in show mode after changing its status to visible.
A: Make all higher-level nodes of tree visible by tapping the SHOW command on each level; also ensure the Geo-Block is visible as well. Or tap the RESET VISIBILITY command on the highest level of the tree to reset everything to visible.

16) Q: There is no wireframe visible after activating one of the respective options under VIEW SETTINGS > SHADING.
A: It is possible that there are no wireframes in the file (e.g. possible for JT files).
17) Q: Components disappear while rotating / translating the 3D model.
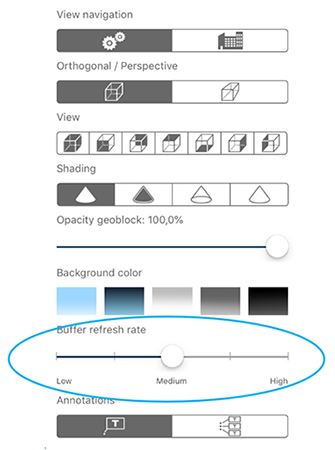
A: The BUFFER REFRESH RATE under VIEW SETTINGS in the 3D view is activated. For very big files, some components are hidden on moving the model to make the handling much faster.
18) Q: A very large file makes the handling of the 3D view slow.
A: You can adjust the BUFFER REFRESH RATE under VIEW SETTINGS in the 3D view (see Q17: Components disappear while rotating / translating the 3D model above).
If you have a large 3D model with a high amount of triangles, you can speed up the handling by using this slider. While rotating, translating and zooming, some parts of the product structure will not be drawn so the action can be processed faster. Once finger movement is complete, the whole model will be shown again.
The BUFFER REFRESH RATE value defines the amount of elements not to be drawn while manipulation. If the rate is LOW, more elements will be hidden while manipulating the model and handling will be faster. The larger the model is, the more elements will be hidden with a Low rate. If the rate is HIGH, nothing will be hidden while manipulating, the complete model will always be shown and handling might be slower for large models. You can select a value appropriate for the size of your model.
This slider will only be active if your 3D model contains more than 500.000 triangles. If your model contains less triangles, the slider is deactivated and the model will always be shown completely while manipulating the view. Depending on the SHADING settings, some of the faces might be fully hidden during manipulating but they will be shown as soon as manipulation will be finished.
19) Q: The command MIRROR is not available.
A: This command is only shown on single parts or sub-products/assemblies in a product structure, it is not available on the highest level of a product structure or if you have only a single element in the product structure.
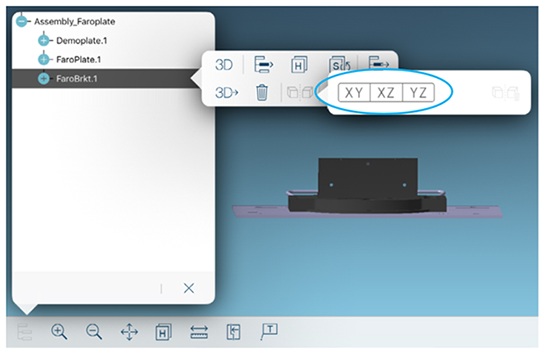
20) Q: The sectioning plane is not removed after leaving the sectioning dialog.
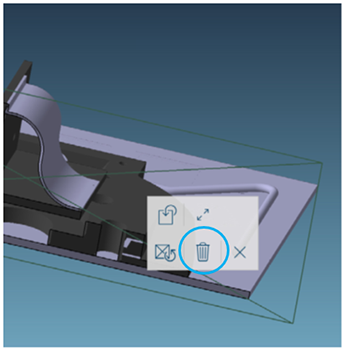
A: You have to remove the sectioning plane separately by tapping it and then tap the DELETE command in the 3D context menu.
21) Q: There are no matching results when using the SEARCH command.
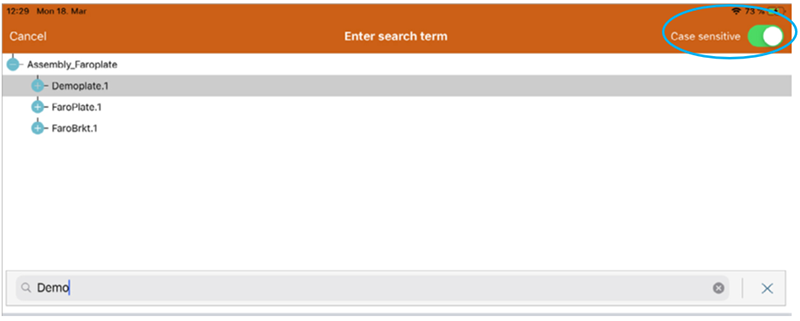
A: Check if you activated the CASE SENSITIVE switch in the search bar. When activated, search queries will be case sensitive. Otherwise deactivate the switch to have a case insensitive search.
22) Q: The password defined for the app is not requested.
A: If you have defined a password for the app under area LOCAL FILES > SETTINGS > DEFINE PASSWORD the app only asks for the password if it was completely closed, not if it is only running in the background. To securely close the app, double tap the home button and swipe-up the app.
23) Q: The password used for the app is forgotten.
A: If you have defined a password for the app and you forgot it, the only solution is to delete the app and to reinstall. All data will be lost in this case.
24) Q: The overlay doesn’t work after starting the AR functionality.
A: Make sure that your markers in the CAD model fit the markers in reality. So check if you have used the same marker types at the same positions and check if you have for example not switched two markers by accident.
Another problem could be that a wrong marker set is active or that your markers are not placed in the correct context of the tree structure.
Additionally, it is possible that you need to activate the Continuous AUTOFOCUS if the camera image would be blurred and the markers are not detected because of that..
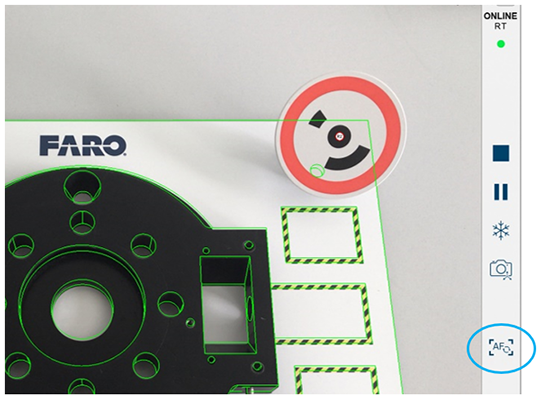
Ensure that all the markers are in the viewing area of the camera and that the light conditions are acceptable for all of the markers. To control which markers are detected you can activate the display of small marker images at the detected positions under SETTINGS > AR SETTINGS > SHOW MARKER SYMBOLS.

25) Q: The AR overlay is not accurate.
A: Make sure that your markers are exactly positioned (the virtual position must equal the real position). Best practice is to position markers in holes (if available). In general, you should be very careful with the positioning of targets, otherwise an accurate overlay cannot be achieved.
26) Q: If I press the AR command, I don’t see a real-time camera image.
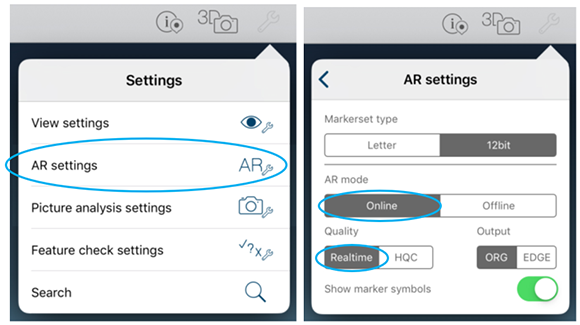
A: Probably you are in the wrong AR mode. In the 3D view, tap the command SETTINGS in the upper toolbar, then go to AR SETTINGS and activate the ONLINE and REALTIME settings.
27) Q: I have created a camera position overlaid by key points. Although I have defined 4 key point pairs, I don’t’ see the OVERLAY command.
A: Make sure that you didn’t mismatch the key points, the key points pairs must match. Check that the orange and blue points with the same number match/fit together.
28) Q: I want to edit / overlay a camera position I created before, but I cannot see the 2D/3D and OVERLAY commands.
A: Make sure that the device is in the same orientation as the image you used for the overlay. If you hold the device in landscape orientation but the image is in portrait orientation, the buttons will not be available.
29) Q: Why is the import of images to the OWN IMAGES area not possible?
A: You cannot import every photo. The photos you can import must be taken with an authorized camera system which was specially calibrated. Then the registration of your iPad allows the import of photos from a known camera system.
30) Q: In the OWN IMAGES area, after I take images with the external camera, there is no reaction from the app.
A: Make sure that you have started the FTP server by using the FTP button. Also, check that the iPad is connected to the correct Wi-Fi network.
31) Q: Problems with FTP connection - cannot upload file.
A: Check the name of the FTP folders (and sub-folders) as well as communication messages your FTP server sends to the device - they should not contain special characters (#, $, %, &, ! etc.) or empty spaces. For example, FileZilla FTP Client sends by default „%v20welcome“ message during session initialization, which might lead to problems with file uploads. Starting from version 2019.0 (July 2019) this should not be an issue any longer.
32) Q: Some UI buttons like Tree structure or AR are not visible.
A: More than likely your license is not valid or your Visual Inspect App was not activated.
33) Q: Which memory / performance limitations can occur in Visual Inspect?
A: If you try to open the 3D View of extremely large CAD models in Visual Inspect, it might cause the app to crash. The memory available on the iPad depends on which iPad model you use and additional apps running in the background and how much memory they consume.
If you are experiencing memory issues, you should close all apps running in the background and restart the iPad. If you are experiencing performance issues with the manipulation of a 3D model (rotation / translation / zoom), you could adjust the BUFFER REFRESH RATE (see Q18: A very large file makes the handling of the 3D view slow above).
iPad Configuration
1) Q: How to activate / access WI-FI.
A: Go to the general app SETTINGS of the iPad. Scroll to the entry WI-FI on the left side and select it. Select the desired Wi-Fi network in the list on the right side and select it to connect. If necessary specify the needed parameters, e.g. the password.
2) Q: How to create an Apple ID.
A: Tap CREATE YOUR APPLE ID on the Apple homepage under https://appleid.apple.com to create a new Apple ID.
3) Q: How to access the Apple AppStore.
A: Go to the general app SETTINGS of the iPad. Scroll to the entry ITUNES & APP STORE on the left side and select it. Sign in on the right side with your Apple ID. Then start the app APP STORE.
Accessories
1) Q: Where should I place the markers?
A: Best results can be achieved by placing the markers as far apart as possible. Additionally, they should best be placed asymmetrically and on different height levels.
2) Q: How can I identify the marker type?
A: You can use the marker reference sheet contained in your kit to identify marker types. Also you can use the MARKER SCANNER feature inside the App. You can find this command in the upper toolbar of the 3D VIEW or of OWN IMAGES. If you tap the command and point the camera to a marker, the software will show its type in a small image.
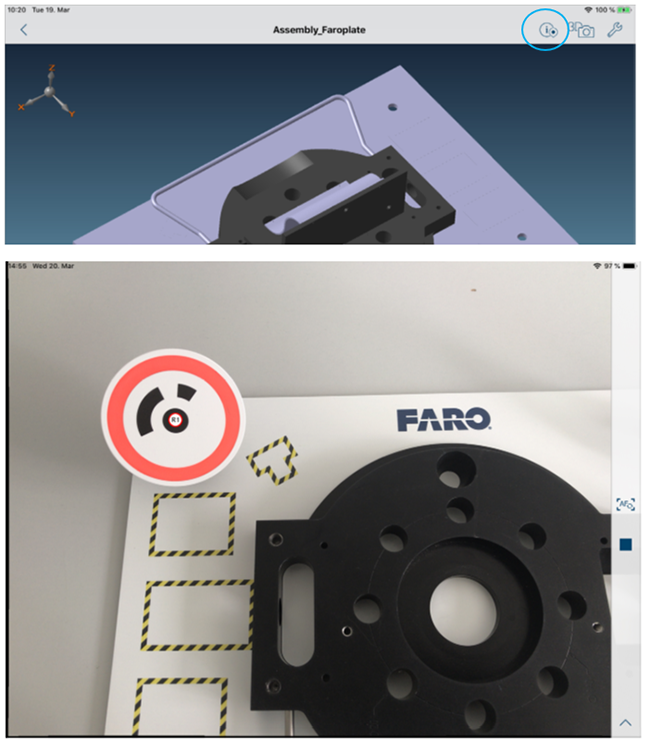
3) Q: Would it be possible to have other marker adapters?
A: In general, a customization is possible.
4) Q: What is the best working area for overlaying the model?
A: You can get best results at a distance of 1.5ft-3ft (0.5m-3m) from your actual object.
5) Q: How do I transfer files with SanDisk Wireless Stick?
A: See how to transfer files between Visual Inspect and SanDisk Wireless Stick in the following video: Data transfer with ScanDisk Wireless Stick
6) Q: SanDisk Connect Drive mobile app is not recognizing recently uploaded files to the SanDisk WLAN memory stick.
A: Restart the SanDisk Connect Drive mobile app on your mobile device to synchronize the data with SanDisk WLAN memory stick.
7) Q: How can I move the software to new hardware?
A: Contact the FARO Customer Support team and provide the information about the license (App-Id) and both the old and new iPad serial numbers. Note: The iPad or external cameras have to be calibrated by FARO for proper AR usage.
Visual Inspect CAD Translator
1) Q: The installation of the Translator is aborted by an Antivirus program I have installed.
A: To avoid this, deactivate any Antivirus software you have for the time of the installation. Remember to reactive the software after installation is complete.
2) Q: The Translator cannot be started; Error message: "Only one instance is allowed".
A: The Translator is already running in another window. It is not possible to start the Translator twice.
3) Q: When starting the CAD Translator the following error message is displayed “The application has failed to start because its side-by-side configuration is incorrect. Please see the application event log or use the command-line sxstrace.exe tool for more detail” or “The application has failed to start because its side-by-side configuration is incorrect. Please see the application event log or use the command-line sxstrace.exe tool for more detail.” while starting.
A: The Microsoft Runtime Libraries (Microsoft Visual C++ Redistributable Package) are not available on the PC, all which are available in installation folder must be installed.
4) Q: VisualInspectCAD.exe is not executable, nothing happens after double click.
A: There are missed permissions/rights for the network drive where the .exe file is stored.
5) Q: An unknown error occurred during CAD Translator product activation.
A: More than likely you are experiencing a problem with the activation request not reaching the FARO Licensing system. For example, it might be blocked by your IT department or firewall settings. Make sure there are no obstacles from your side blocking activation sending request, see the following for more information: TCP/UDP Port Used by the Sentinel HASP Driver and FARO Licensing System. As a workaround, you can use the Offline Activation procedure outlined in the following article: License Activation for FARO Software
6) Q: Which installation/license types are supported by the CAD Translator?
A: The VI CAD Translator only supports standalone one single license instance for each installation.
The following license types are NOT officially supported at the moment:
- Remote Desktop Access
- Network license - central installation of license manager (can be provided upon request, contact your FARO Sales Representative).
- Virtual Machine
7) Q: Target path for export not valid.
A: The User does not have permission/rights to write to this folder or the folder does not exist.
8) Q: CAD Translator froze or is taking too much time during a conversion.
A: There might be a few reasons:
- CAD file contains numerous small and repetitive elements to be converted which will take more time. For example, rivets or fasteners.
- A high tessellation rate is used for CAD data you would like to convert. For example, tessellation rate of 0.01-0.001 mm for big CAD models will cause a significant performance hit and may cause the application to freeze due to all available RAM memory consumption. To avoid this, set a coarser tessellation rate during the export of your model from the native CAD software. Try 1 mm for example.
9) Q: Problems with CAD conversion: Conversion results in empty MWPAK file.
A: Check the name of the original file and its sub-elements - they should not contain special characters (#, $, %, &, ! etc.) or empty spaces. Starting from version 2019.0 (July 2019) this should not be an issue any longer.

