On-site Compensation Instructions for Freestyle 2
Overview
The Freestyle 2 scanner is calibrated before shipping, but if you drop or knock the handset, or if it has been subjected to large changes in temperature, you should compensate it —just to be sure that it is ready to accurately capture. The best time to compensate the device is on-site, right before capturing.
Each Freestyle 2 kit includes a reference plate and a corresponding calibration file which is found on the provided USB flash drive.
Preparation
Compensation involves capturing the reference plate from different angles and at different heights. Use the following procedure to calibrate the device:
- Switch on the Mobile PC and plug-in the provided USB flash drive. Leave the flash drive in for about 10 seconds. A calibration file for your reference plate will be transferred to the Mobile PC. This step is only required once for each reference plate
- Get the reference plate and note the number that is written on the back. You will need that number later in the procedure.
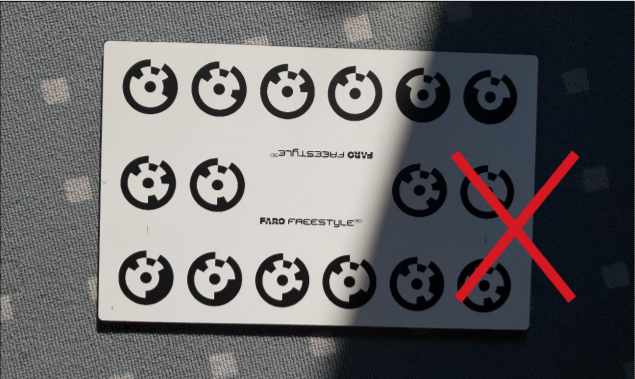
NOTE: Treat the reference plate with care. Although it is quite rugged, it is possible to scratch the printing. Store the reference plate in its place in the Freestyle 2 transport case when not in use to avoid scratching. - Place the reference plate on a flat, stable surface, for example, the floor. The markers must face upward and each marker must be visible.
- Ensure that the reference plate is well illuminated. The illumination intensity should be at least 250 Lux (25 fc).
- Ensure that the reference plate is not covered by hard shadows. This may happen easily, so check in advance if parts of your body, Freestyle 2, or something else could produce a hard shadow on the reference plate during the compensation procedure.
- With the handset switched on and the app started, select Tools > On-site Compensation.
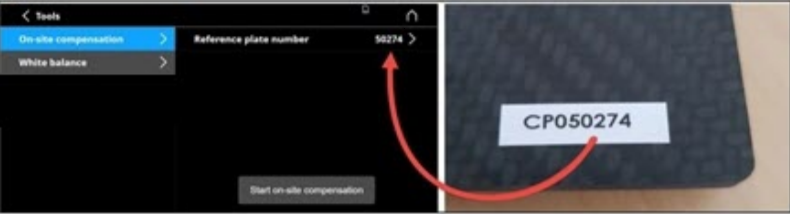
- Enter the reference plate’s number (leaving out “CP” and any leading zeros) and tap the OK button.
- The start window of the compensation is displayed. Start compensation by tapping Start on-site compensation, and then pressing the middle button on the Freestyle 2 handset.
Rotational Compensation
- The handset now starts to capture. You will see a stylized view of the reference plate, a drawing of the handset, and a diagonal line representing the approximate place and angle at which you should hold the handset in relation to the reference plate.
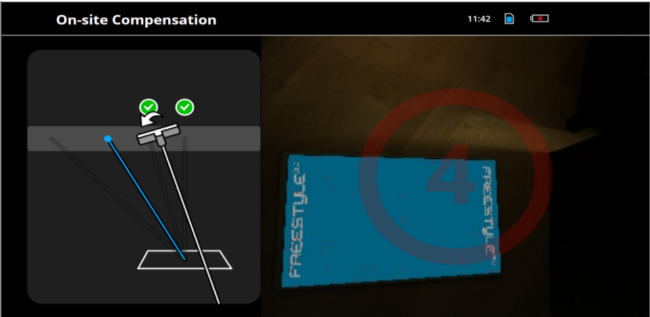
- Hold the handset above the reference plate. When the handset starts scanning the plate, an animation on screen will show you the appropriate position of the handset in relation to the reference plate.
- Move the handset so that it is scanning at the angle shown by the blue line, and from the height represented by the blue dot. A black band across the background of the animation will turn gray when you have the proper height. Note that the white line illustrating the scanning angle does not have to match up with the blue line--it only needs to be parallel to it as long as the scanner is still scanning the reference plate. A white arrow may appear to tell you the direction that you need to rotate the handset to get the correct angle. When the position of the handset is correct, the red 4 on the right side of the screen will turn green and quickly count down to 0. If the handset remains in the correct position during the countdown, then green a circle with a check mark will appear at the first compensation position, and the second position will appear.
- Repeat the step above for all compensation positions.
- When the rotational compensation is complete, the vertical compensation begins.
Vertical Compensation
- A vertical bar with a drawing of the handset is shown at the left, together with a vertical line and a measurement showing an approximate height from the reference plate.
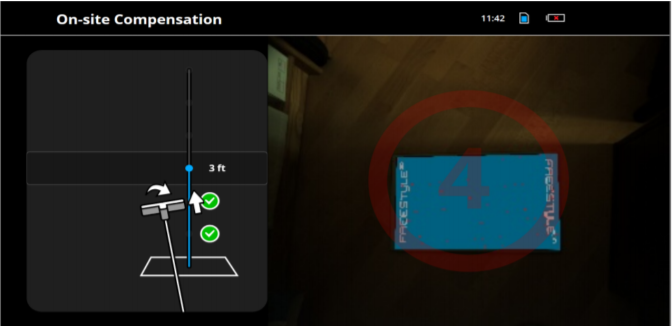
- Hold the handset directly and horizontally over the reference plate. A black band across the background of the animation will turn gray when you have the proper height. Note that the white line illustrating the scanning angle does not have to match up with the blue line - it only needs to be parallel to it as long as the scanner is still scanning the reference plate. A white arrow may appear to tell you the direction that you need to rotate the handset to be perpendicular and parallel to the reference plate. When the position of the handset is correct, the red 4 on the right side of the screen will turn green and quickly count down to 0. If the handset remains in the correct position during the countdown, then a green circle with a check mark will appear at the first compensation position, and the second position will appear.
- Repeat the step above for all compensation positions.
As soon as all positions have a green check mark the calibration of the device is checked, and, if necessary, adjusted. After that, on-site compensation is finished.
Compensation Data and Report
The compensation data can be found on the Mobile PC under:
C:\ProgramData\FARO\Freestyle\cameras\
Compensation Report
The compensation report is saved as a PDF file. You can find it in your scan project folder, in a subfolder called compensationReports. The Compensation report states whether the on-site compensation was successful, and it shows some important data including the information below which may be necessary for verification of accuracy.
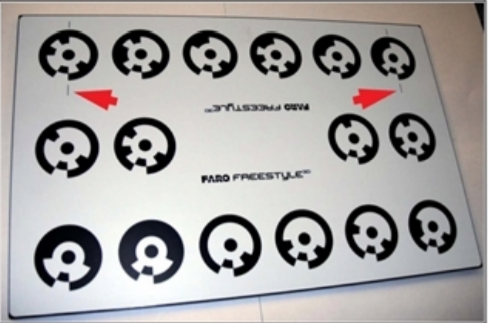
- Target value of control marker distance: This is the factory measurement of the distance between the two control markers on the reference plate. The measurement is made photogrammetrically, and is accurate to +/- 0.02 mm.
- Measured control marker distance: This is the distance that the sensor measured between the two control markers immediately after the compensation process.
- Distance deviation to target value: This is the variation between the Target value of control marker distance and the Measured control marker distance.
Troubleshooting
Unable to Perform Onsite Compensation
One reason for Onsite Compensation failures can be due to the Onsite Compensation file (stored on the Mobile PC) has the wrong file naming convention. The compensation file is stored at: "C:\ProgramData\FARO\Freestyle\Cameras/". An example of the correct naming convention of the Onsite Compensation file is: “00220176.cpd” (“CP” should not present in the filename).
For instance, if your compensation file is named “CP00220176.cpd” then it should be renamed to “00220176.cpd” before attempting to perform the onsite compensation.