Wireless Network for Connecting to Laser Projectors

Overview
In a production setting, it is common that FARO® Tracer Laser Projectors and the computer used with them are not located close enough to each other to connect them directly. To solve this, set up a simple network using a wireless router that has enough Ethernet ports to connect each Laser Projector to the router with a cable. The Tracer would be connected to the router via a wired connection and the computer can be connected to the router via WiFi.
Because each production setting is unique, FARO does not supply a router or cables, but you can purchase them online or at any electronics store.
Note: Although the Tracer User Manual suggests you can set up a network using a wireless USB network adapter plugged into the USB port on the Laser Projector, this network does not adequately support the communications needs of Laser Projectors and their computer.
Procedure
This article will help you connect to the Tracer though a wireless router which is set to bridge mode with automatic IP address (DHCP) enabled. This is a typical out of the box configuration for most wireless routers. For the purpose of this tutorial, the D-Link wireless AC750 Dual Band router has been used.
Before we can begin, we must set the Tracer to automatically obtain an IP address (DCHP). This procedure differs depending on the current configuration of the Tracer.
- The Tracer IP address is already set to automatic (DHCP), continue to “Connecting the Router and Configuring the Computer”
- The Tracer IP address is static (ex. 172.20.162.12) or unknown, continue to “Setting the Tracer to DHCP”
Setting the Tracer to DHCP
Configure the Ethernet adapter properties on your computer to connect to the Tracer via its current static IP address.
If you do not know the current IP address of the Tracer, you can reset the unit to its default network configuration.
Resetting the Tracer to its Default Network Configuration
The default network configuration is as follows:
- Name: TRMxxxx for TracerSI or LPT8xxxx for TracerM
(where “xxxx” are the last four numbers of the serial number) - IP Address (Static): 192.168.1.8
- (Sub) Net Mask: 255.255.255.0
To restore the Tracer’s default network configuration:
- Turn off the power switch to power down the Tracer.
- Press and hold the Reset button next to the Power ON indicator on the right-side panel of the projector.
Note: To prevent accidental activation, the Reset button is recessed, and a hairpin or needle-like instrument is required to press it. - With the Reset button pressed, turn on the Tracer. Continue to hold the Reset button for at least five seconds, then release.
While the Tracer is running with the default configuration, open the computer's web browser, type in http:\\TRMxxxx (for TracerSI) or http:\\LPT8xxxx (for TracerM), and make all necessary network configuration settings changes and save them. If no new changes are saved, the default network configuration will only persist until the Tracer is powered down and the prior “unknown” network configuration will return when the Tracer is powered back on.
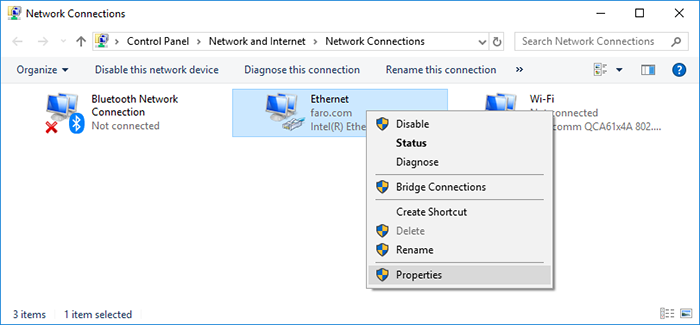
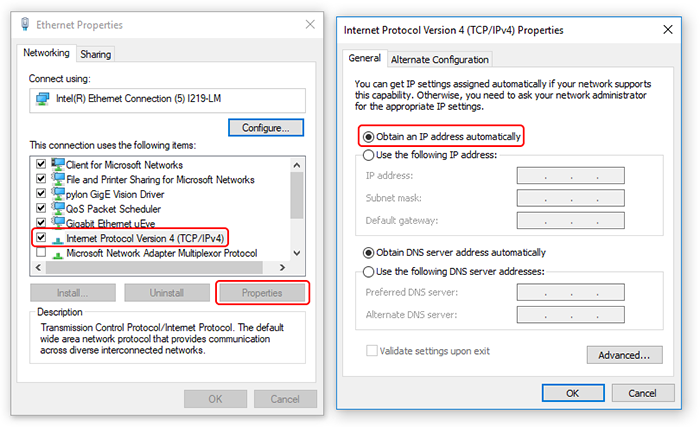
- Via the Windows Control panel, go to the Windows Network Connections screen.
- Right click on the Ethernet adapter and choose Properties from the menu.
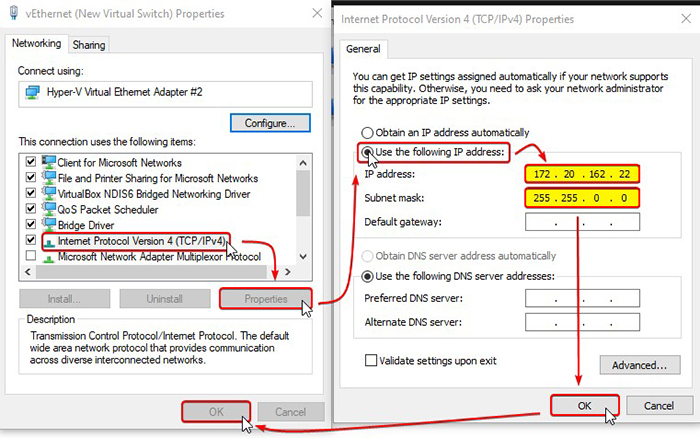
- Follow the instructions in the images below. Note that the IP address should be the same as the known Tracer IP address but with different ending (ex. 172.20.162.X, where X is any number different than 12 in this example). You may press "tab" and the "Subnet mask" will field auto-populate.
- Connect the computer directly to the Tracer via an Ethernet cable.
- Open the Tracer configuration page from the computer by typing the Tracer name on a browser (ex. http://lpt81185.local/). The URL of the Tracer usually is its model number plus the last 4 digits of its serial number (TRMxxxx for TracerSI or LPT8xxxx (for TracerM).
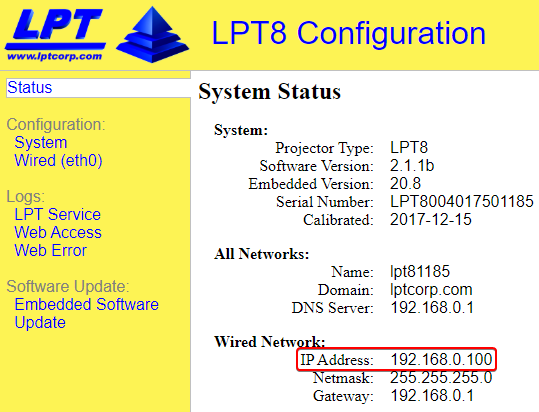
- If you are unable to connect using the Tracer name, try connecting using the IP address (ex. http://172.20.162.12/) and obtain the name as shown in the image below. Once obtained, load this page again with its name instead of the IP address.
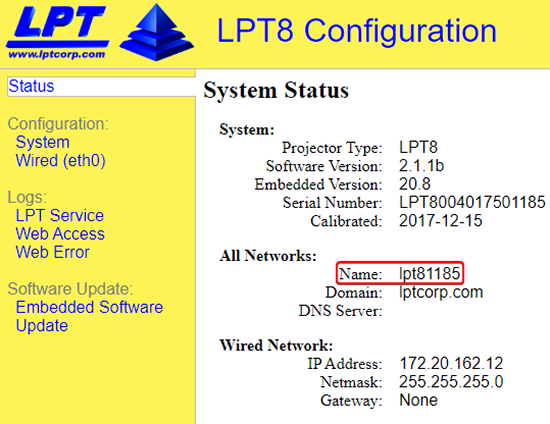
- If you are unable to connect using the Tracer name, try connecting using the IP address (ex. http://172.20.162.12/) and obtain the name as shown in the image below. Once obtained, load this page again with its name instead of the IP address.
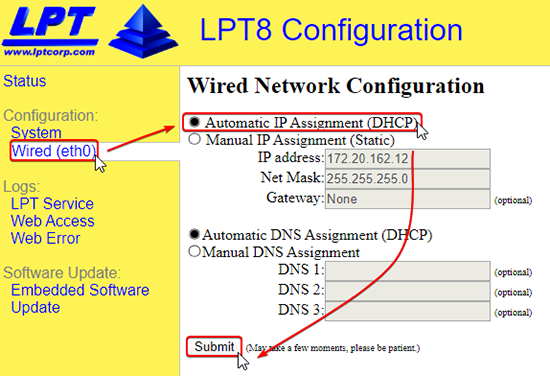
- On the Configuration > Wired (eth0) page. Click on Automatic IP Assignment (DHCP) radio button and then click Submit.
- Once the changes are saved you will more than likely lose the connection to the Tracer. Continue to “Connecting the Router and Configuring the Computer”
Connecting the Router and Configuring the Computer
Before a Wi-Fi connection can be established, the current IP of the Tracer must be retrieved.
Retrieve the IP Address of the Tracer
- Via the Windows Control panel, go to the Windows Network Connections screen.
- Right click on the Ethernet adapter and choose Properties from the menu.
- Verify (and set if necessary) that Obtain an IP address automatically is selected.
- Connect both the computer and the Tracer to the router via Ethernet cables (make sure they are connected to LAN ports and not to the Internet/WAN port). Ensure both the Tracer and router are turned on.
- Open the Tracer configuration page from the computer by typing the Tracer name on a browser (ex. http://lpt81185.local/). The URL of the Tracer usually is its model number plus the last 4 digits of its serial number (TRMxxxx for TracerSI or LPT8xxxx (for TracerM).
- On the System Status page, record the IP address assigned to the Tracer.
Setup the Wireless Connection to the Router
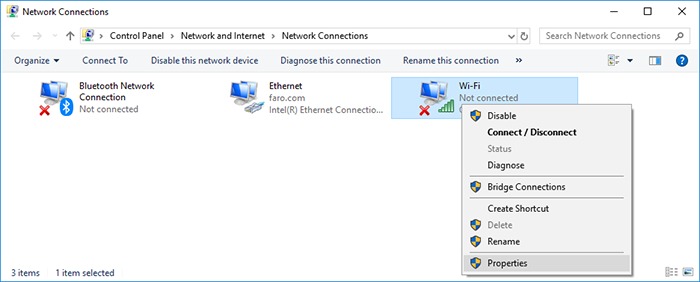
- Via the Windows Control panel, go to the Windows Network Connections screen.
- Right click on the Wi-Fi adapter and choose Properties from the menu.
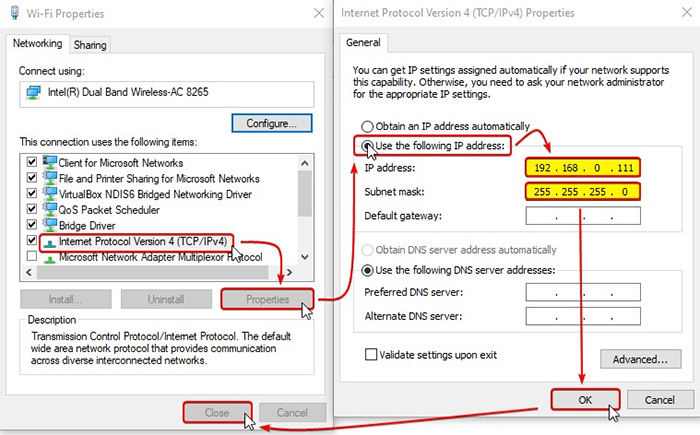
- Follow instructions in the images below. Note that the IP address should be the same as the new Tracer IP address (obtained from Step 6 in the “Retrieve the IP Address of the Tracer” section above) but with different ending (ex. 192.168.0.X, where X is any number different to 100). You may press "tab" and the "Subnet mask" will field auto-populate.
- Disconnect the Ethernet cable connecting the computer to the router.
- Connect the computer to the corresponding Wi-Fi network of the router (ex. dlink-4339).
- If prompted, use the password supplied with the router. If it has not being changed, it should be indicated on a card included with the router or on the bottom of the router.
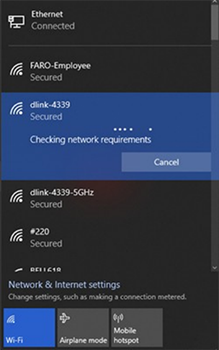
- If prompted, use the password supplied with the router. If it has not being changed, it should be indicated on a card included with the router or on the bottom of the router.
- Open the Tracer configuration from the computer by using the IP address obtained from Step 6 in the “Retrieve the IP Address of the Tracer” section above, (ex. http://192.168.0.100/). If the System Status page loads, your computer is successfully connected to the Tracer via the router.