                     
As-Built As-Built - Revit As-Built - AutoCAD VirtuSurv - VirtuSurv 2018 As-Built - Modeler VirtuSurv - VirtuSurv 2019          
BuildIT BuildIT - Projector BuildIT - Construction BuildIT - Metrology              
CAM2 CAM2 - SmartInspect CAM2 - 2023 CAM2 - 2018 CAM2 - Measure 10 CAM2 - Measure Q CAM2 - Measure X CAM2 - Measure 3/4 CAM2 - AnthroCAM CAM2 - 2019 CAM2 - 2020
CAM2 CAM2 - 2021                  
Cobalt 3D Imager 3D Imager - Cobalt                  
Cobalt Design Cobalt Design - M Cobalt Design - S Cobalt Design - Dual              
Computers Computers - All Computers                  
FARO Aras 360 & CAD Zone FARO CAD Zone - Fire & Insurance FARO CAD Zone - Crime & Crash FARO CAD Zone - CZ Point Cloud FARO CAD Zone - First Look Pro FARO 360 - Reality FARO 360 - HD FARO 360 - Blitz FARO 360 - Genius    
FARO Connect FARO Connect - Connect                  
FARO Zone present4D - present4D                  
FARO Zone 2D FARO Zone 2D - 2018 FARO Zone 2D - 2019 FARO Zone 2D - 2020 FARO Zone 2D - 2021 FARO Zone 2D - 2022 FARO Zone 2D - 2023        
FARO Zone 3D FARO Zone 3D - 2018 FARO Zone 3D - 2019 FARO Zone 3D - 2020 FARO Zone 3D - 2021 FARO Zone 3D - 2022 FARO Zone 3D - 2023 FARO Zone 3D - 2024      
FARO Zone 3D Advanced FARO Zone 3D Advanced - 2018 FARO Zone 3D Advanced - 2019 FARO Zone 3D Advanced - 2020 FARO Zone 3D Advanced - 2021 FARO Zone 3D Advanced - 2022          
FaroArm/ScanArm FaroArm/ScanArm - Quantum S FaroArm/ScanArm - Quantum M FaroArm/ScanArm - Quantum E FaroArm/ScanArm - Edge FaroArm/ScanArm - Fusion FaroArm/ScanArm - Prime FaroArm/ScanArm - Platinum FaroArm/ScanArm - Legacy Quantum FaroArm/ScanArm - Titanium FaroArm/ScanArm - Advantage
FaroArm/ScanArm FaroArm/ScanArm - Digital Template FaroArm/ScanArm - Gage FaroArm/ScanArm - Quantum S Max FaroArm/ScanArm - Quantum M Max FaroArm/ScanArm - Quantum E Max FaroArm/ScanArm - Gage Max        
GeoSLAM Software GeoSLAM Software - Connect GeoSLAM Software - Draw GeoSLAM Software - Hub GeoSLAM Software - Volumes            
GeoSLAM ZEB GeoSLAM ZEB - Horizon GeoSLAM ZEB - Horizon RT GeoSLAM ZEB - Revo GeoSLAM ZEB - Revo RT GeoSLAM ZEB - Go          
Hand Held Scanner 2D Hand Held Scanner - ScanPlan 3D Hand Held Scanner - Freestyle3D 3D Hand Held Scanner - Freestyle3D X 3D Hand Held Scanner - Freestyle3D Objects 3D Hand Held Scanner - Freestyle 2          
Language Quality HT MT AT NT INT - Internal Sales - Internal Resources Sales - Order and Quote Sales - Product Info Sales - Sales Readiness Sales - Training
Language Quality Sales - Product Launch Sales - Promotions CS - Quote to Invoice CS - Phone System CS - New Hire Training CS - General CS - Product Info CS - Licensing CS - Procedures General CS - Procedures Salesforce
Language Quality CS - Procedures Loaner CS - Procedures SAP                
Languages Language - English Language - Japanese Language - German Language - Chinese Language - Spanish Language - Italian Language - Portuguese Language - French Language - Korean  
Laser Projector RayTracer - RayTracer Laser Projector - Tracer M Laser Projector - Tracer SI              
Laser Radar Imaging Laser Radar - VectorRI                  
Laser Scanner 3D Laser Scanner - Focus S 3D Laser Scanner - Focus M 3D Laser Scanner - Focus3D 3D Laser Scanner - Focus3D X 3D Laser Scanner - Focus3D X HDR 3D Laser Scanner - Focus3D S 3D Laser Scanner - Photon 3D Laser Scanner - Focus S Plus 3D Laser Scanner - Swift 3D Laser Scanner - Focus Premium
Laser Scanner 3D Laser Scanner - Focus Core                  
Laser Tracker Laser Tracker - Vantage Laser Tracker - ION Laser Tracker - Vantage S Laser Tracker - Si Laser Tracker - X Laser Tracker - Xi Laser Tracker - Vantage E Laser Tracker - Vantage S6 Laser Tracker - Vantage E6  
Legacy Gage Legacy Gage - Bluetooth Legacy Gage - Plus Legacy Gage - Standard Legacy Gage - Power            
Legacy Software Legacy Software - CAM2 Gage Legacy Software - Gage Software Legacy Software - Insight              
Mobile Scanner Mobile Scanner - Orbis                  
PointSense PointSense - Basic PointSense - Pro PointSense - Building PointSense - Plant PointSense - Heritage PointSense - Revit CAD Plugin - TachyCAD Building CAD Plugin - TachyCAD Archeology CAD Plugin - TachyCAD Interior CAD Plugin - PhoToPlan Basic
PointSense CAD Plugin - PhoToPlan CAD Plugin - PhoToPlan Pro CAD Plugin - PhoToPlan Ultimate CAD Plugin - DisToPlan CAD Plugin - MonuMap CAD Plugin - hylasFM CAD Plugin - VirtuSurv      
RevEng RevEng - RevEng                  
ScanArm ScanArm - Design ScanArm 2.0 ScanArm - Design ScanArm ScanArm - Forensic ScanArm ScanArm - Design ScanArm 2.5C            
SCENE SCENE - Capture and Process SCENE - WebShare Server and 2Go SCENE - WebShare 2Go App SCENE - 2018 SCENE - 7.x SCENE - 6.x SCENE - 5.x SCENE - 4.x SCENE - LT SCENE - 2019
SCENE SCENE - 2go App SCENE - 2020 SCENE - 2021 SCENE - 2022 SCENE - 2023          
Serial FaroArm Serial FaroArm - Silver Serial FaroArm - Gold Serial FaroArm - Bronze              
Sphere FARO Sphere - Sphere                  
Visual Inspect Visual Inspect - App Visual Inspect - CAD Translator                
WebShare WebShare - Enterprise WebShare - WebShare Cloud                

3D Laser Scanner

Focus Premium

Focus S

Focus S Plus

BuildIT

Construction

FARO® Knowledge Base

Scanning with Multiple Focus Scanners Simultaneously in BuildIT Construction

BuildITConstruction-bty.png

Overview 

BuildIT allows the user the ability to work with multiple scanners simultaneously.
Communication between BuildIT and the scanners can be achieved via Wi-Fi.
It can also be achieved via a Ethernet cable, using the Automation Adapter and a Automation Ready Focus Scanner.

The Automation Adapter is also needed when any of the following condition has to be met:

  • An Ethernet connection is required (Example: Wi-Fi restrictions).
  • The scanner is running at a stationary location, for extended period of time, and needs to remain powered on.
  • The scanner needs to be mounted at a repeatable position and angle.
  • There is a need to control the scanner directly using the SDK (Example: Utilizing a COM Port for triggering the scanner).

Mechanical Setup

Start by removing the automation cover from the Focus using a star key.

  1. Unscrew both screws. 
  2. Use a thin card to lift the cover.

Make sure the cover is fully unscrewed before removing it.

 Builtit_Focuscover_removed.png

The Automation Adapter has a screw on the inside, that attaches to the FARO Focus Scanner, using an Allen Wrench.

  1. Place the FARO Focus Scanner on the Automation Adapter.
  2. Rotate the Focus, until it seats firmly on the Automation Adapter. 
  3. Use an Allen Wrench to tighten the Automation Adapter to the FARO Focus Scanner. 
Builtit_FocusCover_adapter.png

To connect the computer and the FARO Focus Automation Adapter:

  1. Connect the CAT5 cable to the computer, then to the Port 1 of the network switch. 
  2. Connect another CAT5 cable to the FARO Focus Automation Adapter, then connect the other end of the CAT5 cable to the network switch using any of the remaining ports. 
  3. Repeat Step 2, for any additional FARO Focus Automation Adapters. You can use as many as your network switch allows. 
Builtit_CAT5cables.png

The FARO Automation Adapter has a power option built into the side. This power source is typically utilized when the Scanner is being mounted at a stationary location and requires constant power. 
It is also possible to plug-in the power cable from the FARO Focus Scanner directly into the Focus, if power is necessary.  
Builtit_FAROAutomationAdapter.png

Configure FARO Focus Scanners

  1. Turn on the Automation Ready FARO Focus Scanner. 
  2. Go to Manage > General Settings > LAN. 
  3. Swipe the Status button to the right (it will turn blue)
  4. Take note of the IP Address for each FARO Focus Scanner, this will be needed for the software configuration.
Builtit_IPAdress.png

Configure Computer settings

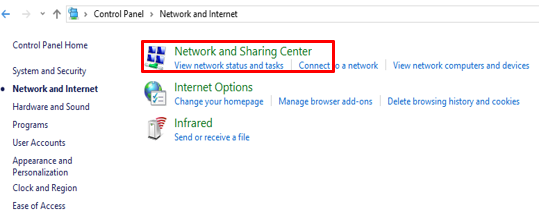
  1. Open the Control Panel.
  2. Click on Network and Internet. 
    Builit_Network_Internet.png
  3. Click on Network and Sharing Center. 
    Builtit_Network_SharingCenter.png
  4. On the left side panel, click on Change adapter settings. 
    Builtit_Changeadaptersettings.png
  5. Double-click “Ethernet”. A pop-window will open. 
  6. Choose “Internet Protocol Version 4 (TCP/IPv4)” and click on Properties. 
  7. Change your IP Address to a Static IP Address, by selecting “Use the following IP address”
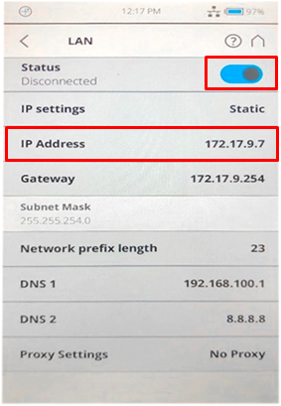
  8. The IP Address will be similar to the Focus LAN IP address, with the exception of the last few digits. Example: 172.17.9.100
    1. For the last three digits of the IP address, use 100 or any other 2 digit combination. DO NOT use the IP Address being used by the Focus. 
    2. The Subnet mask should automatically populate

Builit_NetworkConnections.png

Configure Software Settings

  1. Open BuildIT Metrology
    Builit_Scan_using_Focus.png
  2. From the top toolbar navigate to Automate > FARO Focus > Scan using FARO Focus.Builtit_ScanSetting.png
  3. Enter the IP address for each Focus Automation Adapter being used.
  4. Define your Scan Settings (Resolution, Quality, and Color), if you decide to leave as current, it will use the individual FARO Focus Scanners Settings
  5. Under Import Options, define the following settings. 
    1. Check Detect Spheres and/or Checkerboards (If utilizing either targets)
    2. Enter the Sphere Radius (If utilizing Spheres)
    3. If you want to use a Distance Filter, check Distance Filter, and define the Maximum Distance.
  6. Click the Checkmark to begin scanning.

When using Targets for registration, a Bundle Registration is recommended after the automation program has processed and registered the scans. 
Builtit_BundingRegistration.png

  1. From the top toolbar, click Align, then click on Bundling Registration.Builtit_Commands.png
  2. Click “All” under Devices and Points.
  3. Delete the individual scans that were imported with the targets.
    1. To delete the scans, highlight the individual scan name and press the delete key.
  4. Under Network final position, select Stationary device.
  5. Click the Checkmark, to solve the alignment.
  6. The Bundle Registration Results will appear with your Target Registration error. Review the RMS error and if this is within your desired tolerance, click the Checkbox to save the alignment. 

Builtit_BundleRegistrationResults.png