Wall Plumb - Without CAD with BuildIT Construction

 Objective:
Use BuildIT Construction to import a *.E57 file and perform a surface deviation analysis on a cloud surface to evaluate the wall plumbness.
You’ll learn:
- A simple workflow from importing the files to producing a report of the surface deviation analysis.
- Opening BuildIT, import a *.E57 file.
- Creating a surface over the selected cloud
- Preform surface deviation
- Produce a Report
Tutorial Download
If you would like to download the file used in this article, download the accompanying Training Data and extract its contents to a folder on your PC.
Import E57 File
- Launch BuildIT by double-clicking the BuildIT icon on your desktop.
- Import the scan data by the following method.
- In the menu bar, click “File > Import > Import E57 Clouds”.


- Navigate to and select the file “wall.e57” from the training data and click Open.
- On the Next screen, click OK. BuildIT will now begin the import.

- Once the import is completed, many times the point cloud will be outside of the current view, click the Zoom All icon
 to view the entire project.
- In the menu bar, click “File > Import > Import E57 Clouds”.
Create a Surface from the Cloud Points
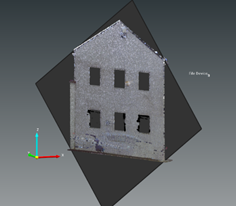
- Orient the imported model to the view shown (the ghost image of the vehicle should be visible).

- Select “Refine > Extract Surface”.

- Create a plane from cloud.
- In the Tolerance field enter 0.5.
- Using the Growning selection tool, click on the surface of the wall to select it.
- For "Constraint", use Constrain tangent with Z selected as the constraint. This ensures the plane is extracted as perfectly perpendicular to the ground.
- Ensure “Create new cloud from identified points” checkbox is selected.
- Select Apply.


Invert the Surface (if needed)
 When the surface plane has been extracted, there is a possibility the nominal plane may be facing the wrong direction. It is best to check which way the extracted surface is facing. This will help provide the positive and negative direction of the result. The face showing light gray indicates the positive side of the surface and the dark grey side indicates the negative side of the surface.
In the image shown, the dark grey surface plane is facing the top surface of the cloud. Hence the negative value is an in upward direction. Follow the procedure below to reverse the surface orientation.
- If the surface is in the wrong position, the plane can be flipped by selecting on “Edit > Surface > Reverse Normal”.
- Select the plane and then Apply.

- You should now have a view similar to the image below:

 Perform Surface Deviation Analysis
- Create a Surface Deviation plot on the inspected surface.
- In the menu bar, select “Evaluate > Surface Deviation Analysis”.

- Fill in the command fields as outlined below:
- In the menu bar, select “Evaluate > Surface Deviation Analysis”.
- Surfaces - The Surfaces input box is already active (yellow), simply click on the created surface.
- Points - The Points input box will automatically populate with the point from the extract surface command, as it was auto-associated.
- Maximum search distance - Set the Maximum search distance to 2.0.
TIP: The Maximum search distance is the distance the software will search from that perfect plane/surface. - Color scale - Pass/Fail will give you a scale for deviations within a tolerance zone.
- Analysis mode - Colored patches allow you to see the general pattern in the deviations. Needles are a visual aid for seeing the magnitude of the deviations.
- Limit computation - For this procedure, select User-Defined from the drop down and input the required tolerances, +/- 0.25.
- When you are done filling in the command, click Apply.
Generate a Report from the Analysis
- Save a view
- Click the Save View Icon
 or select “View > Save View” from the menu.
 - Enter a name for the view, and Select Apply.

- Click the Save View Icon
- Create a report
- In the Manager Tab on the right of the screen, right click on Custom View1 and select Add to report. Also add Surface Deviation Analysis1 to the report.

-
Click on the Report tab and click on Generate Report.


- In the Manager Tab on the right of the screen, right click on Custom View1 and select Add to report. Also add Surface Deviation Analysis1 to the report.
Recap:
Congratulations, you have completed the module on wall plumbness! By now you should have a grasp of the following:
- A simple workflow from importing the files to producing a report of the surface deviation analysis.
- Opening BuildIT, import a *.E57 file.
- Creating a surface over the selected cloud
- Preform surface deviation
- Produce a Report