Import XML Files from 3rd Party Projection Systems to BuildIT Projector

Overview
With the release of BuildIT Projector 2021, the import of external XML file types has been increased and the process simplified. This workflow is now fully embedded into the software and allows seamless import of RayTracer, Virtek and LAP XML,CAL,PLY, and LPD formats. For importing instructions with older versions of BuildIT Projector, see the Workflow - Pre 2021 Versions section below.
Workflow
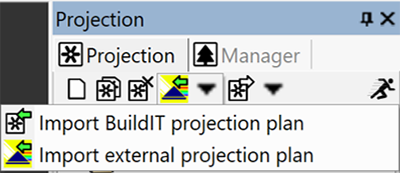
- Click on the “Import” icon on the Projection Toolbar then “Import external projection plan”.
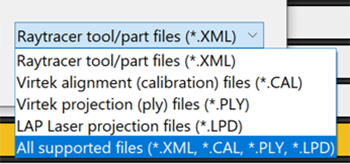
- Browse to the location of the file to import, you may need to change the File Type drop-down selection.
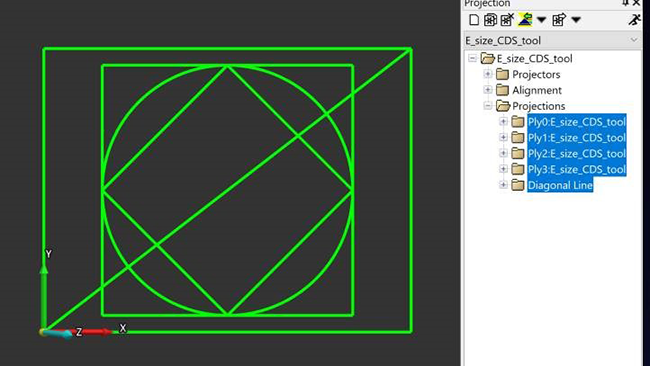
- The projection lines will then be imported into the CAD workspace and ordered in the Projection tree as per your planning workflow.
Workflow - Pre 2021 Versions
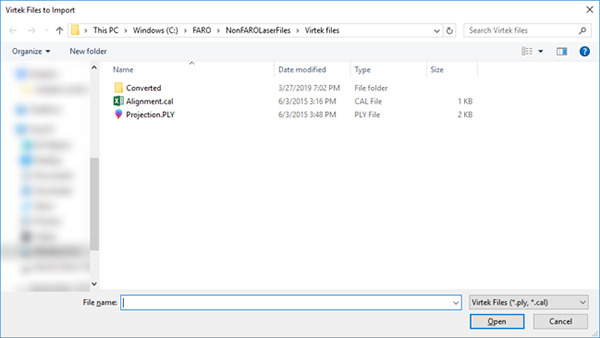
Importing PLY and CAL
Note: BuildIT Projector version 2020 and later will import native PLY and CAL files directly. The below conversion procedure is only required for earlier versions.
Using a free conversion utility, Virtek .PLY or .CAL projection plans can be converted and used with BuildIT Projector.
Note: PLY and CAL files can be exported from other software in addition to Virtek, (Fibersim, Catia, SA, Verisurf. etc.). The Conversion Utility provided, and the procedure outlined below can be used for any compatible PLY or CAL files.
- Download the Virtek To Projector Conversion Utility. Once downloaded, launch the VirtekToProjector.exe file.
Note: This converter can also be found under the BuildIT Projector installation location: C:\Program Files\BuildIT\BuildIT Projector 20xx\projection - Select the Virtek .PLY or .CAL file to convert.
- Choose a location where to save the converted BuildIT XML file. Make sure you add the xml extension to the file name. Once the conversion is compete a successful pop-up message will be displayed.

- You can now import the converted XML file directly into BuildIT via the Import Projection Plan button.
- Multiple files can be imported into a plan, the data will be added to the bottom of the list

- Multiple files can be imported into a plan, the data will be added to the bottom of the list
-
After import, the projection data will now be populated the plan.
Note: These are only projection curves and are not actual entities in the model. These curves can be viewed and selected in the plan, but can’t be edited or used otherwise.

Importing RayTracer
Using a free conversion utility, projection plans created with RayTracer can be converted and used with BuildIT Projector.
Note: BuildIT combines only one LASER GROUP, one PART, and one TOOL at a time, working on a per-job-basis. Therefore, if the JOB file being converted contains more than one LASER GROUP, one PART, or one TOOL, the conversion process will fail. In those cases, you can convert each LASER GROUP, PART and TOOL individually to then import or combine them as needed.
- Download the RayTracer Database Conversion Utility. Once downloaded, launch the RaytracerToProjector.exe file.
Note: This converter can also be found under the BuildIT Projector installation location: C:\Program Files\BuildIT\BuildIT Projector 20xx\projection
- Select the projection job in the RayTracer database, located in the JOBS folder.

- Choose a location where to save the converted BuildIT XML file. Make sure you add the xml extension to the file name.

- You should have a converted XML file, and you can import it directly into BuildIT via the Import Projection Plan button.
- After import, the projection data will now be populated the plan.
Note: These are only projection curves and are not actual entities in the model. These curves can be viewed and selected in the plan, but can’t be edited or used otherwise.