As-Built As-Built - Revit As-Built - AutoCAD VirtuSurv - VirtuSurv 2018 As-Built - Modeler VirtuSurv - VirtuSurv 2019          
BuildIT BuildIT - Projector BuildIT - Construction BuildIT - Metrology              
CAM2 CAM2 - SmartInspect CAM2 - 2024 CAM2 - 2023 CAM2 - 2018 CAM2 - Measure 10 CAM2 - Measure Q CAM2 - Measure X CAM2 - Measure 3/4 CAM2 - AnthroCAM CAM2 - 2019
CAM2 CAM2 - 2020 CAM2 - 2021                
Cobalt 3D Imager 3D Imager - Cobalt                  
Cobalt Design Cobalt Design - M Cobalt Design - S Cobalt Design - Dual              
Computers Computers - All Computers                  
FARO Aras 360 & CAD Zone FARO CAD Zone - Fire & Insurance FARO CAD Zone - Crime & Crash FARO CAD Zone - CZ Point Cloud FARO CAD Zone - First Look Pro FARO 360 - Reality FARO 360 - HD FARO 360 - Blitz FARO 360 - Genius    
FARO Connect FARO Connect - Connect                  
FARO Zone present4D - present4D                  
FARO Zone 2D FARO Zone 2D - 2018 FARO Zone 2D - 2019 FARO Zone 2D - 2020 FARO Zone 2D - 2021 FARO Zone 2D - 2022 FARO Zone 2D - 2023 FARO Zone 2D - 2024      
FARO Zone 3D FARO Zone 3D - 2018 FARO Zone 3D - 2019 FARO Zone 3D - 2020 FARO Zone 3D - 2021 FARO Zone 3D - 2022 FARO Zone 3D - 2023 FARO Zone 3D - 2024      
FARO Zone 3D Advanced FARO Zone 3D Advanced - 2018 FARO Zone 3D Advanced - 2019 FARO Zone 3D Advanced - 2020 FARO Zone 3D Advanced - 2021 FARO Zone 3D Advanced - 2022          
FaroArm/ScanArm FaroArm/ScanArm - Quantum S FaroArm/ScanArm - Quantum M FaroArm/ScanArm - Quantum E FaroArm/ScanArm - Edge FaroArm/ScanArm - Fusion FaroArm/ScanArm - Prime FaroArm/ScanArm - Platinum FaroArm/ScanArm - Legacy Quantum FaroArm/ScanArm - Titanium FaroArm/ScanArm - Advantage
FaroArm/ScanArm FaroArm/ScanArm - Digital Template FaroArm/ScanArm - Gage FaroArm/ScanArm - Quantum S Max FaroArm/ScanArm - Quantum M Max FaroArm/ScanArm - Quantum E Max FaroArm/ScanArm - Gage Max FaroArm/ScanArm - Quantum X.S FaroArm/ScanArm - Quantum X.M FaroArm/ScanArm - Quantum X.E  
GeoSLAM Software GeoSLAM Software - Connect GeoSLAM Software - Draw GeoSLAM Software - Hub GeoSLAM Software - Volumes            
GeoSLAM ZEB GeoSLAM ZEB - Horizon GeoSLAM ZEB - Horizon RT GeoSLAM ZEB - Revo GeoSLAM ZEB - Revo RT GeoSLAM ZEB - Go          
Hand Held Scanner 2D Hand Held Scanner - ScanPlan 3D Hand Held Scanner - Freestyle3D 3D Hand Held Scanner - Freestyle3D X 3D Hand Held Scanner - Freestyle3D Objects 3D Hand Held Scanner - Freestyle 2          
Language Quality HT MT AT NT INT - Internal Sales - Internal Resources Sales - Order and Quote Sales - Product Info Sales - Sales Readiness Sales - Training
Language Quality Sales - Product Launch Sales - Promotions CS - Quote to Invoice CS - Phone System CS - New Hire Training CS - General CS - Product Info CS - Licensing CS - Onboarding CS - Procedures General
Language Quality CS - Procedures Salesforce CS - Procedures Loaner CS - Procedures SAP              
Languages Language - English Language - Japanese Language - German Language - Chinese Language - Spanish Language - Italian Language - Portuguese Language - French Language - Korean  
Laser Projector RayTracer - RayTracer Laser Projector - Tracer M Laser Projector - Tracer SI              
Laser Radar Imaging Laser Radar - VectorRI                  
Laser Scanner 3D Laser Scanner - Focus S 3D Laser Scanner - Focus M 3D Laser Scanner - Focus3D 3D Laser Scanner - Focus3D X 3D Laser Scanner - Focus3D X HDR 3D Laser Scanner - Focus3D S 3D Laser Scanner - Photon 3D Laser Scanner - Focus S Plus 3D Laser Scanner - Swift 3D Laser Scanner - Focus Premium
Laser Scanner 3D Laser Scanner - Focus Core 3D Laser Scanner - Focus Premium Max                
Laser Tracker Laser Tracker - Vantage Laser Tracker - ION Laser Tracker - Vantage S Laser Tracker - Si Laser Tracker - X Laser Tracker - Xi Laser Tracker - Vantage E Laser Tracker - Vantage S6 Laser Tracker - Vantage E6  
Legacy Gage Legacy Gage - Bluetooth Legacy Gage - Plus Legacy Gage - Standard Legacy Gage - Power            
Legacy Software Legacy Software - CAM2 Gage Legacy Software - Gage Software Legacy Software - Insight              
Mobile Scanner Mobile Scanner - Orbis                  
PointSense PointSense - Basic PointSense - Pro PointSense - Building PointSense - Plant PointSense - Heritage PointSense - Revit CAD Plugin - TachyCAD Building CAD Plugin - TachyCAD Archeology CAD Plugin - TachyCAD Interior CAD Plugin - PhoToPlan Basic
PointSense CAD Plugin - PhoToPlan CAD Plugin - PhoToPlan Pro CAD Plugin - PhoToPlan Ultimate CAD Plugin - DisToPlan CAD Plugin - MonuMap CAD Plugin - hylasFM CAD Plugin - VirtuSurv      
RevEng RevEng - RevEng                  
ScanArm ScanArm - Design ScanArm 2.0 ScanArm - Design ScanArm ScanArm - Forensic ScanArm ScanArm - Design ScanArm 2.5C            
SCENE SCENE - Capture and Process SCENE - WebShare Server and 2Go SCENE - WebShare 2Go App SCENE - 2024 SCENE - 2018 SCENE - 7.x SCENE - 6.x SCENE - 5.x SCENE - 4.x SCENE - LT
SCENE SCENE - 2019 SCENE - 2go App SCENE - 2020 SCENE - 2021 SCENE - 2022 SCENE - 2023        
Serial FaroArm Serial FaroArm - Silver Serial FaroArm - Gold Serial FaroArm - Bronze              
Sphere FARO Sphere - Sphere                  
Visual Inspect Visual Inspect - App Visual Inspect - CAD Translator                
WebShare WebShare - Enterprise WebShare - WebShare Cloud                

3D Laser Scanner

Focus Core

Focus Premium

Focus Premium Max

Focus S

Focus S Plus

FARO® Knowledge Base

PanoCam Installation and Setup for the Focus Laser Scanner

Focus-bty.png

Note: The PanoCam is only compatible on Focus Premium Max, Focus Premium, Focus Core, FocusS and FocusS Plus models.

Overview

Once you have configured the PanoCam with your Focus Laser Scanner, you can easily add panoramic images to a project. The camera can be positioned strategically, and the images will be automatically added to the scan project and can processed with in SCENE.

For additional information on the PanoCam setup and usage see:

Installation

Required Items:

  • Ricoh Theta Z1 Camera (As a general preparation, it is recommended to update your Ricoh Theta Z1 camera to the latest firmware)
    • 23 MP (6720 x 3360) camera
    • 4K video (3840 x 1920, 29,97 f/sec.)
    • Storage for ~350 RAW+ pictures
    • USB 3.0, Wifi, Bluetooth
    • Operating temp: 0°C - 40°C
    • Storage temp: -20°C - 60°C
  • Panocam Mount
  • 3mm Allen Key
  • Focus Scanner
    • Focus Premium Max, Focus Premium or Focus Core
    • FocusS or FocusS Plus with Focus Firmware version 6.8 or greater
  • SCENE 2022 or later (Focus Premium) | 2021.0 or later for FocusS or FocusS Plus

Always power OFF both units when installing or removing the PanoCam. Click the link below to download the PanoCam Quickstart installation guide.

PanoCam Quickstart Guide

Note: The PanoCam should always be removed from the Focus Scanner before shipping or storage in its transport case.

Caution: The PanoCam is not IP (Ingress Protection) rated and is not recommended for wet environments.

PanoCam Setup and Calibration

Setup

  1. Power ON both the PanoCam and the Focus scanner.
  2. From the Focus home screen, tap Parameters > Color Settings and then tap Panorama Camera.
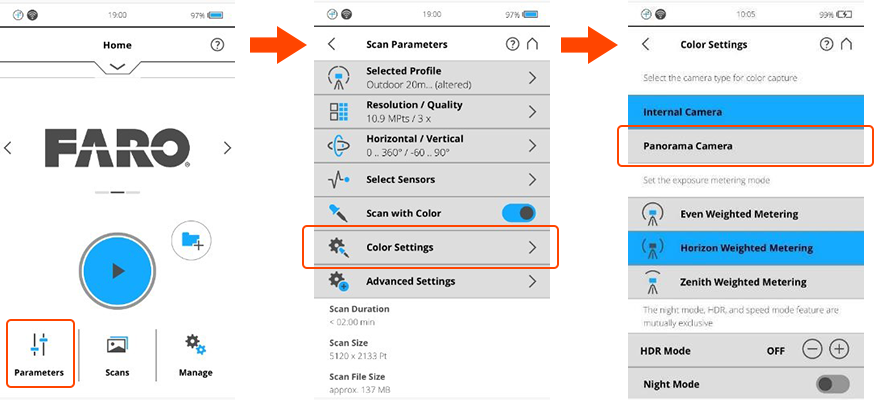
    PanoEnable.png
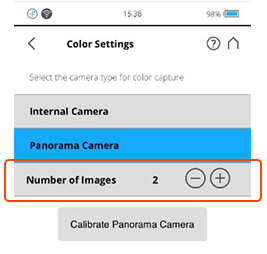
  3. Set the Number of Images to a value of "2". Higher values can be used but will increase scanning/processing times and files sizes.
    PanoNumImages.png
  4. Before scanning, be sure to calibrate the camera as outlined in the Calibration section below.

Calibration

Before any scan projects are created it is required to calibrate the PanoCam after installation. The calibration routine will automatically perform a 1/5 / 2x quality scan, 1 PanoCam picture and an internal camera color capture with even weighted metering.

  • The calibration scan should be done in an indoor environment (office, room, etc.)
  • Walls should have a distance of a few meters to the scanner
  • There must be visible objects / patterns well distributed around the floor, walls, and ceiling to receive an optimal calibration
  • Avoid plain white walls, dark environments, and moving objects

After the calibration scan is complete the scan must be processed in SCENE and evaluated for proper color registration. If the processed scan does not have proper color overlay repeat the calibration scan and processing in SCENE.

Calibration should be repeated if the camera or mount was removed from the scanner or was subject to impacts or extreme temperature changes. It is also recommend to repeat the calibration periodically or if color overlay errors are detected.

Scanning

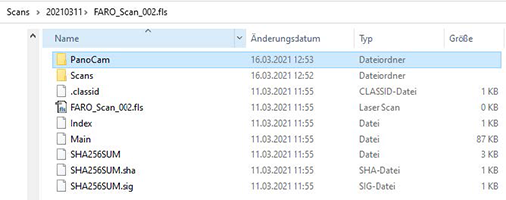
Once the PanoCam has been enabled and properly calibrated, images will be captured automatically as part of the normal scan process. Images are automatically transferred (and removed from the storage of the camera) to the Laser Scanner upon completion of each scan. PanoCam images are stored in the "PanoCam" subfolder within the scan project.
PanoImageFileLocation.png

Troubleshooting

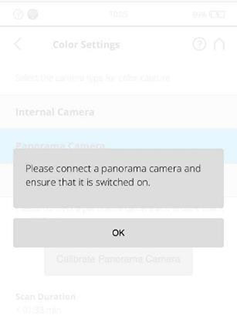
Error Message: "Please connect a panorama camera and ensure that it is switched on."
PanoError_NoCam.png

This error is caused when the Focus Laser scanner does not detect the PanoCam:

Verify the PanoCam is powered on and that the PanoCam is correctly mounted (see the PanoCam Quickstart Guide for mounting information).