As-Built As-Built - Revit As-Built - AutoCAD VirtuSurv - VirtuSurv 2018 As-Built - Modeler VirtuSurv - VirtuSurv 2019          
BuildIT BuildIT - Projector BuildIT - Construction BuildIT - Metrology              
CAM2 CAM2 - SmartInspect CAM2 - 2024 CAM2 - 2023 CAM2 - 2018 CAM2 - Measure 10 CAM2 - Measure Q CAM2 - Measure X CAM2 - Measure 3/4 CAM2 - AnthroCAM CAM2 - 2019
CAM2 CAM2 - 2020 CAM2 - 2021                
Cobalt 3D Imager 3D Imager - Cobalt                  
Cobalt Design Cobalt Design - M Cobalt Design - S Cobalt Design - Dual              
Computers Computers - All Computers                  
FARO Aras 360 & CAD Zone FARO CAD Zone - Fire & Insurance FARO CAD Zone - Crime & Crash FARO CAD Zone - CZ Point Cloud FARO CAD Zone - First Look Pro FARO 360 - Reality FARO 360 - HD FARO 360 - Blitz FARO 360 - Genius    
FARO Connect FARO Connect - Connect                  
FARO Zone present4D - present4D                  
FARO Zone 2D FARO Zone 2D - 2018 FARO Zone 2D - 2019 FARO Zone 2D - 2020 FARO Zone 2D - 2021 FARO Zone 2D - 2022 FARO Zone 2D - 2023 FARO Zone 2D - 2024      
FARO Zone 3D FARO Zone 3D - 2018 FARO Zone 3D - 2019 FARO Zone 3D - 2020 FARO Zone 3D - 2021 FARO Zone 3D - 2022 FARO Zone 3D - 2023 FARO Zone 3D - 2024      
FARO Zone 3D Advanced FARO Zone 3D Advanced - 2018 FARO Zone 3D Advanced - 2019 FARO Zone 3D Advanced - 2020 FARO Zone 3D Advanced - 2021 FARO Zone 3D Advanced - 2022          
FaroArm/ScanArm FaroArm/ScanArm - Quantum S FaroArm/ScanArm - Quantum M FaroArm/ScanArm - Quantum E FaroArm/ScanArm - Edge FaroArm/ScanArm - Fusion FaroArm/ScanArm - Prime FaroArm/ScanArm - Platinum FaroArm/ScanArm - Legacy Quantum FaroArm/ScanArm - Titanium FaroArm/ScanArm - Advantage
FaroArm/ScanArm FaroArm/ScanArm - Digital Template FaroArm/ScanArm - Gage FaroArm/ScanArm - Quantum S Max FaroArm/ScanArm - Quantum M Max FaroArm/ScanArm - Quantum E Max FaroArm/ScanArm - Gage Max FaroArm/ScanArm - Quantum X.S FaroArm/ScanArm - Quantum X.M FaroArm/ScanArm - Quantum X.E  
GeoSLAM Software GeoSLAM Software - Connect GeoSLAM Software - Draw GeoSLAM Software - Hub GeoSLAM Software - Volumes            
GeoSLAM ZEB GeoSLAM ZEB - Horizon GeoSLAM ZEB - Horizon RT GeoSLAM ZEB - Revo GeoSLAM ZEB - Revo RT GeoSLAM ZEB - Go          
Hand Held Scanner 2D Hand Held Scanner - ScanPlan 3D Hand Held Scanner - Freestyle3D 3D Hand Held Scanner - Freestyle3D X 3D Hand Held Scanner - Freestyle3D Objects 3D Hand Held Scanner - Freestyle 2          
Language Quality HT MT AT NT INT - Internal Sales - Internal Resources Sales - Order and Quote Sales - Product Info Sales - Sales Readiness Sales - Training
Language Quality Sales - Product Launch Sales - Promotions CS - Quote to Invoice CS - Phone System CS - New Hire Training CS - General CS - Product Info CS - Licensing CS - Onboarding CS - Procedures General
Language Quality CS - Procedures Salesforce CS - Procedures Loaner CS - Procedures SAP              
Languages Language - English Language - Japanese Language - German Language - Chinese Language - Spanish Language - Italian Language - Portuguese Language - French Language - Korean  
Laser Projector RayTracer - RayTracer Laser Projector - Tracer M Laser Projector - Tracer SI              
Laser Radar Imaging Laser Radar - VectorRI                  
Laser Scanner 3D Laser Scanner - Focus S 3D Laser Scanner - Focus M 3D Laser Scanner - Focus3D 3D Laser Scanner - Focus3D X 3D Laser Scanner - Focus3D X HDR 3D Laser Scanner - Focus3D S 3D Laser Scanner - Photon 3D Laser Scanner - Focus S Plus 3D Laser Scanner - Swift 3D Laser Scanner - Focus Premium
Laser Scanner 3D Laser Scanner - Focus Core 3D Laser Scanner - Focus Premium Max                
Laser Tracker Laser Tracker - Vantage Laser Tracker - ION Laser Tracker - Vantage S Laser Tracker - Si Laser Tracker - X Laser Tracker - Xi Laser Tracker - Vantage E Laser Tracker - Vantage S6 Laser Tracker - Vantage E6  
Legacy Gage Legacy Gage - Bluetooth Legacy Gage - Plus Legacy Gage - Standard Legacy Gage - Power            
Legacy Software Legacy Software - CAM2 Gage Legacy Software - Gage Software Legacy Software - Insight              
Mobile Scanner Mobile Scanner - Orbis                  
PointSense PointSense - Basic PointSense - Pro PointSense - Building PointSense - Plant PointSense - Heritage PointSense - Revit CAD Plugin - TachyCAD Building CAD Plugin - TachyCAD Archeology CAD Plugin - TachyCAD Interior CAD Plugin - PhoToPlan Basic
PointSense CAD Plugin - PhoToPlan CAD Plugin - PhoToPlan Pro CAD Plugin - PhoToPlan Ultimate CAD Plugin - DisToPlan CAD Plugin - MonuMap CAD Plugin - hylasFM CAD Plugin - VirtuSurv      
RevEng RevEng - RevEng                  
ScanArm ScanArm - Design ScanArm 2.0 ScanArm - Design ScanArm ScanArm - Forensic ScanArm ScanArm - Design ScanArm 2.5C            
SCENE SCENE - Capture and Process SCENE - WebShare Server and 2Go SCENE - WebShare 2Go App SCENE - 2024 SCENE - 2018 SCENE - 7.x SCENE - 6.x SCENE - 5.x SCENE - 4.x SCENE - LT
SCENE SCENE - 2019 SCENE - 2go App SCENE - 2020 SCENE - 2021 SCENE - 2022 SCENE - 2023        
Serial FaroArm Serial FaroArm - Silver Serial FaroArm - Gold Serial FaroArm - Bronze              
Sphere FARO Sphere - Sphere                  
Visual Inspect Visual Inspect - App Visual Inspect - CAD Translator                
WebShare WebShare - Enterprise WebShare - WebShare Cloud                

Cobalt Design

Dual

M

S

FARO® Knowledge Base

Troubleshooting for the Cobalt Design

CobaltDesign-bty.jpg

Overview

In this article you will find various tips and troubleshooting instructions to improve your user experience with the FARO® Cobalt Design. For complete setup and configuration instructions, refer to the: User Manual for the Cobalt Design

Description Files

Each Cobalt Design includes a thumb drive (pen drive), which includes configuration/calibration files that are matched and are specific to your equipment. These files will appear as follows:

  • A-20-S3-19-xxxxx.optconf - Main unit configuration file
  • T-A3-19-xxxxx.optconf - Manipulator (rotary table) configuration file (optional)
  • CAL-20-19-xxxxx-masure.xml - Calibration plate "Master XML" descriptor file

Importing Description Files

Before attempting to import any configuration files, be sure the RevEng software and associated drivers are installed.

  1. Insert the included thumb drive (pen drive).
  2. Open RevEng.
  3. Click Settings icon at the lower left of the screen.
    RevEng_SettingsClick-small.png
  4. Select Cobalt Design Settings, and then click Import.
    RevEng_SettingsCobaltImportConfig.png
  5. Locate the scanner configuration A-20-S3-19-xxxxx.optconf file (located on the thumb drive) and click Open.
  6. If you are using a manipulator (rotary table), also import the manipulator’s configuration file.

Note: Once imported, configuration files are stored in the folder: C:\Users\<Username>\AppData\Local\FARO\FARO RevEng\confs

Calibration Plate "Master XML" Descriptor File

RevEng software reads the settings contained in this file each time it accesses the scanner. To avoid having the thumb drive connected at all times, copy the "CAL-20-19-xxxxx-masure.xml" configuration file to a permanent folder location on your computer. For the use of this file and complete calibration instructions, see the: User Manual for the Cobalt Design.

Cameras Not Detected

In the event of a Camera not detected issue, verify the following:

Hardware Checks

  1. Check all power connections:
    • On the rear of the Cobalt Design
    • The power supply (brick)
    • A known good AC wall outlet
  2. Make sure the power switch is in the "On" position
  3. Check the USB 3.0 cable connections between the Cobalt Design and the computer. Also ensure the USB port on your computer is functional and supports USB 3.0 peripherals.

CobaltDesign_DeviceManager.pngSoftware/Driver Checks

Open the Windows Device Manager and verify the following items are visible and active:

  • Basler USB3 Vision Cameras
    • 2 (or 4 devices for Dual models) Basler ace USB3 Vision Camera
  • Universal Serial Bus Controllers
    • 1x Generic USB SuperSpeed Hub


  • If these entries are not listed:
    • Check all cable/power connections (see Hardware Checks above)
       
  • If these entries are listed but with warning flags or as unrecognized peripherals:
    • Check all cable/power connections (see Hardware Checks above)
    • Reinstall the drivers. Drivers are installed as part of the RevEng software installation.
      • Run the RevEng installer. When prompted, ensure the "Cronos Drivers" are selected to be installed.
        CobaltDesign_RevEng_InstallCronos.png
      • After the installation is complete, restart the computer and recheck the Device Manager.

Projector Not Detected

In the event of a Projector not detected issue, verify the following:

Hardware Checks

  1. Check all power connections:
    • On the rear of the Cobalt Design
    • The power supply (brick)
    • A known good AC wall outlet
  2. Make sure the power switch is in the "On" position
  3. Verify the Cobalt Design is projecting light.
  4. If the Cobalt Design is projecting light, check the HDMI cable connections.
  5. Check that the Graphics adapter (installed in the computer) is listed in the Windows Device Manager. It must be fully installed, without conflicts, and using the latest drivers from the manufacturer.

Windows Setup

Verify the Windows Display settings:

  1. Right-click on the desktop and select "Display Settings".
    Windows_RightClickDisplaySettings.png
  2. The projector of the Cobalt Design must be detected as an external projector with the following settings
    • Resolution: 1280x800
    • Orientation: Landscape
    • Multiple Displays: Extend these displays
      CobaltDesign_DisplaySettings.png
  3. Also ensure the displays are positioned as shown, where display "2" is the Cobalt Design.
    CobaltDesign_DisplayPosition.png

Cleaning

Never attempt to clean, insert fingers or any other object inside the camera openings.
CobaltDesign_NoCleanCamera.png

The projector lens can be cleaned with a dry microfiber cloth. After cleaning adjustment of the focus of the projector may be necessary.
CobaltDesign_CleanProjector.png

Exposure and Focus Issues

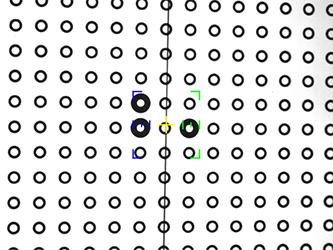
Shown below are examples of common exposure and focus Issues. Most issues can be corrected via software settings within RevEng or adjusting the position of the Cobalt Design or the calibration plate.

CobaltDesign_ExposureGood.png

Good

  • No adjustment necessary

CobaltDesign_ExposureOver.png

Overexposure

  • Adjust the "Exp factor" and "Exposure" settings within the RevEng Scanner Settings window

CobaltDesign_ExposureUnder.png

Underexposure

  • Adjust the "Exp factor" and "Exposure" settings within the RevEng Scanner Settings window

CobaltDesign_Blurry.png

Blurry/Out of Focus

  • Adjust the working distance by moving the Cobalt Design or the calibration plate until the vertical black line aligns with the yellow cross.
  • Adjust the focus dial on the top of the unit

CobaltDesign_WrongPosition_Dust.png

Wrong position and areas of dust or humidity

  • Adjust the position by moving the Cobalt Design or the calibration plate
  • Ensure the calibration plate is clean, dry, and free of defects

Manipulator (Rotary Table)

If RevEng can not recognize or communicate with the manipulator (rotary table), verify the 

  1. Check all power connections:
    • On the rear of the Cobalt Design
    • The power supply (brick)
    • A known good AC wall outlet
  2. Make sure the power switch is in the "On" position
  3. Check the USB 3.0 cable connections between the manipulator (rotary table) and the computer. Also ensure the USB port on your computer is functional and supports USB 3.0 peripherals.
  4. Verify the proper configuration file has been loaded, see Description Files above.