                     
As-Built As-Built - Revit As-Built - AutoCAD VirtuSurv - VirtuSurv 2018 As-Built - Modeler VirtuSurv - VirtuSurv 2019          
BuildIT BuildIT - Projector BuildIT - Construction BuildIT - Metrology              
CAM2 CAM2 - SmartInspect CAM2 - 2023 CAM2 - 2018 CAM2 - Measure 10 CAM2 - Measure Q CAM2 - Measure X CAM2 - Measure 3/4 CAM2 - AnthroCAM CAM2 - 2019 CAM2 - 2020
CAM2 CAM2 - 2021                  
Cobalt 3D Imager 3D Imager - Cobalt                  
Cobalt Design Cobalt Design - M Cobalt Design - S Cobalt Design - Dual              
Computers Computers - All Computers                  
FARO Aras 360 & CAD Zone FARO CAD Zone - Fire & Insurance FARO CAD Zone - Crime & Crash FARO CAD Zone - CZ Point Cloud FARO CAD Zone - First Look Pro FARO 360 - Reality FARO 360 - HD FARO 360 - Blitz FARO 360 - Genius    
FARO Connect FARO Connect - Connect                  
FARO Zone present4D - present4D                  
FARO Zone 2D FARO Zone 2D - 2018 FARO Zone 2D - 2019 FARO Zone 2D - 2020 FARO Zone 2D - 2021 FARO Zone 2D - 2022 FARO Zone 2D - 2023        
FARO Zone 3D FARO Zone 3D - 2018 FARO Zone 3D - 2019 FARO Zone 3D - 2020 FARO Zone 3D - 2021 FARO Zone 3D - 2022 FARO Zone 3D - 2023 FARO Zone 3D - 2024      
FARO Zone 3D Advanced FARO Zone 3D Advanced - 2018 FARO Zone 3D Advanced - 2019 FARO Zone 3D Advanced - 2020 FARO Zone 3D Advanced - 2021 FARO Zone 3D Advanced - 2022          
FaroArm/ScanArm FaroArm/ScanArm - Quantum S FaroArm/ScanArm - Quantum M FaroArm/ScanArm - Quantum E FaroArm/ScanArm - Edge FaroArm/ScanArm - Fusion FaroArm/ScanArm - Prime FaroArm/ScanArm - Platinum FaroArm/ScanArm - Legacy Quantum FaroArm/ScanArm - Titanium FaroArm/ScanArm - Advantage
FaroArm/ScanArm FaroArm/ScanArm - Digital Template FaroArm/ScanArm - Gage FaroArm/ScanArm - Quantum S Max FaroArm/ScanArm - Quantum M Max FaroArm/ScanArm - Quantum E Max FaroArm/ScanArm - Gage Max        
GeoSLAM Software GeoSLAM Software - Connect GeoSLAM Software - Draw GeoSLAM Software - Hub GeoSLAM Software - Volumes            
GeoSLAM ZEB GeoSLAM ZEB - Horizon GeoSLAM ZEB - Horizon RT GeoSLAM ZEB - Revo GeoSLAM ZEB - Revo RT GeoSLAM ZEB - Go          
Hand Held Scanner 2D Hand Held Scanner - ScanPlan 3D Hand Held Scanner - Freestyle3D 3D Hand Held Scanner - Freestyle3D X 3D Hand Held Scanner - Freestyle3D Objects 3D Hand Held Scanner - Freestyle 2          
Language Quality HT MT AT NT INT - Internal Sales - Internal Resources Sales - Order and Quote Sales - Product Info Sales - Sales Readiness Sales - Training
Language Quality Sales - Product Launch Sales - Promotions CS - Quote to Invoice CS - Phone System CS - New Hire Training CS - General CS - Product Info CS - Licensing CS - Procedures General CS - Procedures Salesforce
Language Quality CS - Procedures Loaner CS - Procedures SAP                
Languages Language - English Language - Japanese Language - German Language - Chinese Language - Spanish Language - Italian Language - Portuguese Language - French Language - Korean  
Laser Projector RayTracer - RayTracer Laser Projector - Tracer M Laser Projector - Tracer SI              
Laser Radar Imaging Laser Radar - VectorRI                  
Laser Scanner 3D Laser Scanner - Focus S 3D Laser Scanner - Focus M 3D Laser Scanner - Focus3D 3D Laser Scanner - Focus3D X 3D Laser Scanner - Focus3D X HDR 3D Laser Scanner - Focus3D S 3D Laser Scanner - Photon 3D Laser Scanner - Focus S Plus 3D Laser Scanner - Swift 3D Laser Scanner - Focus Premium
Laser Scanner 3D Laser Scanner - Focus Core                  
Laser Tracker Laser Tracker - Vantage Laser Tracker - ION Laser Tracker - Vantage S Laser Tracker - Si Laser Tracker - X Laser Tracker - Xi Laser Tracker - Vantage E Laser Tracker - Vantage S6 Laser Tracker - Vantage E6  
Legacy Gage Legacy Gage - Bluetooth Legacy Gage - Plus Legacy Gage - Standard Legacy Gage - Power            
Legacy Software Legacy Software - CAM2 Gage Legacy Software - Gage Software Legacy Software - Insight              
Mobile Scanner Mobile Scanner - Orbis                  
PointSense PointSense - Basic PointSense - Pro PointSense - Building PointSense - Plant PointSense - Heritage PointSense - Revit CAD Plugin - TachyCAD Building CAD Plugin - TachyCAD Archeology CAD Plugin - TachyCAD Interior CAD Plugin - PhoToPlan Basic
PointSense CAD Plugin - PhoToPlan CAD Plugin - PhoToPlan Pro CAD Plugin - PhoToPlan Ultimate CAD Plugin - DisToPlan CAD Plugin - MonuMap CAD Plugin - hylasFM CAD Plugin - VirtuSurv      
RevEng RevEng - RevEng                  
ScanArm ScanArm - Design ScanArm 2.0 ScanArm - Design ScanArm ScanArm - Forensic ScanArm ScanArm - Design ScanArm 2.5C            
SCENE SCENE - Capture and Process SCENE - WebShare Server and 2Go SCENE - WebShare 2Go App SCENE - 2018 SCENE - 7.x SCENE - 6.x SCENE - 5.x SCENE - 4.x SCENE - LT SCENE - 2019
SCENE SCENE - 2go App SCENE - 2020 SCENE - 2021 SCENE - 2022 SCENE - 2023          
Serial FaroArm Serial FaroArm - Silver Serial FaroArm - Gold Serial FaroArm - Bronze              
Sphere FARO Sphere - Sphere                  
Visual Inspect Visual Inspect - App Visual Inspect - CAD Translator                
WebShare WebShare - Enterprise WebShare - WebShare Cloud                

3D Hand Held Scanner

Freestyle3D Objects

Freestyle3D X

Freestyle3D

FARO® Knowledge Base

Scanning and Registration Guide FARO Freestyle

Freestyle3D Scanner

Overview

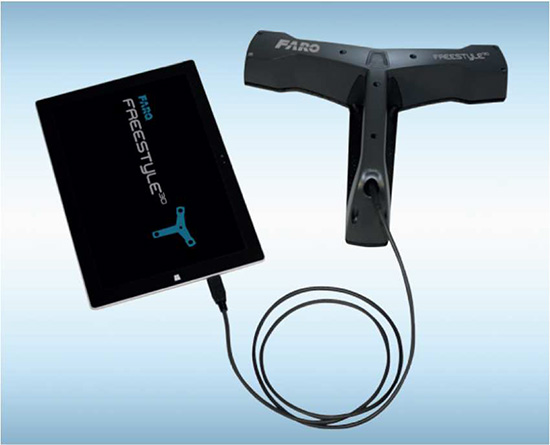
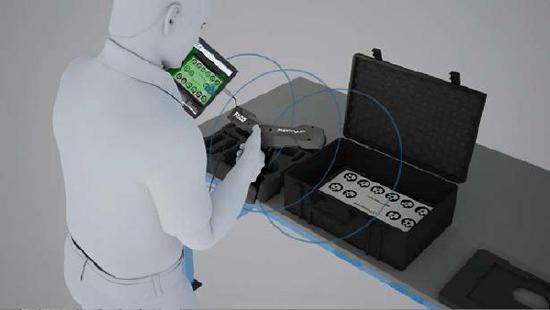
This guide allows you easily scan your area with the Freestyle 3D. It will also show how you can Process, Register, Explore. and Export your point cloud.

  • Click here to download a PowerPoint version of this article.

Setup and Scanning

Connection to the Tablet

  1. Plug the Freestyle 3D USB cable into a USB port on your tablet. The red status LED will light up.
  2. Wait until Scene Capture detect the Freestyle 3D. Scene Capture will show a loading message.
  3. As soon as your Freestyle is ready, the red status LED will switch off and the blue LED will light up.
image 1 connection to the tablet.jpg

Start a Scan

  1. To start a scan, press the button on the Freestyle 3D or tap the record button in the software.

image 2 start a scan.jpg

Scan in Process – While Recording

  1. Move the device slowly and constantly across the object to be scanned
  • Try to move the device in circles or loops
  • Try to finish recording at the starting place
  • Try to capture data within the intended range (0.5 to 3m). Freestyle3D Objects models (0.3m - 0.8m)
image 4 scan in process 2.jpg

If Tracking is Lost

  1. Try to move the Freestyle 3D so, that the video view and the view in the small window match.
  2. Then, a green and red cross-shaped icon appears in the live video view. Try to move the Freestyle so, that the red and green crosses match and then the tracking will resume automatically.

image 5 if tracking is lost.jpg

Process and Register Scans
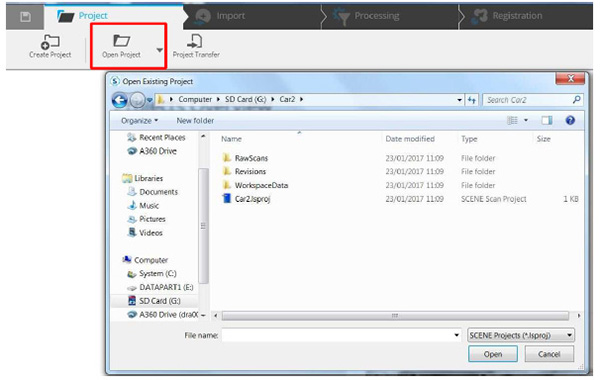
Open your Project

  1. If you’ve started SCENE, click on Project and Open Project. A window opens up and you can choose the location of your scan project.

  2. The project overview appears. On the right side you can see the project content.

image 6 open your project.jpg

Process your Scans

In the next step you will process your scan data.

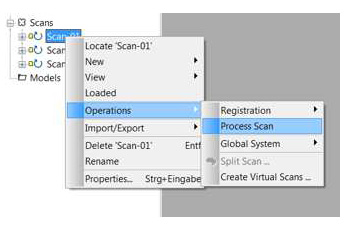
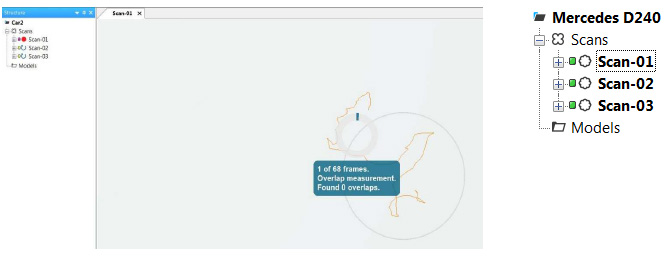
  1. Right click on one or more scans and select >Operations >Process Scans.
  2. Now the scans will be processed. You can see the status in the middle of the screen. After your scans are processed, you will see a green square next to the name (e.g.Scan-01).

image 8 process your scans.jpg

image 9 process your scans 2.jpg

Registration of your Scan Data

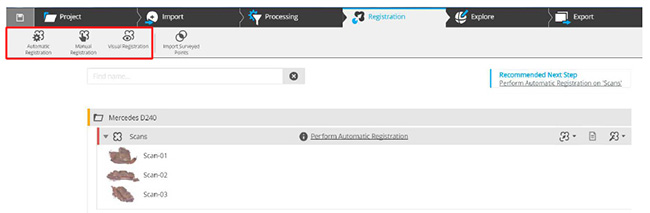
  1. You can access the Registration menu by clicking on the button Registration. Here you can choose between Automatic, Manual and Visual registration. You may want to choose Manual Registration if you haven’t worked with targets or limited overlapping areas.
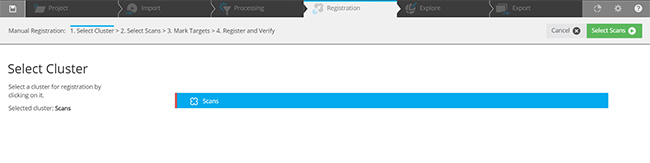
  2. Select your cluster scans and click on Select Scans. Here you can select your first and second scan and click on Mark Targets.
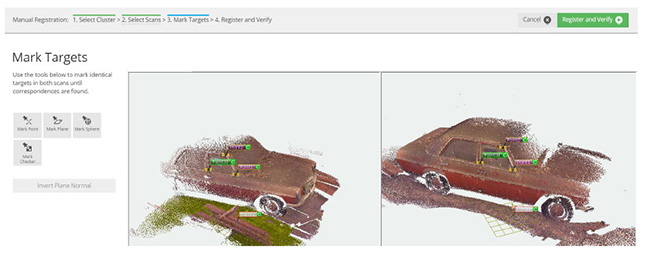
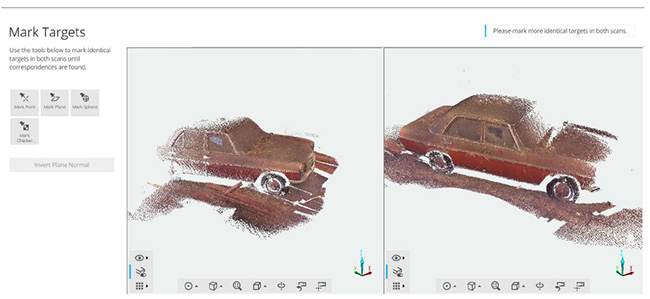
image 10 registration of your scan data.jpg

image 1 registration of your scan data 2.jpg

 Place your Scans

  1. On the left side, you see Scan 1 and on the right side Scan 2. You can choose which correspondences you have and what you want to select (points, spheres, checkerboards or planes).

image 14 place your scans.jpg

  1. You need minimum three common references for your registration. If you have selected these references, they automatically have the same name.
    Now you can click on Register and Verify for the next step.

image 15 place your scans 2.jpg

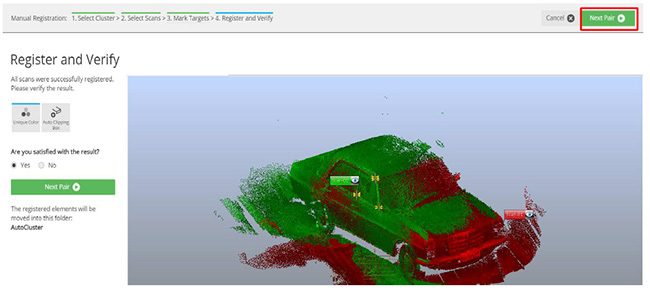
  1. You can see the two Scans in different colors (Scan-01 in red, Scan-02 in green). If you are satisfied with the result, click on Yes. If not, then you will have to mark more or other points for the registration. Repeat this operation for the other scans you have.

image 16 place your scans 3.jpg
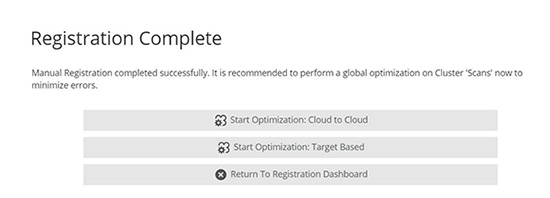
  1. Once finished, you have the possibility to optimize your registration with the following options. Optimization Cloud to Cloud, Target Based or go back to the dashboard.

image 17 place your scans 4.jpg

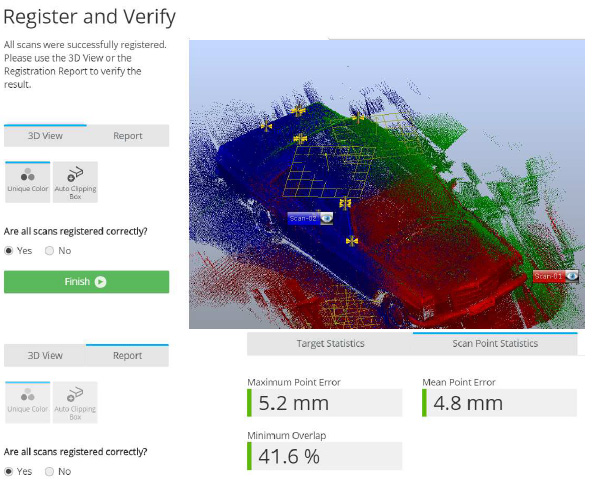
  1. After the optimization, you will see your Scans in the 3D view and you can also access a report. If everything is processed correctly click on Yes. Now you can click on Finish.

image 18 place your scans 5.jpg
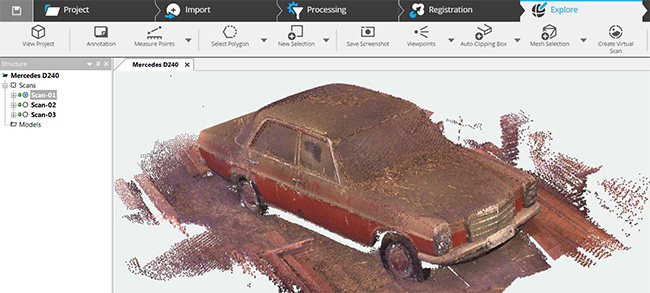
  1. After the registration is completed, you can go to Explore and the 3D view from your open scans.

image 19 software-explore.jpg
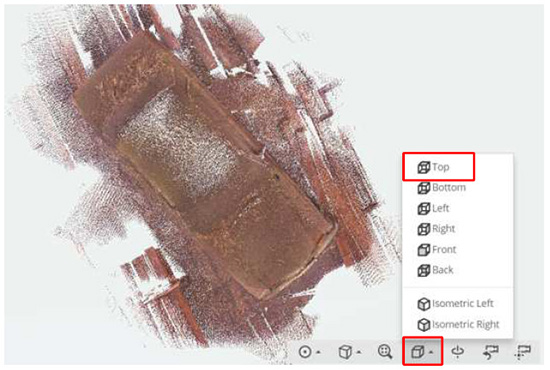
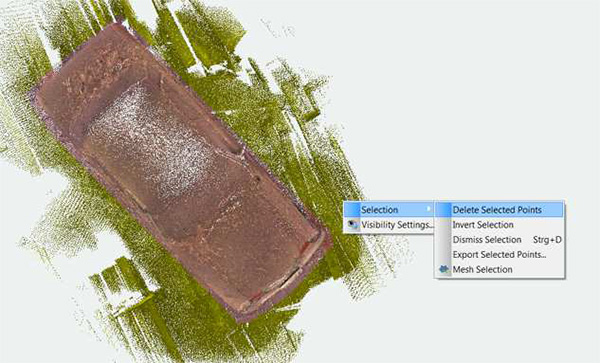
  1. The next step is to delete the scan points you don’t want. For this, Top view provides the easiest access.

image 20 software_explore 2.jpg
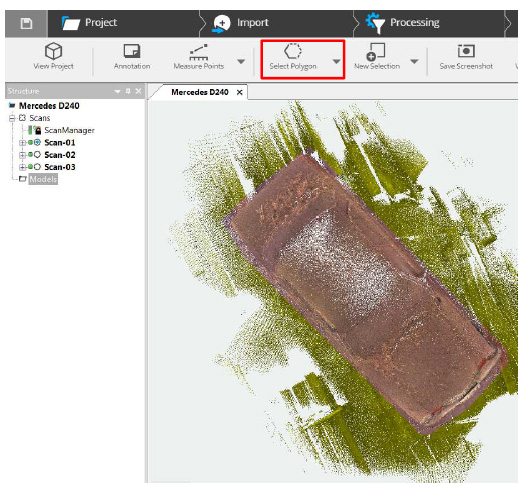
  1. You can select scan points by Select Polygon (or via the drop-down menu Select Brush). Mark all points you want to delete.

image 21 software_delete scan points.jpg

  1. Right-click on the selection and choose Selection> Delete Selected Scan Points.

image 22 software_delete scan points 2.jpg

  1. You can repeat the same steps for the Side view until you have a clean scanning project. If you don’t want to delete any scan points, you can also create a Clipping box and hide these points.
image 23 software_delete scan points 3.jpg
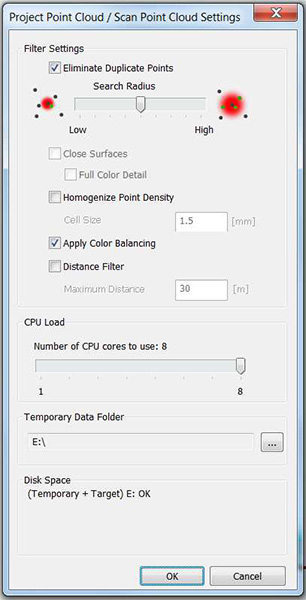
  1. In preparation for the export, create a Project point cloud. Go to Project Point Cloud> Create. Then save your project.

image 24 software_delete scan points 4.jpg

  1. An options box appears. Here you can eliminate duplicate points, homogenize your point density or apply
    a color balancing. Check your boxes and click on OK. You will receive a message when your project point cloud is finished.

image 25 software_delete scan points 5.jpg
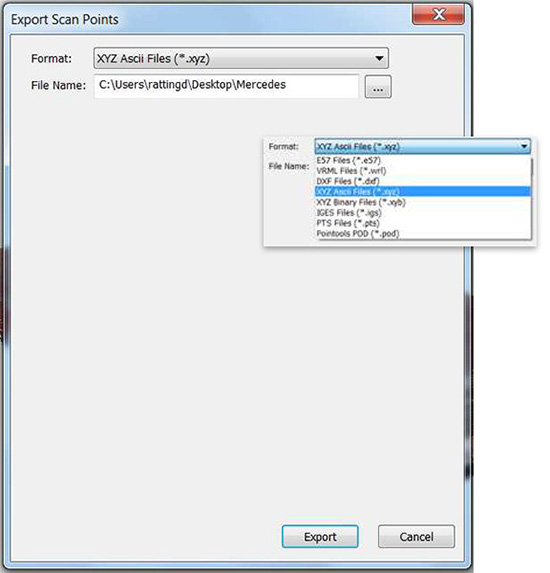
  1. The last step is to export the point cloud, so you can easily work within other software packages for reverse engineering, 3D modeling and much more.

    Here you can export each scan separately (you will get one file for each scan).

    You can also export the project point cloud (you will only get one file).
    Export Project means that you can export your project as SCENE or Recap project.

image 26 software_delete scan points 6.jpg

  1. In this example we will export as a project point cloud. So click on Export Project Point Cloud and a window appears.

    Here you can select your file format and file name. Click on Export and the export starts.
image 27 software_project_point_cloud.jpg