                     
As-Built As-Built - Revit As-Built - AutoCAD VirtuSurv - VirtuSurv 2018 As-Built - Modeler VirtuSurv - VirtuSurv 2019          
BuildIT BuildIT - Projector BuildIT - Construction BuildIT - Metrology              
CAM2 CAM2 - SmartInspect CAM2 - 2023 CAM2 - 2018 CAM2 - Measure 10 CAM2 - Measure Q CAM2 - Measure X CAM2 - Measure 3/4 CAM2 - AnthroCAM CAM2 - 2019 CAM2 - 2020
CAM2 CAM2 - 2021                  
Cobalt 3D Imager 3D Imager - Cobalt                  
Cobalt Design Cobalt Design - M Cobalt Design - S Cobalt Design - Dual              
Computers Computers - All Computers                  
FARO Aras 360 & CAD Zone FARO CAD Zone - Fire & Insurance FARO CAD Zone - Crime & Crash FARO CAD Zone - CZ Point Cloud FARO CAD Zone - First Look Pro FARO 360 - Reality FARO 360 - HD FARO 360 - Blitz FARO 360 - Genius    
FARO Connect FARO Connect - Connect                  
FARO Zone present4D - present4D                  
FARO Zone 2D FARO Zone 2D - 2018 FARO Zone 2D - 2019 FARO Zone 2D - 2020 FARO Zone 2D - 2021 FARO Zone 2D - 2022 FARO Zone 2D - 2023        
FARO Zone 3D FARO Zone 3D - 2018 FARO Zone 3D - 2019 FARO Zone 3D - 2020 FARO Zone 3D - 2021 FARO Zone 3D - 2022 FARO Zone 3D - 2023 FARO Zone 3D - 2024      
FARO Zone 3D Advanced FARO Zone 3D Advanced - 2018 FARO Zone 3D Advanced - 2019 FARO Zone 3D Advanced - 2020 FARO Zone 3D Advanced - 2021 FARO Zone 3D Advanced - 2022          
FaroArm/ScanArm FaroArm/ScanArm - Quantum S FaroArm/ScanArm - Quantum M FaroArm/ScanArm - Quantum E FaroArm/ScanArm - Edge FaroArm/ScanArm - Fusion FaroArm/ScanArm - Prime FaroArm/ScanArm - Platinum FaroArm/ScanArm - Legacy Quantum FaroArm/ScanArm - Titanium FaroArm/ScanArm - Advantage
FaroArm/ScanArm FaroArm/ScanArm - Digital Template FaroArm/ScanArm - Gage FaroArm/ScanArm - Quantum S Max FaroArm/ScanArm - Quantum M Max FaroArm/ScanArm - Quantum E Max FaroArm/ScanArm - Gage Max        
GeoSLAM Software GeoSLAM Software - Connect GeoSLAM Software - Draw GeoSLAM Software - Hub GeoSLAM Software - Volumes            
GeoSLAM ZEB GeoSLAM ZEB - Horizon GeoSLAM ZEB - Horizon RT GeoSLAM ZEB - Revo GeoSLAM ZEB - Revo RT GeoSLAM ZEB - Go          
Hand Held Scanner 2D Hand Held Scanner - ScanPlan 3D Hand Held Scanner - Freestyle3D 3D Hand Held Scanner - Freestyle3D X 3D Hand Held Scanner - Freestyle3D Objects 3D Hand Held Scanner - Freestyle 2          
Language Quality HT MT AT NT INT - Internal Sales - Internal Resources Sales - Order and Quote Sales - Product Info Sales - Sales Readiness Sales - Training
Language Quality Sales - Product Launch Sales - Promotions CS - Quote to Invoice CS - Phone System CS - New Hire Training CS - General CS - Product Info CS - Licensing CS - Procedures General CS - Procedures Salesforce
Language Quality CS - Procedures Loaner CS - Procedures SAP                
Languages Language - English Language - Japanese Language - German Language - Chinese Language - Spanish Language - Italian Language - Portuguese Language - French Language - Korean  
Laser Projector RayTracer - RayTracer Laser Projector - Tracer M Laser Projector - Tracer SI              
Laser Radar Imaging Laser Radar - VectorRI                  
Laser Scanner 3D Laser Scanner - Focus S 3D Laser Scanner - Focus M 3D Laser Scanner - Focus3D 3D Laser Scanner - Focus3D X 3D Laser Scanner - Focus3D X HDR 3D Laser Scanner - Focus3D S 3D Laser Scanner - Photon 3D Laser Scanner - Focus S Plus 3D Laser Scanner - Swift 3D Laser Scanner - Focus Premium
Laser Scanner 3D Laser Scanner - Focus Core                  
Laser Tracker Laser Tracker - Vantage Laser Tracker - ION Laser Tracker - Vantage S Laser Tracker - Si Laser Tracker - X Laser Tracker - Xi Laser Tracker - Vantage E Laser Tracker - Vantage S6 Laser Tracker - Vantage E6  
Legacy Gage Legacy Gage - Bluetooth Legacy Gage - Plus Legacy Gage - Standard Legacy Gage - Power            
Legacy Software Legacy Software - CAM2 Gage Legacy Software - Gage Software Legacy Software - Insight              
Mobile Scanner Mobile Scanner - Orbis                  
PointSense PointSense - Basic PointSense - Pro PointSense - Building PointSense - Plant PointSense - Heritage PointSense - Revit CAD Plugin - TachyCAD Building CAD Plugin - TachyCAD Archeology CAD Plugin - TachyCAD Interior CAD Plugin - PhoToPlan Basic
PointSense CAD Plugin - PhoToPlan CAD Plugin - PhoToPlan Pro CAD Plugin - PhoToPlan Ultimate CAD Plugin - DisToPlan CAD Plugin - MonuMap CAD Plugin - hylasFM CAD Plugin - VirtuSurv      
RevEng RevEng - RevEng                  
ScanArm ScanArm - Design ScanArm 2.0 ScanArm - Design ScanArm ScanArm - Forensic ScanArm ScanArm - Design ScanArm 2.5C            
SCENE SCENE - Capture and Process SCENE - WebShare Server and 2Go SCENE - WebShare 2Go App SCENE - 2018 SCENE - 7.x SCENE - 6.x SCENE - 5.x SCENE - 4.x SCENE - LT SCENE - 2019
SCENE SCENE - 2go App SCENE - 2020 SCENE - 2021 SCENE - 2022 SCENE - 2023          
Serial FaroArm Serial FaroArm - Silver Serial FaroArm - Gold Serial FaroArm - Bronze              
Sphere FARO Sphere - Sphere                  
Visual Inspect Visual Inspect - App Visual Inspect - CAD Translator                
WebShare WebShare - Enterprise WebShare - WebShare Cloud                

BuildIT

Metrology

FARO® Knowledge Base

Perform a Station Move in BuildIT for the Laser Tracker and Other Devices

Objective

Perform a Station Move in BuildIT for the FARO® Laser Tracker and other devices. This workflow is applicable with other hard probe devices such as the FaroArm.

You'll learn how to:

  • A simple workflow for aligning a FARO Laser Tracker and other devices positioned at different locations around the inspected part.
  • Connect to a device and record drift points.
  • Connect new devices and align to recorded drift points as reference

Connect Device and Record Drift Points

This section describes how to record Drift Points using a FARO Laser Tracker.
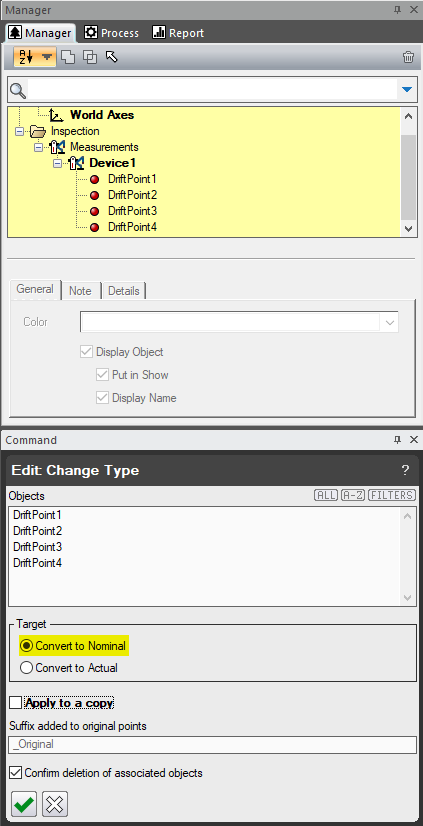
 covert_to_nominal_openpane.png

  1. Open “File > New
  2. Add and connect to the device.
    1. Select “Measure > Device Manager”  devicemanager_icon.png
    2. Fill the information for Device Type and Device Model
    3. Click Add and the broker will open 
    4. In the broker, hit Connect
    5. Once the device is connected, close the Device Manager.
       
  3. Place the Spherically Mounted Retroreflector (SMR) in a drift nest used to measure the drift points.
    1. Drift Points: Points that can be used to align a new device after a station move
    2. Drift Nest: Pucks repeatable points located in the environment of the inspected part as reference points. Accessories are available at FARO, go to See Also.
  4. Select “Measure > Record Point”.  recordpoint_icon.png
  5. Press Measure measure_icon.png  and Accept. accept_icon.png
  6. Repeat locating the SMR in the remaining drift nests. Measure and Accept each one of the drift points and close Record Point command.
    1. Minimum quantity of drift points is three, ideally at least six to overcome the risk of having drift nest displacement, but more can be used depending on the application. 
    2. More drift points may be added afterward if needed for subsequent device relocations.
  7. Select "Edit > Change Type”.  changetype_icon.png
  8. Select all drift points that were measured. Tips for helping selection: Press FILTERS and select Point: Measurement.
  9. Make sure that “Convert to Nominal” is checked and Apply. apply_icon.png


Connect New Devices and Align to Recorded Drift Points

After taking all the necessary measurements at the current location, we are ready to relocate the device and take new measurements.driftpoint1_openpane.png
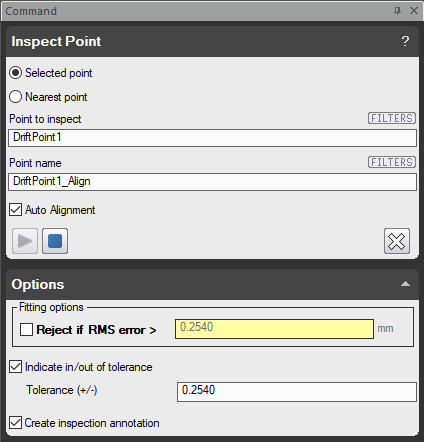
We will add a new device to the model before connecting to it

This section describes how to align a new device to the recorded drift points.
 

  1. Connect to the device.
    1. Refer to Step 2 above.
      Tip: Select Reconnect under Device Manager or go to “Measure > Quick Connect/Relocatequickconnect_icon.jpg
  2. Select "Measure > Inspect Pointinspectpoint_icon.png
    1. Check Auto Alignment
       
  3. Select a drift point and locate the RMS at the respective drift nest.

    Tips for helping the selection: Press FILTERS and select Point: Measurement
     
  4. Press Measure measure_icon.png and Accept. accept_icon.png
  5. Repeat selecting each created drift point and placing the SMR in the corresponding drift nest.
     
  6. Verify that the RMS of the alignment is in a valid range (depending on the application).
    You can exclude out-of-tolerance points by clicking Delete Pointdeletepoint_icon.png
     
  7. If other device locations and more drift points are required, repeat all steps for recording a new drift point under Connect Device and Record Drift Points.

    If other device relocations can be performed with the existing set of drift points, repeat steps under Connect New Devices and Align to Recorded Drift Points.

Recap

Congratulations, you have completed the Perform a Station Move in BuildIT for the Laser Tracker and Other Devices Module!

By now you should have a grasp of how to:

  • A simple workflow for aligning a FARO Laser Tracker and other devices positioned at different locations around the inspected part.
  • Connect to a device and record drift points.
  • Connect new devices and align to recorded drift points as reference.


  • Was this article helpful?