Using the Record Auto-Cloud in BuildIT Metrology

Overview
For recording individual points or clouds in an interactive or semi-automated way, "Measure > Record Cloud" command can be used.
This command can be automated but it doesn't provide a feedback mechanism to programmatically confirm when a measurement has started and does not provide a convenient mechanism to programmatically stop a measurement.
The Record Auto-Cloud command allows performing the same measurement as Record Cloud, in addition to running a Python script in parallel in a secondary thread while the command is open. The Python environment is preserved, so that all the Python objects created prior to launching the command can be accessed while the command is open.
In addition to the Python script running in parallel, the Record Auto-Cloud offers an addition option: Wait for data before accept.
- If True, the command will return once both the Python script has returned and the number of Samples defined in the Triggering section have been reached.
- If False, the command will return as soon as the Python script has returned.
- The command will still stop recording new measurements once the Samples limit has been reached, but it will not return until the script has returned as well.
Use cases:
- An external application or system can send events with precise timing for starting and stopping measurements
- Performing handshakes with external applications or systems while BuildIT is performing a measurement
A current limitation with the Record Auto-Cloud command is that the UI is not available to the Python script running in the secondary thread, meaning that functions such as buildit.ui.messagebar.message() will be ignored. To output messages to a console while the command is running, buildit.util.open_console() can be used.
Performing a Measurement Using Record Auto-Cloud
You'll learn how to:
- Create a Process with Record Auto-Cloud command
- Run a Process with Record Auto-Cloud command
Tutorial Download
If you would like to download the file used in this article, download the accompanying Training Data and extract its contents to a folder on your PC.
Create a Process with Record Auto-Cloud Command
- Select "Automate > Edit".

- Click New Process.

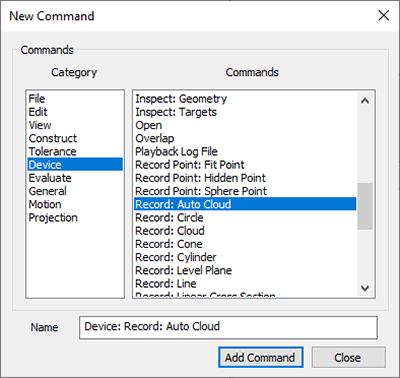
- Click Add Command.

- Select "Device > Record: Auto Cloud" and click Add Command.
- Set the parameters accordingly to your specific need:
- For Triggering, use Time Trigger or Distance Trigger as the Record Type with the maximum number of samples needed and the Distance or Time between measurement, respectively.
- For Python Script, use Inline or External and write the program on the Script field or attach it on the Filename field, respectively.
- Keep Wait For Data Before Accept set to True to auto-accept the measurements.

- Click Save Process
 to save the file at the desired location.
Run a Process with Record Auto-Cloud
This section shows how to trigger an event with precise timing to stop the measurements. In the example below, the Python script waits for an external signal to stop the measurement. In this case, the external signal is sent by opening a web browser and trying to reach the address http://localhost:65432/
This example uses socket messaging.
- Launch BuildIT
- Go to "Automate > Play Process" or press F5 and play "Record Auto Cloud Example.process". This process will:
- Add and connect to a simulated tracker.
- Instantiate a socket messaging object.
- Run the Record Auto-Cloud command while listening the external application's signal through the Python script to stop the measurements.
- Open a browser at address http://localhost:65432/ to interrupt measurement as indicated in the instructions. The measurements will stop and auto-accept.
The same concept may be use for starting the measurement and handshakes with the external application.
- Close immediately if Wait for data before accept is False
- Close or as soon as the number of Samples has been reached, if Wait for data before accept is True