Login/Logout Commands and User Level Profiles with BuildIT Operator

Overview
In this article you will find a description of the following commands:
- Windows Login: Login to BuildIT as a Windows user and set the User Level accordingly
- BuildIT Login: Login to BuildIT as a custom user and set the User Level accordingly
- Logout: Logout of BuildIT
These commands are completely optional to projection workflows, but for customers that want additional traceability and control, they can be set up to capture username and disable commands based on their assigned permission levels.
FAQs related to this topic are also included below for your reference.
Login / Logout Description
In the Operator workbench only, you will find Windows Login, BuildIT Login and Logout in the toolbar as well as in the File menu.
Clicking the login command  will pop up the Login Interface:
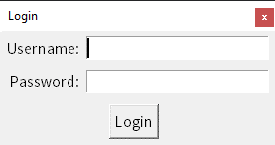
Windows Login:
- The Username field will accept any Windows User that is defined in the Users.config file (see Related Files).
- The Password for a given user name stored and managed by Windows. In other words, your Windows account password is the same one used in BuildIT.
BuildIT Login:
- Both the Username and the Password fields will accept any custom user and its password that are defined in the Users.json file (see Related Files). A maximum of three login attempts is allowed. If authentication fails 3 times, the user will be locked.
Clicking the logout command  will restore to "no user" mode, which has a user level of 0 (maximum restriction) when there is not a user logged in.
The Username is used for traceability on reports by tagging the name with their operations (i.e. measurements, completed layers, etc.) while the User Level is used to restrict the use of BuildIT user interface accordingly (i.e. it defines what commands are enable/unable for the current user). Both Username and User Level will be shown on the BuildIT title bar when logged in.
User Level Description
The User Level may be defined as follows:
| 0 - Observers | Users at this level can only open and view an existing BuildIT file to look at the results. They cannot make any modifications. This is equivalent to the "Viewer" mode that is enabled if there is no license detected. |
| 1 - Operators | Users at this level can open an existing file an run through a predetermined process but should not be allowed to execute operations outside this defined workflow (process). |
| 2 - Users | Users at this level are regular users or Operators with the ability to assemble their own command sequences, likely following a prescribed workflow (external), but with some ability to backtrack or fix measurements on minor operational errors. |
| 3 - Supervisors | Users at this level can bypass some validations or gates defined to limit any out-of-spec parts and accept them anyway. |
| 4 - Specialists | Users at this level are in charge of defining the workflow for their organization or cover a wide range of applications and are able to determine the proper methods to be applied in each case. |
| 5 - Administrators | Users at his level have full control of the application, including defining site-specific configuration parameters and customizing the application and restricted parameters. |
Related Files
| Name | Location | Description |
|---|---|---|
| Users.config |
C:\Users\UserName\Documents\BuildIT Note: This file is only created after the first time the Login command has been launched. |
Defines the User Level for each Windows user and/or group. When initially created, the "users" section will be empty. You can add any existing username. The "groups" section will already be populated with the groups made available by the IT administrators managing the computer. You can edit the permission level assigned to each group. |
| Users.json |
Location is set by the user. Note: This file needs to be manually created.
|
Defines the list of users when using BuildIT Login only. It is not required for Windows Login. It also defines the Usernames, User Level, and Password. |
| login_path.config |
C:\Users\UserName\Documents\BuildIT Note: This file needs to be manually created |
Defines the location of the Users.json file so that BuildIT can access it and retrieve the list of users when using BuildIT Login only. It is not required for Windows Login. |
| permissions.data |
C:\Program Files\BuildIT\BuildIT Projector 20xx.x\data\profiles\Projector Note: For older versions it is in ..\profiles\Operator |
Defines the minimum User Level required to enable for each command. It also defines the default User Level when launching BuildIT, before anyone inputs their credentials. When first installing BuildIT, it is set at User Level 5 so that there are no restrictions initially. If you wish to enforce user levels, edit this file by setting "defaultUserLevel" to 0. |
FAQs
What is the difference between the user when using Windows Login or BuildIT Login? Are they interchangeable?
When using Windows Login, users are defined by the active Windows user. On the other hand, when using BuildIT Login, users are custom defined. Each type of user needs to use its specific login command. Windows Users cannot login using BuildIT Login and custom users cannot login using Windows Login.
What login command is preferable, Windows Login or BuildIT Login?
While both Windows Login and BuildIT Login have their merits, Windows Login is generally the preferred choice due to its password schema being defined by Windows, which offers a higher level of security. BuildIT Login is designed to be an alternative when Windows Login cannot be used. For instance, it becomes the preferred option in cases where operators lack individual Windows accounts and rely on a single shared account for access.
For Windows Users, how are the permission level define for each Username? How can I define or customize the permission level for each Username?
When you first login, the following message will appear:
“The configuration file for user levels was not found and one was created automatically. It should be reviewed to adjust the level assigned to key user groups.
C:\Users\UserName\Documents\BuildIT\Users.config”
This file is auto populated with all Windows groups, whose User Levels may be edited. You may also set the User Levels individually in the “users” section. If customization is needed, follow these instructions:
- Go to “C:\Users\UserName\Documents\BuildIT”
- Create a copy of the “User.config” file and rename it as “User_old.config”, if needed for backup
- Open Notepad as an administrator
- Open the “User.config” file
- Make changes to the groups’ User Level or add specific Usernames with respective User Level:
- Groups (“groups” section): Change the numbers of each group to the desired values between 0 and 5. Note that the number represent the User Level given to each user of the respective group. Make sure to change the numbers only.
- Users (“users” section): Add the Username and its respective User Level in the following the format
"username": user levelwhere:
"username"is a Windows user login
user levelis a value between 0 and 5.
Example:
    "users": {

        "John Smith": 5

    },
Contact us at support@builditsoftware.com for more details.
For BuildIT Users, how can I setup users and configure it to work in BuildIT?
There are 2 files that need to be manually created: Users.json file and login_path.config.
To create Users.json file:
- Go to your preferred location to store the file containing the list of users. This location should not be obvious for regular users.
- Create a file named “Users.json”
- In this JSON file, define the list of users, along with their passwords and permission levels, using the following format:
{

    "user1":

        {

            "level": 1,

            "password":"password1"

        },

    "user2":

        {

            "level": 2,

            "password":"password2"

        }

}
To create login_path.config file:
- Go to “C:\Users\UserName\Documents\BuildIT”
- Create a file named “login_path.config”
- In this file, specify the path to the Users.json file on a single line. For example: C:\PATH\Users.json
For BuildIT Users, how can I unlock a user that was locked after 3 failed connection attempts?
- Navigate to the folder where the Users.json file was created during setup.
- Delete the file named "LockedUsername.lock," where "LockedUsername" is the specific user that you want to unlock. Once deleted, next time the command BuildIT Login is run, that user would be able to have 3 more attempts.
Contact us at support@builditsoftware.com for more details.
What’s the purpose of this command?
The Username is used for reporting purposes. The User Level is used for enabling/disabling some commands.
Do we have some levels of restrictions, edit, etc.?
Yes, on installation of the software, there are default restrictions according to the User Level (see User Level Description section above). If customization is needed, follow these instructions:
- Go to "C:\Program Files\BuildIT\BuildIT Projector 20xx.x\data\profiles\Projector"
- Create a copy of the “permissions.data” file and rename it as “permissions_old.data”, if needed for backup
- Open Notepad as administrator
- Open the “permissions.data” file
- Change the numbers to the desired values. Note that the number represents the minimum level required to enable the command. Make sure to change the numbers only.
Contact us at support@builditsoftware.com for more details.
Can multiple users log in simultaneously?
By default, only one user can be logged in at a time. However, for workflows where multiple operators are working on the same plan, you may enable the "multiuser" parameter, and then you’ll be able to have multiple names (users) per layer in the report. If desired, follow these instructions:
- Go to “C:\Users\[UserName]\Documents\BuildIT”
- Create a copy of the “User.config” file and rename it as “User_old.config”, if needed for backup
- Open Notepad as administrator
- Open the “User.config” file
- Make the following change:

Contact us at support@builditsoftware.com for more details.
If I enable multiple users, can a mix of Windows Users and BuildIT users connect simultaneously?
Yes, there is no restriction on what time of user is connected. The only restriction is that a Windows Users connects using the Windows Login command and BuildIT user using the BuildIT login command. For example, operators could be defined as BuildIT users and higher level users like Supervisors or Administrators can login with their Windows login information.
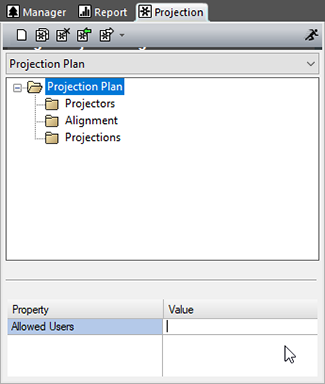
Can I lock projection plans so that they can only be run by specific users?
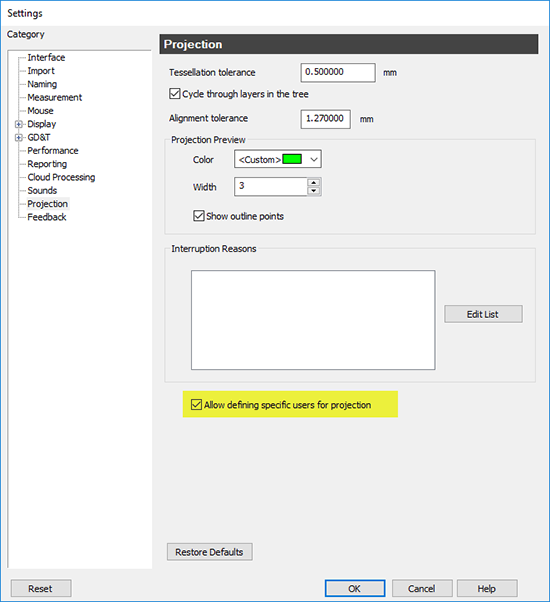
Yes. In order to make it available, go to “File > Settings > Projection”, and check “Allow defining specific users for projection”.
Then, select the projection plan that you want to lock and add the users to the “Allowed Users” property.