                     
As-Built As-Built - Revit As-Built - AutoCAD VirtuSurv - VirtuSurv 2018 As-Built - Modeler VirtuSurv - VirtuSurv 2019          
BuildIT BuildIT - Projector BuildIT - Construction BuildIT - Metrology              
CAM2 CAM2 - SmartInspect CAM2 - 2023 CAM2 - 2018 CAM2 - Measure 10 CAM2 - Measure Q CAM2 - Measure X CAM2 - Measure 3/4 CAM2 - AnthroCAM CAM2 - 2019 CAM2 - 2020
CAM2 CAM2 - 2021                  
Cobalt 3D Imager 3D Imager - Cobalt                  
Cobalt Design Cobalt Design - M Cobalt Design - S Cobalt Design - Dual              
Computers Computers - All Computers                  
FARO Aras 360 & CAD Zone FARO CAD Zone - Fire & Insurance FARO CAD Zone - Crime & Crash FARO CAD Zone - CZ Point Cloud FARO CAD Zone - First Look Pro FARO 360 - Reality FARO 360 - HD FARO 360 - Blitz FARO 360 - Genius    
FARO Connect FARO Connect - Connect                  
FARO Zone present4D - present4D                  
FARO Zone 2D FARO Zone 2D - 2018 FARO Zone 2D - 2019 FARO Zone 2D - 2020 FARO Zone 2D - 2021 FARO Zone 2D - 2022 FARO Zone 2D - 2023        
FARO Zone 3D FARO Zone 3D - 2018 FARO Zone 3D - 2019 FARO Zone 3D - 2020 FARO Zone 3D - 2021 FARO Zone 3D - 2022 FARO Zone 3D - 2023 FARO Zone 3D - 2024      
FARO Zone 3D Advanced FARO Zone 3D Advanced - 2018 FARO Zone 3D Advanced - 2019 FARO Zone 3D Advanced - 2020 FARO Zone 3D Advanced - 2021 FARO Zone 3D Advanced - 2022          
FaroArm/ScanArm FaroArm/ScanArm - Quantum S FaroArm/ScanArm - Quantum M FaroArm/ScanArm - Quantum E FaroArm/ScanArm - Edge FaroArm/ScanArm - Fusion FaroArm/ScanArm - Prime FaroArm/ScanArm - Platinum FaroArm/ScanArm - Legacy Quantum FaroArm/ScanArm - Titanium FaroArm/ScanArm - Advantage
FaroArm/ScanArm FaroArm/ScanArm - Digital Template FaroArm/ScanArm - Gage FaroArm/ScanArm - Quantum S Max FaroArm/ScanArm - Quantum M Max FaroArm/ScanArm - Quantum E Max FaroArm/ScanArm - Gage Max        
GeoSLAM Software GeoSLAM Software - Connect GeoSLAM Software - Draw GeoSLAM Software - Hub GeoSLAM Software - Volumes            
GeoSLAM ZEB GeoSLAM ZEB - Horizon GeoSLAM ZEB - Horizon RT GeoSLAM ZEB - Revo GeoSLAM ZEB - Revo RT GeoSLAM ZEB - Go          
Hand Held Scanner 2D Hand Held Scanner - ScanPlan 3D Hand Held Scanner - Freestyle3D 3D Hand Held Scanner - Freestyle3D X 3D Hand Held Scanner - Freestyle3D Objects 3D Hand Held Scanner - Freestyle 2          
Language Quality HT MT AT NT INT - Internal Sales - Internal Resources Sales - Order and Quote Sales - Product Info Sales - Sales Readiness Sales - Training
Language Quality Sales - Product Launch Sales - Promotions CS - Quote to Invoice CS - Phone System CS - New Hire Training CS - General CS - Product Info CS - Licensing CS - Procedures General CS - Procedures Salesforce
Language Quality CS - Procedures Loaner CS - Procedures SAP                
Languages Language - English Language - Japanese Language - German Language - Chinese Language - Spanish Language - Italian Language - Portuguese Language - French Language - Korean  
Laser Projector RayTracer - RayTracer Laser Projector - Tracer M Laser Projector - Tracer SI              
Laser Radar Imaging Laser Radar - VectorRI                  
Laser Scanner 3D Laser Scanner - Focus S 3D Laser Scanner - Focus M 3D Laser Scanner - Focus3D 3D Laser Scanner - Focus3D X 3D Laser Scanner - Focus3D X HDR 3D Laser Scanner - Focus3D S 3D Laser Scanner - Photon 3D Laser Scanner - Focus S Plus 3D Laser Scanner - Swift 3D Laser Scanner - Focus Premium
Laser Scanner 3D Laser Scanner - Focus Core                  
Laser Tracker Laser Tracker - Vantage Laser Tracker - ION Laser Tracker - Vantage S Laser Tracker - Si Laser Tracker - X Laser Tracker - Xi Laser Tracker - Vantage E Laser Tracker - Vantage S6 Laser Tracker - Vantage E6  
Legacy Gage Legacy Gage - Bluetooth Legacy Gage - Plus Legacy Gage - Standard Legacy Gage - Power            
Legacy Software Legacy Software - CAM2 Gage Legacy Software - Gage Software Legacy Software - Insight              
Mobile Scanner Mobile Scanner - Orbis                  
PointSense PointSense - Basic PointSense - Pro PointSense - Building PointSense - Plant PointSense - Heritage PointSense - Revit CAD Plugin - TachyCAD Building CAD Plugin - TachyCAD Archeology CAD Plugin - TachyCAD Interior CAD Plugin - PhoToPlan Basic
PointSense CAD Plugin - PhoToPlan CAD Plugin - PhoToPlan Pro CAD Plugin - PhoToPlan Ultimate CAD Plugin - DisToPlan CAD Plugin - MonuMap CAD Plugin - hylasFM CAD Plugin - VirtuSurv      
RevEng RevEng - RevEng                  
ScanArm ScanArm - Design ScanArm 2.0 ScanArm - Design ScanArm ScanArm - Forensic ScanArm ScanArm - Design ScanArm 2.5C            
SCENE SCENE - Capture and Process SCENE - WebShare Server and 2Go SCENE - WebShare 2Go App SCENE - 2018 SCENE - 7.x SCENE - 6.x SCENE - 5.x SCENE - 4.x SCENE - LT SCENE - 2019
SCENE SCENE - 2go App SCENE - 2020 SCENE - 2021 SCENE - 2022 SCENE - 2023          
Serial FaroArm Serial FaroArm - Silver Serial FaroArm - Gold Serial FaroArm - Bronze              
Sphere FARO Sphere - Sphere                  
Visual Inspect Visual Inspect - App Visual Inspect - CAD Translator                
WebShare WebShare - Enterprise WebShare - WebShare Cloud                

BuildIT

Projector

Laser Projector

Tracer SI

Tracer M

INT

Internal

FARO® Knowledge Base

ScanAlign Alignment Feature with BuildIT Projector

BuildITProjector-bty.png

Overview

ScanAlign (available in BuildIT Projector 2021.5 and later) speeds up the alignment process by eliminating the need to aim the scanbox to the first 4 retro-targets. It automatically finds and measures all retro-targets in a specified area.

ScanAlign brochure.png

Download this image as a PDF

Trying it out is simple:

  1. Run a traditional alignment as usual, so that the software 'learns' the optimal ScanAlign parameters.
  2. Select the Projectors folder in the plan and set ScanAlign to True

From this point on, the alignment command will use ScanAlign.

Note: ScanAlign requires an Operator Premium or a Planner Premium license. An error message will alert you if your license does not meet these requirements:

ScanAlign_ValidLicense.png

This article goes in depth in explaining every aspect to fine tune it for speed and potentially troubleshoot

ScanAlign - Overview Video


Tracer Setup

First, in order for your Tracer to work well with ScanAlign, none of the targets can be in the blind spots/zones. There are 2 areas of the FOV that will not detect targets:

  1. The area behind the Centre View Crosshair:
    ScanAlign_BehindCrosshairs.png
    • Go to Scan Box in the broker and click the FOV/Center button once to see the FOV, click it a 2nd time to see the Center View Crosshair.
      ScanAlign_ActiveDeviceWindow-FOV-Center.png
  2. Near the left & right sides of FOV
    • For those familiar with the Viewfinder feature (available for TracerSI only), the black strips on the sides are the "blind zones":
      ScanAlign_BlindZones.png
    • Keep targets 6in from the sides at a 15ft range, and 12in from the sides at a 30ft range.
    • Consider rotating/tilting your Tracer up to 90 degrees in order to avoid the blind zones.

Ensure the Tracer is positioned such that none of its targets are in those zones.

Planner: Set ScanAlign Settings in the Projection Plan

There are two ways to set the scan area and resolution for ScanAlign: The easy automated way, or the advanced user-specified way.

Automated

This is the mode by default, and is the easiest way to set it up. You first align your projector the old-fashioned way in order to 'learn' the right settings, and then turn on ScanAlign to align with the new method.

  1. Click Align Projectors in Plan to run a regular alignment routine.
    ScanAlign_AlignProjectorsinPlan.png
    Once successfully aligned, each projector will update its ScanAlign Settings.
  2. Enable the ScanAlign function in the Projection plan.
    • Click the Projectors folder and set LaserScan to True.
    • There is a Target size parameter that can be adjusted.
      • By default, Target size will be set to 1/8in. If you have 1/4in targets (fairly common), set it accordingly, for a 4x speed increase.
      • Note that if you purchased the less common 1/2in targets, it would run 16x faster!
        ScanAlign_TargetSize.png

Now, if you click Align Projectors in Plan it will run ScanAlign.

User-specified

The settings that are automatically updated can also be updated manually. This can be preferable for users that project a variety of parts with the same projectors.

As this is not the default setting, you must turn it off by going to File: Settings: Projection and unchecking "Automatically update ScanAlign Settings after each successful alignment".

Settings AutoUpdate ScanAlign.png

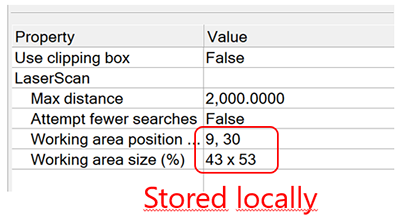
For each Projector's properties, adjust the ScanAlign Settings:

  • Set "Max distance" to the furthest target from the Projector in the active distance units.
    • Overestimating adds a bit of scan time, underestimating risks failing to align. Better to overestimate.
    • To know which unit of distance is active, go to File: Document Properties.
  • “Attempt fewer searches” is better set to False initially, to favor robustness over speed. BuildIT will prompt you in the message bar after a ScanAlign if you can safely benefit from this feature.
    ScanAlign_MaxDistance.png
  • Set the Working Area (i.e. the scan zone) for each Projector:
    1. Open the Setup Page in the Broker
    2. Adjust the Scanbox to fully surround your targets
    3. Click the “Set Working Area” button, which will update the values in the projection planScanAlign_SetWorking Area.png

Now, if you click Align Projectors in Plan it will run ScanAlign.

Operator: Use the same alignment command

For an Operator, there is nothing special to do. All ScanAlign settings should have been previously set up by the Planner. They simply click Align Projectors in Plan as they normally would, and ScanAlign will be launched.
ScanAlign_AlignProjectorsinPlan.png
After that single click, ScanAlign runs through the following process:

  1. Quick scan of the Working Area to set gain values (TracerSI only)
  2. High-resolution scan of the Working Area
  3. Scanbox aims at each detected reflections and measures retro-target when it finds one
  4. The alignment is then calculated and applied.

The Projector is now aligned, and projection can commence.

Notes and Tips

Warning: Mind the Workbench!

  • If you are in the Instant Projection Workbench, the alignment command in the toolbar is different:
    • It opens an interactive panel on the right.
    • It does not recall the Working Area set earlier.
    • It only aligns one Projector at a time.
  • To get the full benefits, use the Planner or Operator workbench.
ScanAlign_InstantProjectionDifference.png

Notes to Users with Multiple Laser Bays:

  • Different laser bays usually need different Working Area positions, and sometimes sizes.
  • To accommodate this, Working Area is not stored in the projection plan. Rather, it is stored locally.
  • As a result, each computer recalls their own working area, independent on the projection plan.
ScanAlign_StoredLocally.png

Notes for Working with Multiple Models:

  • Only one Working Area is stored locally, and it is reused regardless of the projection plan.
  • The ideal Working Area size may vary from one model to another, but we want one that works for all of them.
  • One-size-fits-all: Adjust the Working Area/scanbox to be large enough for any model.
ScanAlign_SetWorking Area-multi.png