Deleting Scan Points in SCENE

Overview
Deleting unnecessary scan points can increase performance times and allow users to create a refined visual project with more accurate measurements. SCENE has several tools which can be used to select scan points for deletion.
NOTE: Unload scans before cleaning, to avoid black areas in shots.
NOTE: Cleaning in quick view will also generate black areas.
Workflow Interface
Deleting Points in 3D View
There are two tools available for selecting scan points to be deleted in 3D View, polygon and brush.
Polygon Selection
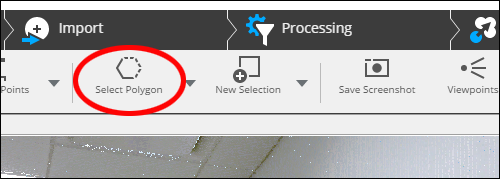
- Click Select Polygon in the Explore menu.
- Click a point in the 3D view to establish a starting point for the polygon.
- Click an additional point, and a yellow line will automatically connect the points.
- Continue clicking points to establish each side of the polygon.

- Double click a point to automatically complete the polygon.
- Right-click the polygon and click Selection > Delete Points.

Note: In SCENE version 2019.1 or later, you will click Current Selection > Delete Points.

Brush Selection
- Click Select Brush from the Select Polygon submenu in the Explore ribbon.

- Click and hold down the mouse button to drag the brush across the scanned surfaces.

- Release the mouse button to complete the selection area.
- Right-click the selection area and click Selection > Delete Points to remove scan points.
Deleting Points in Quick View/ Planar View
There are several tools available for selecting scan points to be deleted in Quick View or Planar View.
- Click the Select Polygon submenu.
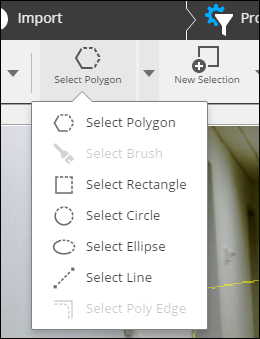
- Select Polygon – Click a point in the view area to define the starting point of the polygon. Click another point, and a straight line will connect the two points. Continue clicking points to define the polygon. Close the polygon by double clicking close to the polygon start point.
- Select Rectangle – Click and drag to create a rectangular marquee. Release the mouse button to define the selection.
- Select Circle – Use the mousewheel to change the diameter of the circular area to be selected. Click to select the area of points.
- Select Ellipse – Click a point to define the starting point of the selection. Drag the mouse to change the length and rotation of the ellipse. Use the mouse wheel to change the width of the ellipse. Click again to define the selection.
- Select Line – Click a point to define the line starting point. Click another point to end the line. Move and click again to create a second line. Double-click to define the selection.
- Select Poly Edge (Planar View only) – This is similar to the regular polygon select tool, except SCENE follows the visible scan point edges in the image. Edge-detection can be turned off by right-clicking and unchecking Snap on Edge. Double click to define the selection.
- Once the selection has been defined. Right-click the selection and click Scan Points > Delete.

Refining a Selection
Use the Selection tools in the Explore ribbon to create more complex selections.

- New Selection - Only one selection area can exist at a time.
- Add Selection - Multiple selection areas can exist. If two areas intersect, they are added together to form one area.
- Subtract Selection - A second selection area can be used to subtract a portion of the existing selection area.
- Intersect Selection - When a second selection area intersects the existing area, only the area formed by that intersection remains.
Classic Interface
Deleting Points in 3D View
There are two tools available for selecting scan points to be deleted in 3D View, polygon and brush.
Polygon Selection
- Click the Polygon Selector icon
 in the 3D Toolbar.
 - Click a scan point to establish a starting point.
- Click an additional point, and a yellow line will automatically connect the points.
- Continue clicking points to establish each side of the polygon.
- Double click a point to automatically complete the polygon.
- Right-click the polygon and click Selection > Delete Points.
Brush Selection
- Click the 3D Brush Selector icon
 in the 3D Toolbar.
 - Click and hold down the mouse button to drag the brush across the scanned surfaces.
- Release the mouse button to complete the selection area.
- Right-click the selection area and click Selection > Delete Points to remove scan points.
Deleting Points in Quick/Planar View
There are several tools available for selecting scan points to be deleted in Quick View or Planar View.
Click the selector type in the Point Selection Toolbar in the main toolbar area.

 Rectanglar Selector – Click and drag to create a rectangular marquee. Release the mouse button to define the selection.
 Line Selector – Click a point to define the line starting point. Click another point to end the line. Move and click again to create a second line. Double-click to define the selection.
 Polygon Selector – Click a point in the view area to define the starting point of the polygon. Click another point, and a straight line will connect the two points. Continue clicking points to define the polygon. Close the polygon by double clicking close to the polygon start point.
 Sphere Selector – Use the mousewheel to change the diameter of the circular area to be selected. Click to select the area of points.
  Ellipse Selector – Click a point to define the starting point of the selection. Drag the mouse to change the length and rotation of the ellipse. Use the mouse wheel to change the width of the ellipse. Click again to define the selection.
 Polygon Edge Selector (Planar View only) – This is similar to the regular polygon select tool, except SCENE follows the visible scan point edges in the image. Edge-detection can be turned off by right-clicking and unchecking Snap on Edge. Double click to define the selection.
Refining a Selection
Use the selection combination tools in the Point Selection Toolbar to create more complex selections.

 New Selection - Only one selection area exists at a time.
  Add Selection - Multiple selection areas can exist. If two areas intersect, they are added together to form one area.
 Subtract Selection - A second selection area can be used to subtract a portion of the existing selection area.
 Intersect Selection - When a second selection area intersects the existing area, only the area formed by that intersection remains.
Keywords:
delete, crop, cut, remove, 3-D view