                     
As-Built As-Built - Revit As-Built - AutoCAD VirtuSurv - VirtuSurv 2018 As-Built - Modeler VirtuSurv - VirtuSurv 2019          
BuildIT BuildIT - Projector BuildIT - Construction BuildIT - Metrology              
CAM2 CAM2 - SmartInspect CAM2 - 2023 CAM2 - 2018 CAM2 - Measure 10 CAM2 - Measure Q CAM2 - Measure X CAM2 - Measure 3/4 CAM2 - AnthroCAM CAM2 - 2019 CAM2 - 2020
CAM2 CAM2 - 2021                  
Cobalt 3D Imager 3D Imager - Cobalt                  
Cobalt Design Cobalt Design - M Cobalt Design - S Cobalt Design - Dual              
Computers Computers - All Computers                  
FARO Aras 360 & CAD Zone FARO CAD Zone - Fire & Insurance FARO CAD Zone - Crime & Crash FARO CAD Zone - CZ Point Cloud FARO CAD Zone - First Look Pro FARO 360 - Reality FARO 360 - HD FARO 360 - Blitz FARO 360 - Genius    
FARO Connect FARO Connect - Connect                  
FARO Zone present4D - present4D                  
FARO Zone 2D FARO Zone 2D - 2018 FARO Zone 2D - 2019 FARO Zone 2D - 2020 FARO Zone 2D - 2021 FARO Zone 2D - 2022 FARO Zone 2D - 2023        
FARO Zone 3D FARO Zone 3D - 2018 FARO Zone 3D - 2019 FARO Zone 3D - 2020 FARO Zone 3D - 2021 FARO Zone 3D - 2022 FARO Zone 3D - 2023 FARO Zone 3D - 2024      
FARO Zone 3D Advanced FARO Zone 3D Advanced - 2018 FARO Zone 3D Advanced - 2019 FARO Zone 3D Advanced - 2020 FARO Zone 3D Advanced - 2021 FARO Zone 3D Advanced - 2022          
FaroArm/ScanArm FaroArm/ScanArm - Quantum S FaroArm/ScanArm - Quantum M FaroArm/ScanArm - Quantum E FaroArm/ScanArm - Edge FaroArm/ScanArm - Fusion FaroArm/ScanArm - Prime FaroArm/ScanArm - Platinum FaroArm/ScanArm - Legacy Quantum FaroArm/ScanArm - Titanium FaroArm/ScanArm - Advantage
FaroArm/ScanArm FaroArm/ScanArm - Digital Template FaroArm/ScanArm - Gage FaroArm/ScanArm - Quantum S Max FaroArm/ScanArm - Quantum M Max FaroArm/ScanArm - Quantum E Max FaroArm/ScanArm - Gage Max        
GeoSLAM Software GeoSLAM Software - Connect GeoSLAM Software - Draw GeoSLAM Software - Hub GeoSLAM Software - Volumes            
GeoSLAM ZEB GeoSLAM ZEB - Horizon GeoSLAM ZEB - Horizon RT GeoSLAM ZEB - Revo GeoSLAM ZEB - Revo RT GeoSLAM ZEB - Go          
Hand Held Scanner 2D Hand Held Scanner - ScanPlan 3D Hand Held Scanner - Freestyle3D 3D Hand Held Scanner - Freestyle3D X 3D Hand Held Scanner - Freestyle3D Objects 3D Hand Held Scanner - Freestyle 2          
Language Quality HT MT AT NT INT - Internal Sales - Internal Resources Sales - Order and Quote Sales - Product Info Sales - Sales Readiness Sales - Training
Language Quality Sales - Product Launch Sales - Promotions CS - Quote to Invoice CS - Phone System CS - New Hire Training CS - General CS - Product Info CS - Licensing CS - Procedures General CS - Procedures Salesforce
Language Quality CS - Procedures Loaner CS - Procedures SAP                
Languages Language - English Language - Japanese Language - German Language - Chinese Language - Spanish Language - Italian Language - Portuguese Language - French Language - Korean  
Laser Projector RayTracer - RayTracer Laser Projector - Tracer M Laser Projector - Tracer SI              
Laser Radar Imaging Laser Radar - VectorRI                  
Laser Scanner 3D Laser Scanner - Focus S 3D Laser Scanner - Focus M 3D Laser Scanner - Focus3D 3D Laser Scanner - Focus3D X 3D Laser Scanner - Focus3D X HDR 3D Laser Scanner - Focus3D S 3D Laser Scanner - Photon 3D Laser Scanner - Focus S Plus 3D Laser Scanner - Swift 3D Laser Scanner - Focus Premium
Laser Scanner 3D Laser Scanner - Focus Core                  
Laser Tracker Laser Tracker - Vantage Laser Tracker - ION Laser Tracker - Vantage S Laser Tracker - Si Laser Tracker - X Laser Tracker - Xi Laser Tracker - Vantage E Laser Tracker - Vantage S6 Laser Tracker - Vantage E6  
Legacy Gage Legacy Gage - Bluetooth Legacy Gage - Plus Legacy Gage - Standard Legacy Gage - Power            
Legacy Software Legacy Software - CAM2 Gage Legacy Software - Gage Software Legacy Software - Insight              
Mobile Scanner Mobile Scanner - Orbis                  
PointSense PointSense - Basic PointSense - Pro PointSense - Building PointSense - Plant PointSense - Heritage PointSense - Revit CAD Plugin - TachyCAD Building CAD Plugin - TachyCAD Archeology CAD Plugin - TachyCAD Interior CAD Plugin - PhoToPlan Basic
PointSense CAD Plugin - PhoToPlan CAD Plugin - PhoToPlan Pro CAD Plugin - PhoToPlan Ultimate CAD Plugin - DisToPlan CAD Plugin - MonuMap CAD Plugin - hylasFM CAD Plugin - VirtuSurv      
RevEng RevEng - RevEng                  
ScanArm ScanArm - Design ScanArm 2.0 ScanArm - Design ScanArm ScanArm - Forensic ScanArm ScanArm - Design ScanArm 2.5C            
SCENE SCENE - Capture and Process SCENE - WebShare Server and 2Go SCENE - WebShare 2Go App SCENE - 2018 SCENE - 7.x SCENE - 6.x SCENE - 5.x SCENE - 4.x SCENE - LT SCENE - 2019
SCENE SCENE - 2go App SCENE - 2020 SCENE - 2021 SCENE - 2022 SCENE - 2023          
Serial FaroArm Serial FaroArm - Silver Serial FaroArm - Gold Serial FaroArm - Bronze              
Sphere FARO Sphere - Sphere                  
Visual Inspect Visual Inspect - App Visual Inspect - CAD Translator                
WebShare WebShare - Enterprise WebShare - WebShare Cloud                

present4D

present4D

FARO® Knowledge Base

Export from FARO Zone 3D to present4D

Overview

Present4D is a software application that allows you to combine 360° media into an immersive, VR presentation.  A present4D project consists of a series of 360° panoramic “locations” that are linked together by hotspots. The user can jump from location to location by clicking the hotspots. Each location can have multiple “slideshows” associated with it that users may choose to explore. Slideshows can include a variety of multimedia content, including 2D photographs, images, videos, or documents in .pdf format.

The 360° panoramic images and videos created with FARO Zone 3D make ideal building blocks to create a Virtual Reality environment viewed in Present 4D. FARO Zone 3D enables users to define all their 360° locations and slideshows and export them to a structure that is compatible with Present 4D projects. By using the FARO Zone’s Total View tool, all the 360° views are created automatically when you export them to a present4D project. Projects exported this way from FARO Zone 3D can then be opened in Present 4D and shared with others. Additional editing of the project is done in Present 4D, if needed.

Create a Present4D Project with Total View


In FARO Zone 3D, the Total View tool is used to establish the views that will become the 360° locations in your present4D project.

Follow these steps:

  1. Open Total View. You can minimize the dialog box or drag it away, so it is not blocking the diagram.

    totalview.png
     
  2. Navigate and zoom to the initial view that you want to use as the opening location in your present4D project.
     
  3. Click the Snapshot icon.
    snapshot_view.png
     
  4. Click the "n" button and enter the desired name for this location.

    clickn.png
     
  5. Repeat these steps for all the views you want as locations in present4D.

    locations.png
     
  6. Select the "Export Present4D (P4D)" button from the top of the Total View dialog box. 

    exportpresent4d.png

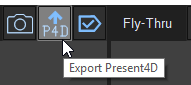
    Or from the FZ3 menu in the upper left of the screen:

     exportpresent4d_alt.png

    This displays the Export Present4D Toolbox.
     
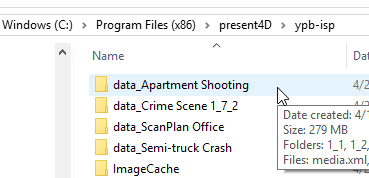
  7. Enter a project name and use the Browse button to select the Export folder to use. This should be your present4D project folder. By default, present4D installs under this folder:

    :\Program Files (x86)\present4D\your_portal_key

    Where “your_portal_key” is your personal, six character portal key that was assigned with your license key.

    enter_projectname.png

    FARO Zone will create a folder under your present4D project folder that starts with “…\data_” and has your new project’s name. All the content files for your new present4D presentation are placed in subfolders there.

    subfolder_present4d.png

  8. Use the up and down arrows to change the order that the locations will appear in the present4D project.

  9. For any location, click Details to change the name of that location or to add a slide show.

    slideshow_present4d.png

  10. To add a slideshow, click the + button and browse to select the desired image or .pdf document. Repeat this step for every location where you wish to add a slideshow.

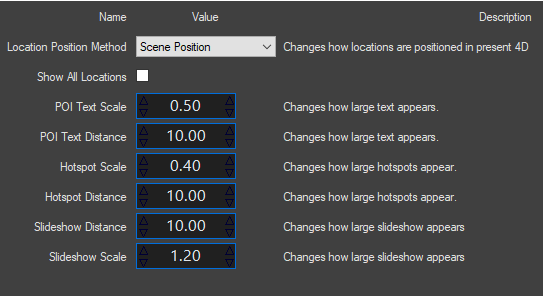
  11. Use the Preferences button, on the bottom of the dialog box, to adjust various settings for the present4D project.

    preferences_present4d.png      scale_present4d.png

  12. Once finished, click the Export button.

    export_button.png

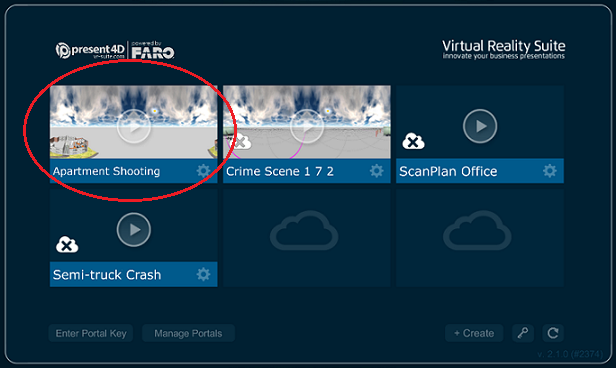
  13. Open present4D. Your new project will be displayed on your project portal. If you do not see the new project, verify that the correct Export Folder was listed in the Export present4D dialog box in FARO Zone (Step 7, above).

  14. Use the present4D editing features to adjust the position of each starting view, hotspots and slideshow infospots, as desired. While using present4D, you can also add more content to your project, including more slideshows, 360 videos, and sounds.

    apartmentshooting_present4d.png


  • Was this article helpful?