                     
As-Built As-Built - Revit As-Built - AutoCAD VirtuSurv - VirtuSurv 2018 As-Built - Modeler VirtuSurv - VirtuSurv 2019          
BuildIT BuildIT - Projector BuildIT - Construction BuildIT - Metrology              
CAM2 CAM2 - SmartInspect CAM2 - 2023 CAM2 - 2018 CAM2 - Measure 10 CAM2 - Measure Q CAM2 - Measure X CAM2 - Measure 3/4 CAM2 - AnthroCAM CAM2 - 2019 CAM2 - 2020
CAM2 CAM2 - 2021                  
Cobalt 3D Imager 3D Imager - Cobalt                  
Cobalt Design Cobalt Design - M Cobalt Design - S Cobalt Design - Dual              
Computers Computers - All Computers                  
FARO Aras 360 & CAD Zone FARO CAD Zone - Fire & Insurance FARO CAD Zone - Crime & Crash FARO CAD Zone - CZ Point Cloud FARO CAD Zone - First Look Pro FARO 360 - Reality FARO 360 - HD FARO 360 - Blitz FARO 360 - Genius    
FARO Connect FARO Connect - Connect                  
FARO Zone present4D - present4D                  
FARO Zone 2D FARO Zone 2D - 2018 FARO Zone 2D - 2019 FARO Zone 2D - 2020 FARO Zone 2D - 2021 FARO Zone 2D - 2022 FARO Zone 2D - 2023        
FARO Zone 3D FARO Zone 3D - 2018 FARO Zone 3D - 2019 FARO Zone 3D - 2020 FARO Zone 3D - 2021 FARO Zone 3D - 2022 FARO Zone 3D - 2023 FARO Zone 3D - 2024      
FARO Zone 3D Advanced FARO Zone 3D Advanced - 2018 FARO Zone 3D Advanced - 2019 FARO Zone 3D Advanced - 2020 FARO Zone 3D Advanced - 2021 FARO Zone 3D Advanced - 2022          
FaroArm/ScanArm FaroArm/ScanArm - Quantum S FaroArm/ScanArm - Quantum M FaroArm/ScanArm - Quantum E FaroArm/ScanArm - Edge FaroArm/ScanArm - Fusion FaroArm/ScanArm - Prime FaroArm/ScanArm - Platinum FaroArm/ScanArm - Legacy Quantum FaroArm/ScanArm - Titanium FaroArm/ScanArm - Advantage
FaroArm/ScanArm FaroArm/ScanArm - Digital Template FaroArm/ScanArm - Gage FaroArm/ScanArm - Quantum S Max FaroArm/ScanArm - Quantum M Max FaroArm/ScanArm - Quantum E Max FaroArm/ScanArm - Gage Max        
GeoSLAM Software GeoSLAM Software - Connect GeoSLAM Software - Draw GeoSLAM Software - Hub GeoSLAM Software - Volumes            
GeoSLAM ZEB GeoSLAM ZEB - Horizon GeoSLAM ZEB - Horizon RT GeoSLAM ZEB - Revo GeoSLAM ZEB - Revo RT GeoSLAM ZEB - Go          
Hand Held Scanner 2D Hand Held Scanner - ScanPlan 3D Hand Held Scanner - Freestyle3D 3D Hand Held Scanner - Freestyle3D X 3D Hand Held Scanner - Freestyle3D Objects 3D Hand Held Scanner - Freestyle 2          
Language Quality HT MT AT NT INT - Internal Sales - Internal Resources Sales - Order and Quote Sales - Product Info Sales - Sales Readiness Sales - Training
Language Quality Sales - Product Launch Sales - Promotions CS - Quote to Invoice CS - Phone System CS - New Hire Training CS - General CS - Product Info CS - Licensing CS - Procedures General CS - Procedures Salesforce
Language Quality CS - Procedures Loaner CS - Procedures SAP                
Languages Language - English Language - Japanese Language - German Language - Chinese Language - Spanish Language - Italian Language - Portuguese Language - French Language - Korean  
Laser Projector RayTracer - RayTracer Laser Projector - Tracer M Laser Projector - Tracer SI              
Laser Radar Imaging Laser Radar - VectorRI                  
Laser Scanner 3D Laser Scanner - Focus S 3D Laser Scanner - Focus M 3D Laser Scanner - Focus3D 3D Laser Scanner - Focus3D X 3D Laser Scanner - Focus3D X HDR 3D Laser Scanner - Focus3D S 3D Laser Scanner - Photon 3D Laser Scanner - Focus S Plus 3D Laser Scanner - Swift 3D Laser Scanner - Focus Premium
Laser Scanner 3D Laser Scanner - Focus Core                  
Laser Tracker Laser Tracker - Vantage Laser Tracker - ION Laser Tracker - Vantage S Laser Tracker - Si Laser Tracker - X Laser Tracker - Xi Laser Tracker - Vantage E Laser Tracker - Vantage S6 Laser Tracker - Vantage E6  
Legacy Gage Legacy Gage - Bluetooth Legacy Gage - Plus Legacy Gage - Standard Legacy Gage - Power            
Legacy Software Legacy Software - CAM2 Gage Legacy Software - Gage Software Legacy Software - Insight              
Mobile Scanner Mobile Scanner - Orbis                  
PointSense PointSense - Basic PointSense - Pro PointSense - Building PointSense - Plant PointSense - Heritage PointSense - Revit CAD Plugin - TachyCAD Building CAD Plugin - TachyCAD Archeology CAD Plugin - TachyCAD Interior CAD Plugin - PhoToPlan Basic
PointSense CAD Plugin - PhoToPlan CAD Plugin - PhoToPlan Pro CAD Plugin - PhoToPlan Ultimate CAD Plugin - DisToPlan CAD Plugin - MonuMap CAD Plugin - hylasFM CAD Plugin - VirtuSurv      
RevEng RevEng - RevEng                  
ScanArm ScanArm - Design ScanArm 2.0 ScanArm - Design ScanArm ScanArm - Forensic ScanArm ScanArm - Design ScanArm 2.5C            
SCENE SCENE - Capture and Process SCENE - WebShare Server and 2Go SCENE - WebShare 2Go App SCENE - 2018 SCENE - 7.x SCENE - 6.x SCENE - 5.x SCENE - 4.x SCENE - LT SCENE - 2019
SCENE SCENE - 2go App SCENE - 2020 SCENE - 2021 SCENE - 2022 SCENE - 2023          
Serial FaroArm Serial FaroArm - Silver Serial FaroArm - Gold Serial FaroArm - Bronze              
Sphere FARO Sphere - Sphere                  
Visual Inspect Visual Inspect - App Visual Inspect - CAD Translator                
WebShare WebShare - Enterprise WebShare - WebShare Cloud                
FARO® Knowledge Base

Creating a Scan with ScanPlan

ScanPlan.PNG

Overview

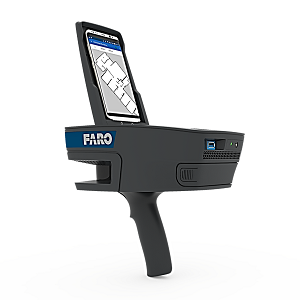
The FARO® ScanPlanTM is a lightweight, handheld mapper that captures and visualizes 2D floor plans for pre-incident planning, threat assessment, and crime/fire investigation. The scanner can be controlled by a compatible smartphone or tablet/PC. To create a floorplan, connect your phone or tablet/PC to the ScanPlan and follow the instructions below.

Creating a Map

Before you begin scanning a project, it's best to decide which parts of an area you will scan at one time and how the scan project will be organized. The ScanPlan allows you to divide a project vertically by levels and record multiple floorplans on each level. Note: If you stop recording a floorplan, you will not be able to rescan it or add additional annotations. You will have to create a new floorplan to continue scanning.

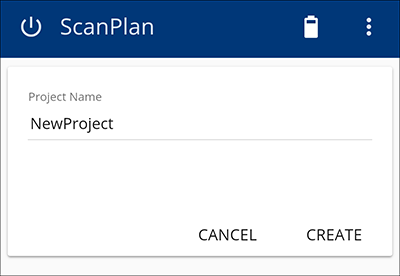
  1. Press the create new project button NewButton.png on the project home page.
    ScanPlan1.png
     
  2. Type in a project name and press CREATE.
    ScanPlan2.png
    Note: When viewing an existing project, press the add icon ScanPlanAddPlan.png to create a new plan.
  3. Name the new plan and change the level number if required.
    ScanPlan3.png
    Note: Changing the Level number will change where the scanned area appears vertically in the project. A higher level number will place the new floorplan higher in the project.
  4. Press ADD to create the new plan and start mapping. 
  5. When you are finished scanning a plan, press the stop button ScanPlanStop.png.

Tips and Tricks

  • Use descriptive plan names. For example, "FARO-Building, Floor 1."
  • In general, it's better to start at the lowest level and work up.
  • Make sure the ScanPlan battery is fully charged and there is enough storage space before beginning.
  • Be aware of your surroundings as you walk through a floorplan.
  • Try to limit foot traffic and obstacles that could make it difficult to navigate the scanning area.
  • Some surfaces such as glass or highly reflective surfaces may be difficult to map.
  • Place annotations at key points to aid floorplan registration.

Note: ScanPlan files are not supported by the 32-bit version of FARO Zone 2D.

Adding Annotations

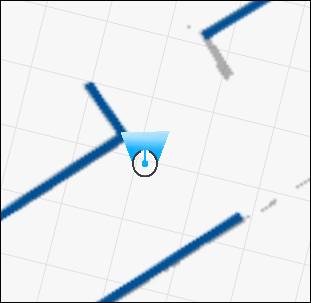
As you begin mapping, an icon will show you your position, relative to the floorplan, along with the direction you are facing.
ScanPlanPosition.png

To add an annotation in your current position, press the documentation button ScanPlanAdd.png to display a list of annotation icons.

ScanPlan 4.png

  • ScanPlanMeasure.png Measure a distance or area.
    • Measure Distance - As you move, press the add point button ScanPlanAddPoint.png to create the points to be measured. Press the finished button ScanPlanEndPoint.png to create the measurement.
    • Measure Area - As you move,, pess the add point button ScanPlanAddPoint.png to create the points to be measured. The ScanPlan app will automatically join three or more points into a shape. Press the finished button ScanPlanEndPoint.png to create the measurement.
  • ScanPlanFile.png Attach a file.
  • ScanPlanPic.png Take a picture with your phone and attach it to the floorplan.
  • ScanPlanNote.png Attach a brief message.

When you have finished adding an annotation, a corresponding symbol will appear on the floorplan.

ScanPlanSymbols.png

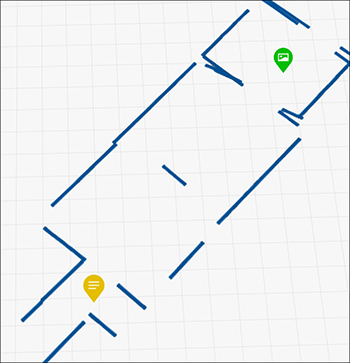
Tap the symbol to view the annotation and available editing functions.

ScanPlanEdit.png

  • ScanPlanDelete.png Delete an annotation.
  • ScanPlanReplace.png Replace an image.
  • ScanPlanDownload.png Download the annotation file.
  • ScanPlanEdit2.png Edit an existing annotation.

Registering Floorplans

If your project contains multiple floorplans, you can register or align the plans by using the edit function. While viewing a project, press the edit button ScanPlanEdit2.png to enter editing mode.

ScanPlanEditMode.png

  • Tap and hold a floorplan until it turns green to select it. While still pressing down, drag your finger to move the plan, or use a second finger to rotate the plan on the grid.
  • Use the slider to change the elevation of a plan on its level.
  • Press the move button ScanPlanMove.png to move a floorplan to a different project level.

Registering Multiple Floorplans on the Same Level

If you have more than one floorplan on the same level, the view mode you are using when you press the edit button will determine how you can rotate the plans.

  • If you are in 3D Mode ScanPlan3D.png when you press the edit button, all of the plans on one level will move together.
  • If you are in Level Mode ScanPlanLevel.png when you press the edit button, you can move each floorplan on a level independently.

To view your floorplans with walls, press the wall button ScanPlanWall.png.

ScanPlanWalls.png