As-Built As-Built - Revit As-Built - AutoCAD VirtuSurv - VirtuSurv 2018 As-Built - Modeler VirtuSurv - VirtuSurv 2019          
BuildIT BuildIT - Projector BuildIT - Construction BuildIT - Metrology              
CAM2 CAM2 - SmartInspect CAM2 - 2024 CAM2 - 2023 CAM2 - 2018 CAM2 - Measure 10 CAM2 - Measure Q CAM2 - Measure X CAM2 - Measure 3/4 CAM2 - AnthroCAM CAM2 - 2019
CAM2 CAM2 - 2020 CAM2 - 2021                
Cobalt 3D Imager 3D Imager - Cobalt                  
Cobalt Design Cobalt Design - M Cobalt Design - S Cobalt Design - Dual              
Computers Computers - All Computers                  
FARO Aras 360 & CAD Zone FARO CAD Zone - Fire & Insurance FARO CAD Zone - Crime & Crash FARO CAD Zone - CZ Point Cloud FARO CAD Zone - First Look Pro FARO 360 - Reality FARO 360 - HD FARO 360 - Blitz FARO 360 - Genius    
FARO Connect FARO Connect - Connect                  
FARO Zone present4D - present4D                  
FARO Zone 2D FARO Zone 2D - 2018 FARO Zone 2D - 2019 FARO Zone 2D - 2020 FARO Zone 2D - 2021 FARO Zone 2D - 2022 FARO Zone 2D - 2023 FARO Zone 2D - 2024      
FARO Zone 3D FARO Zone 3D - 2018 FARO Zone 3D - 2019 FARO Zone 3D - 2020 FARO Zone 3D - 2021 FARO Zone 3D - 2022 FARO Zone 3D - 2023 FARO Zone 3D - 2024      
FARO Zone 3D Advanced FARO Zone 3D Advanced - 2018 FARO Zone 3D Advanced - 2019 FARO Zone 3D Advanced - 2020 FARO Zone 3D Advanced - 2021 FARO Zone 3D Advanced - 2022          
FaroArm/ScanArm FaroArm/ScanArm - Quantum S FaroArm/ScanArm - Quantum M FaroArm/ScanArm - Quantum E FaroArm/ScanArm - Edge FaroArm/ScanArm - Fusion FaroArm/ScanArm - Prime FaroArm/ScanArm - Platinum FaroArm/ScanArm - Legacy Quantum FaroArm/ScanArm - Titanium FaroArm/ScanArm - Advantage
FaroArm/ScanArm FaroArm/ScanArm - Digital Template FaroArm/ScanArm - Gage FaroArm/ScanArm - Quantum S Max FaroArm/ScanArm - Quantum M Max FaroArm/ScanArm - Quantum E Max FaroArm/ScanArm - Gage Max FaroArm/ScanArm - Quantum X.S FaroArm/ScanArm - Quantum X.M FaroArm/ScanArm - Quantum X.E  
GeoSLAM Software GeoSLAM Software - Connect GeoSLAM Software - Draw GeoSLAM Software - Hub GeoSLAM Software - Volumes            
GeoSLAM ZEB GeoSLAM ZEB - Horizon GeoSLAM ZEB - Horizon RT GeoSLAM ZEB - Revo GeoSLAM ZEB - Revo RT GeoSLAM ZEB - Go          
Hand Held Scanner 2D Hand Held Scanner - ScanPlan 3D Hand Held Scanner - Freestyle3D 3D Hand Held Scanner - Freestyle3D X 3D Hand Held Scanner - Freestyle3D Objects 3D Hand Held Scanner - Freestyle 2          
Language Quality HT MT AT NT INT - Internal Sales - Internal Resources Sales - Order and Quote Sales - Product Info Sales - Sales Readiness Sales - Training
Language Quality Sales - Product Launch Sales - Promotions CS - Quote to Invoice CS - Phone System CS - New Hire Training CS - General CS - Product Info CS - Licensing CS - Onboarding CS - Procedures General
Language Quality CS - Procedures Salesforce CS - Procedures Loaner CS - Procedures SAP              
Languages Language - English Language - Japanese Language - German Language - Chinese Language - Spanish Language - Italian Language - Portuguese Language - French Language - Korean  
Laser Projector RayTracer - RayTracer Laser Projector - Tracer M Laser Projector - Tracer SI              
Laser Radar Imaging Laser Radar - VectorRI                  
Laser Scanner 3D Laser Scanner - Focus S 3D Laser Scanner - Focus M 3D Laser Scanner - Focus3D 3D Laser Scanner - Focus3D X 3D Laser Scanner - Focus3D X HDR 3D Laser Scanner - Focus3D S 3D Laser Scanner - Photon 3D Laser Scanner - Focus S Plus 3D Laser Scanner - Swift 3D Laser Scanner - Focus Premium
Laser Scanner 3D Laser Scanner - Focus Core 3D Laser Scanner - Focus Premium Max                
Laser Tracker Laser Tracker - Vantage Laser Tracker - ION Laser Tracker - Vantage S Laser Tracker - Si Laser Tracker - X Laser Tracker - Xi Laser Tracker - Vantage E Laser Tracker - Vantage S6 Laser Tracker - Vantage E6  
Legacy Gage Legacy Gage - Bluetooth Legacy Gage - Plus Legacy Gage - Standard Legacy Gage - Power            
Legacy Software Legacy Software - CAM2 Gage Legacy Software - Gage Software Legacy Software - Insight              
Mobile Scanner Mobile Scanner - Orbis                  
PointSense PointSense - Basic PointSense - Pro PointSense - Building PointSense - Plant PointSense - Heritage PointSense - Revit CAD Plugin - TachyCAD Building CAD Plugin - TachyCAD Archeology CAD Plugin - TachyCAD Interior CAD Plugin - PhoToPlan Basic
PointSense CAD Plugin - PhoToPlan CAD Plugin - PhoToPlan Pro CAD Plugin - PhoToPlan Ultimate CAD Plugin - DisToPlan CAD Plugin - MonuMap CAD Plugin - hylasFM CAD Plugin - VirtuSurv      
RevEng RevEng - RevEng                  
ScanArm ScanArm - Design ScanArm 2.0 ScanArm - Design ScanArm ScanArm - Forensic ScanArm ScanArm - Design ScanArm 2.5C            
SCENE SCENE - Capture and Process SCENE - WebShare Server and 2Go SCENE - WebShare 2Go App SCENE - 2024 SCENE - 2018 SCENE - 7.x SCENE - 6.x SCENE - 5.x SCENE - 4.x SCENE - LT
SCENE SCENE - 2019 SCENE - 2go App SCENE - 2020 SCENE - 2021 SCENE - 2022 SCENE - 2023        
Serial FaroArm Serial FaroArm - Silver Serial FaroArm - Gold Serial FaroArm - Bronze              
Sphere FARO Sphere - Sphere                  
Visual Inspect Visual Inspect - App Visual Inspect - CAD Translator                
WebShare WebShare - Enterprise WebShare - WebShare Cloud                
FARO® Knowledge Base

Installation and Setup for BuildIT Remote - Metrology

BuildIT-bty.png

BuildITRemotePhone.jpgOverview

Basic inspection and measurement workflows can now be controlled via a web browser on a mobile device with a new BuildIT remote control interface. Use the application to open measurement and inspection commands, select geometry for inspection, and trigger and accept measurements while working away from the computer running BuildIT 2019.5 and later.

Installation and Setup (BuildIT 2020.5 and later)

The Remote Control for BuildIT from versions 2019.5 to 2020.2 needed to be installed separately from the main application and required some complex set-up steps to be performed. Starting in 2020.5, we have simplified the process significantly and are including the Remote Control in all BuildIT installations. Follow the procedure below for 2020.5 and later installations, if you are using an early version, please refer to Installation and Setup (BuildIT 2019.5 - 2020.2).

Enable the HTTP (Web) Server in BuildIT

In the Settings: Interface page, under the HTTP Server section, check the "Enabled" checkbox to enable the server. Please note that connection to the server is not encrypted and does not require authentication, so anyone in your internal network can connect and control your BuildIT session. This makes it very easy to set-up, but be aware of the security implications.

BuildITRemote-EnableHTTPServer.png
 
After starting BuildIT and enabling the HTTP server, you will see a message in the message bar with the address you can connect to, see Connect to the Remote Control Server.

BuildITRemote-Message Bar.png


Connect to the Remote Control Server

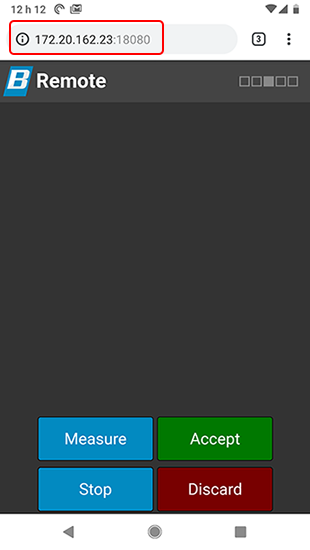
Using your mobile device's browser, enter the specified URL noted in the previous section above. The BuildIT Remote homepage should be displayed.
Remote-remote_in_browser.png

Note: If you are unable to connect, ensure you are connected to the same network as the computer running BuildIT Metrology. In some cases, the IP address shown in the remote control server's window may not be the same if connected to a shared network. In this case, you will need to use the IP address for the BuildIT computer as it's listed on the shared network interface.


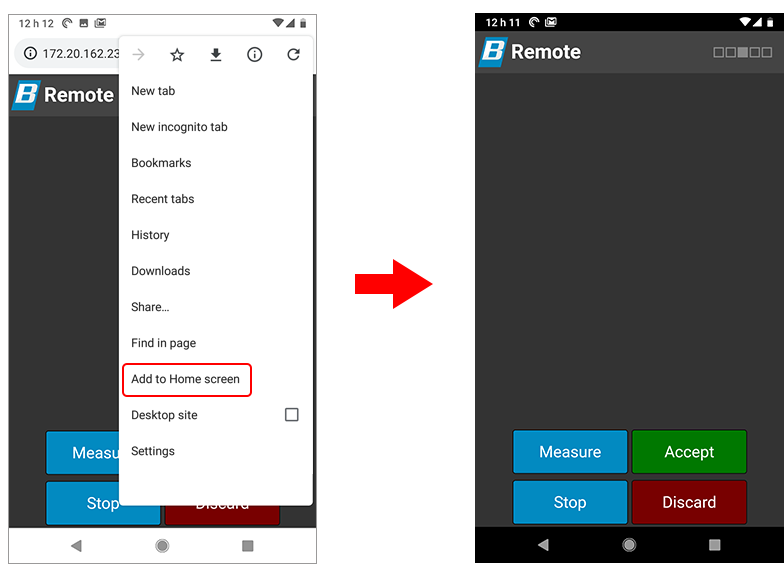
Tip: If you add the page to your home screen and access it from there, it will appear full screen.

Remote-remote_as_app.png


Installation and Setup (BuildIT 2019.5 - 2020.2)

  1. If not already installed, follow the standard installation procedure for BuildIT Metrology software on your computer. The current version of BuildIT Remote Control has been adapted to work with BuildIT 2019.5 and later.
  2. Download the BuildIT Remote Control process files. Once downloaded, extract the contents of the zip file to a folder on your computer.

BuildIT Remote Control

Register the Installation of BuildIT as the Metrology Server

  1. From the BuildIT installation directory (typically C:\Program Files\BuildIT\BuildIT Metrology 20xx), go to the data\profiles folder and double-click on the ProfileChooser.bat batch file.
    profilechooserfolder.png
  2. In the window that appears (your window may have different options than the one shown), click on the "Setup Remote" button at the bottom.
    SetupRemote.png
  3. This will automatically register this installation of BuildIT as the metrology server to be used and will also add a firewall exception to allow incoming connection to BuildIT from the remote control application. The result will be show in a text window:
    RemoteRegisterResult.png
    Note: If any of the following errors are displayed, "Removing old firewall rule..." or "Removing previous COM registration..." stages, these can be safely ignored as they simply indicate that previous versions of these items did not exist.

Start the Remote Control Server

  1. Make sure that the currently installed BuildIT Metrology application has been run at least once (started and stopped).
  2. Run the "Start Remote Control Server.process" file (contained in the BuildIT Remote Control download) by double-clicking on it.
    • You may also start the process within BuildIT by clicking on the "Play Process" button, then browse and open the "Start Remote Control Server.process" file.
      Remote-PlayProcess.png
  3. Note the URL (IP address and port) that the web service is listening on.
    Remote-ipaddress.png
Note: Both the main BuildIT Metrology application and the BuildIT Remote terminal screen must remain running (windows can be minimized) during a remote connection. If either are closed, the connection to your mobile device will be lost.