Security Planning with FARO Zone 3D

Overview
FARO Zone 3D has several tools to help you visualize and plan security features with a 3D drawing.
Security Planning Tools
- To access the security planning tools, click the POWER TOOLS tab.
- Click the Security Tools icon.
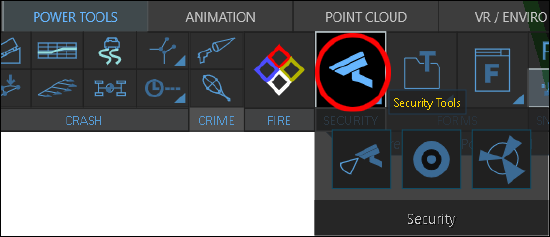
- Select the security tool from the Security Tools menu.
 Draw Camera Planner - Create a camera to place within a scene. A red grid illustrates the camera's field of coverage.
 Draw Security Ring - Illustrate the threat level of areas surrounding a point with concentric rings.
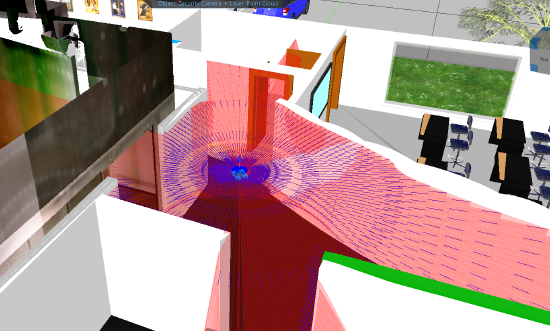
 Draw Security Halo - Generates a 360° grid illustrating the line of site from a position.
Camera Planner
This option places a camera in the scene with a grid illustrating the camera's field of view.
- Click the Draw Camera Planner icon in the Security Tools menu.
- Click to place the camera in the drawing.
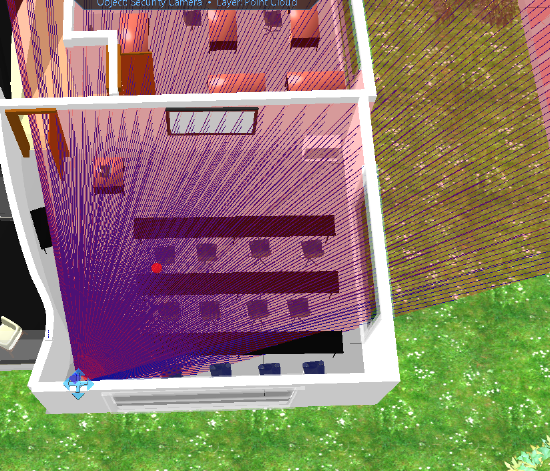
- Use the properties menu to further customize the field of vision grid.
Properties Top Menu
- Color boxes - Use the color boxes to change the alternating colors of the field of vision grid.
- Layer - Place the camera on a different layer.
- Preview Camera View - View the scene from the camera's point of view.
- Next, Previous - Cycle through cameras in the scene.
Properties Menu
- Name - Name the camera.
- URL - Link the camera to a web address with the camera's live view, if available.
- X,Y,Z - Change camera coordinates.
- Rotation, Tilt - Change the camera's rotation or tilt.
- View Angle - Change the camera's field of view.
- Distance to Ceiling - Changes the top of the projected grid.
- Distance to Floor - Changes the bottom of the projected grid.
- Distance Max - Changes the distance of the projected grid.
- Samples Horizontal, Vertical - Change the number of rays projected in the grid.
- Show Sight Lines - Toggle guide lines showing the number of samples.
- Update - Update the grid to reflect changes.
- Open View - Preview the camera view.
Security Ring
Place a security ring in a drawing to illustrate levels of security around a central location.
- Click the Draw Security Ring icon in the Security Tools menu.
- Click to place the ring in the drawing.
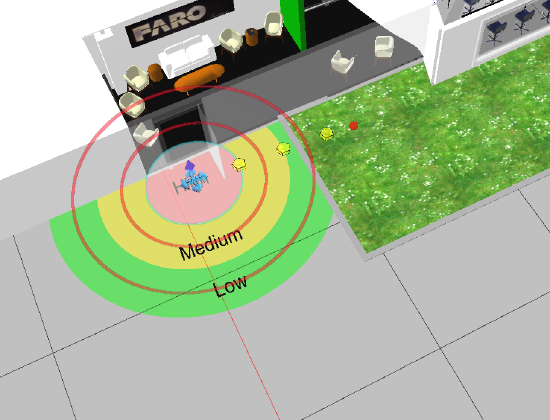
- Move the yellow handles to resize a circle or the red dot to rotate the entire ring.
- Use the properties menu to further customize the ring.
Properties Top Menu
- Layer - Place the ring on a different layer.
Properties Menu
- X,Y,Z - Ring coordinates
- Rotation - Rotate the ring to change the orientation of the text.
- Aspect Ratio - Change the overall ring shape.
- Zones - Customize the ring text, color, number of circles and more.
Zones
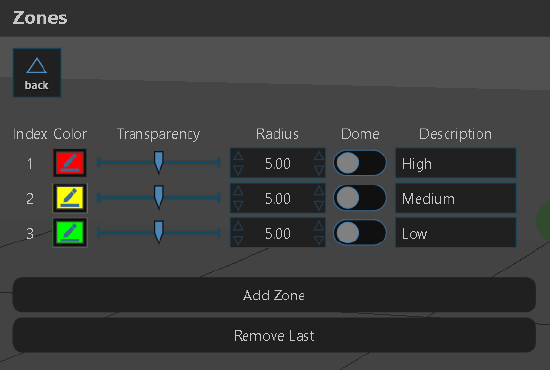
- Color - Change the color of a circle.
- Transparency - Change circle opacity.
- Radius - Change the radius of a circle.
- Dome - Replace the circle with a dome.
- Description - Change the text within a circle.
- Add Zone - Add another circle to the ring.
- Remove Last - Remove the last circle.
Security Halo
Place a viewpoint with a 360° grid illustrating the line of sight from the position.
- Click the Draw Security Halo icon in the Security Tools menu.
- Click to place the viewpoint in the drawing.
- Use the properties menu to further customize the field of vision grid.
Properties Top Menu
- Color boxes - Use the color boxes to change the alternating colors of the field of vision grid.
- Layer - Place the viewpoint on a different layer.
Properties Menu
- Name - Name the viewpoint.
- X,Y,Z - Viewpoint coordinates
- Distance to Floor - Changes the bottom of the projected grid.
- Distance to Ceiling - Changes the top of the projected grid.
- Distance Max - Changes the distance of the projected grid.
- Samples Horizontal, Vertical - Change the number of rays projected in the grid.
- Show Sight Lines - Toggle guide lines showing the number of samples.
- Update - Update the grid to reflect changes.