Set up a Wireless Router to Enable a Wifi Connection to the FARO Laser Tracker
Overview
Any wireless router using Wireless-G or Wireless-N can be used to communicate with the FARO® Laser Tracker. The default router configuration provides an Internet Protocol (IP) address to a series of computers using Dynamic Host Configuration Protocol (DHCP) and a firewall that blocks certain types of network communications.
Because the Tracker has a static IP address and is not capable of using DHCP you must change the router configuration to enable it to be used as a wireless bridge between the Tracker and the computer being used to take measurements. You make these changes using your browser to access the router configuration menus. These menus vary depending on the manufacture and router models. Consult the documentation for your specific router for details.
Multiple Trackers can be connected to the wireless router provided their IP addresses are changed so that each Tracker has a unique IP address. For more information on connecting multiple Trackers, refer to the following article: Connecting Multiple Laser Trackers to One Computer.
Note: These steps are for off-the-shelf wireless routers only. If the Tacker is connected to a corporate network, please contact your company IT department to consider IP allocation of the Tracker. FARO does not have the steps on how to setup a Tracker over corporate networks due to multiple network architecture and security layers.
Guidelines
Here are general guidelines that will get you started.
- Configure the computer's network card to obtain an IP address automatically using DHCP.
- Connect the router to the computer using a standard Ethernet cable.
- Open a web browser and log into the routers configuration setup menus.
- Disable the routers firewall protection.
- Disable any wireless network security or encryption
- Change the SSID or wireless network name to something easily recognizable such as “FAROTracker”
- Disable the router's DHCP Server.
- Change the router's IP address to 128.128.128.99 with a subnet of 255.255.255.0.
- Save these router settings.
- Change the computer's wireless network card’s IP address to 128.128.128.10 with a subnet of 255.255.255.0
- Connect the Tracker Master Control Unit (MCU) to the wireless router.
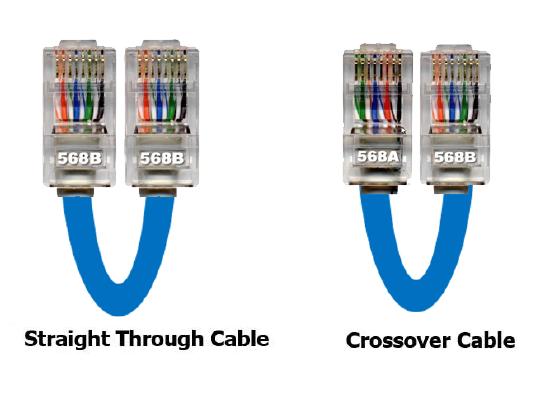
The cable type used to make the connection depends on the design of the router. First try using a standard straight-through Ethernet cable. However, if you are not able to connect but can still find the Tracker using the Find Tracker tool in FARO Utilities, use the crossover cable that comes with the Tracker. This cable is intended to make a direct connection to your computer, but in some cases works best with newer routers or wireless hubs. This image shows the difference between the two cable types.
- Connect wirelessly to the Tracker wireless network.
Keywords:
wifi, wi-fi, connect, remote, connect remotely, wireless hub