Feature Extraction Using Pick from CAD in CAM2
Overview
The purpose of this article is to advise how to extract features from a point cloud aligned to a CAD model.
Download a PDF of this procedure:
Preparation
- Scan the required Point Cloud ensuring ample data is capture in feature area.
- Align to CAD
Feature Extraction
There are 2 methods available to extract features from a Point Cloud:
- Thin Material (default). This is used when little or no data is captured on the inside ‘walls’ of the scanned feature.
- Standard Projection. This is used where ample data is captured on the inside ‘walls’ of the scanned feature.
Thin Material Method
This method only uses data on the face of the feature picked and ignores any data that is captured on the feature inside ‘walls’. By default, all features are calculated using the best fit solver method.
For 2D features, a plane is automatically calculated from the selected data, ignoring points on the feature edge.
- From the Home ribbon select Pick Features

- The Pick Feature mode and cursor will be activated and indicated by an orange border.

- Using the Pick Features cursor, simply left click on the edge or surface feature. The selected edge or surface will highlight.

- The feature will be automatically extracted and displayed.

- If CAM2® detects more than one feature type in the area selected, a feature selection drop-down will appear.

- Simply select the feature from the list and it will be created and displayed.

Pick Features extraction support the following geometries:
- Plane – select surface to extract
- Line – select edge to extract
- Circle – select edge to extract
- Round Slot – select edge to extract
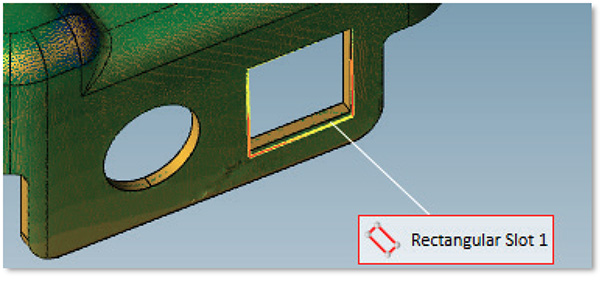
- Rectangular Slot – select edge to extract
- Sphere – select surface to extract
- Cylinder – select surface to extract
- Cone – select surface to extract
- Torus – select surface to extract
Editing the Selected Data of an Extracted Feature
Once created, it is possible to view and edit the data used to create the extraction.
- Select the feature in the Features panel
- Right Click and select Properties

- The Properties window will open:
- Select the Actual tab and the point used will be highlighted

To add or remove data:
- From the Extract ribbon, select an extraction tool

- To add points, press and hold the Shift key, a + icon will appear next to the selection tool cursor
- Keeping the Shift key pressed, press and hold the left mouse button to select additional points.

- Once the selection is made, press Modify to recalculate the feature
- To remove points, press and hold the Ctrl key, a - icon will appear next to the selection tool cursor
- Keeping the Ctrl key pressed, press and hold the left mouse button to deselect points

- Once the selection is made, press Modify to recalculate the feature
Standard Projection Method
This method uses data on the face and inside ‘walls’ of the feature picked. By default, all features are calculated using the best fit solver method.
For 2D features, a plane is automatically calculated from the selected data, ignoring points on the edge and inside ‘walls’ of the feature.
To activate the Standard Projection method:
- From the Extract ribbon, select Standard Projection from the Sampling pull-down

Features can now be selected and edited using the same steps as detailed for Thin Material
See Also
Keywords:
Help Sheet, EX001

