As-Built As-Built - Revit As-Built - AutoCAD VirtuSurv - VirtuSurv 2018 As-Built - Modeler VirtuSurv - VirtuSurv 2019          
BuildIT BuildIT - Projector BuildIT - Construction BuildIT - Metrology              
CAM2 CAM2 - SmartInspect CAM2 - 2023 CAM2 - 2018 CAM2 - Measure 10 CAM2 - Measure Q CAM2 - Measure X CAM2 - Measure 3/4 CAM2 - AnthroCAM CAM2 - 2019 CAM2 - 2020
CAM2 CAM2 - 2021                  
Cobalt 3D Imager 3D Imager - Cobalt                  
Cobalt Design Cobalt Design - M Cobalt Design - S Cobalt Design - Dual              
Computers Computers - All Computers                  
FARO Aras 360 & CAD Zone FARO CAD Zone - Fire & Insurance FARO CAD Zone - Crime & Crash FARO CAD Zone - CZ Point Cloud FARO CAD Zone - First Look Pro FARO 360 - Reality FARO 360 - HD FARO 360 - Blitz FARO 360 - Genius    
FARO Connect FARO Connect - Connect                  
FARO Zone present4D - present4D                  
FARO Zone 2D FARO Zone 2D - 2018 FARO Zone 2D - 2019 FARO Zone 2D - 2020 FARO Zone 2D - 2021 FARO Zone 2D - 2022 FARO Zone 2D - 2023        
FARO Zone 3D FARO Zone 3D - 2018 FARO Zone 3D - 2019 FARO Zone 3D - 2020 FARO Zone 3D - 2021 FARO Zone 3D - 2022 FARO Zone 3D - 2023 FARO Zone 3D - 2024      
FARO Zone 3D Advanced FARO Zone 3D Advanced - 2018 FARO Zone 3D Advanced - 2019 FARO Zone 3D Advanced - 2020 FARO Zone 3D Advanced - 2021 FARO Zone 3D Advanced - 2022          
FaroArm/ScanArm FaroArm/ScanArm - Quantum S FaroArm/ScanArm - Quantum M FaroArm/ScanArm - Quantum E FaroArm/ScanArm - Edge FaroArm/ScanArm - Fusion FaroArm/ScanArm - Prime FaroArm/ScanArm - Platinum FaroArm/ScanArm - Legacy Quantum FaroArm/ScanArm - Titanium FaroArm/ScanArm - Advantage
FaroArm/ScanArm FaroArm/ScanArm - Digital Template FaroArm/ScanArm - Gage FaroArm/ScanArm - Quantum S Max FaroArm/ScanArm - Quantum M Max FaroArm/ScanArm - Quantum E Max FaroArm/ScanArm - Gage Max        
GeoSLAM Software GeoSLAM Software - Connect GeoSLAM Software - Draw GeoSLAM Software - Hub GeoSLAM Software - Volumes            
GeoSLAM ZEB GeoSLAM ZEB - Horizon GeoSLAM ZEB - Horizon RT GeoSLAM ZEB - Revo GeoSLAM ZEB - Revo RT GeoSLAM ZEB - Go          
Hand Held Scanner 2D Hand Held Scanner - ScanPlan 3D Hand Held Scanner - Freestyle3D 3D Hand Held Scanner - Freestyle3D X 3D Hand Held Scanner - Freestyle3D Objects 3D Hand Held Scanner - Freestyle 2          
Language Quality HT MT AT NT INT - Internal Sales - Internal Resources Sales - Order and Quote Sales - Product Info Sales - Sales Readiness Sales - Training
Language Quality Sales - Product Launch Sales - Promotions CS - Quote to Invoice CS - Phone System CS - New Hire Training CS - General CS - Product Info CS - Licensing CS - Procedures General CS - Procedures Salesforce
Language Quality CS - Procedures Loaner CS - Procedures SAP                
Languages Language - English Language - Japanese Language - German Language - Chinese Language - Spanish Language - Italian Language - Portuguese Language - French Language - Korean  
Laser Projector RayTracer - RayTracer Laser Projector - Tracer M Laser Projector - Tracer SI              
Laser Radar Imaging Laser Radar - VectorRI                  
Laser Scanner 3D Laser Scanner - Focus S 3D Laser Scanner - Focus M 3D Laser Scanner - Focus3D 3D Laser Scanner - Focus3D X 3D Laser Scanner - Focus3D X HDR 3D Laser Scanner - Focus3D S 3D Laser Scanner - Photon 3D Laser Scanner - Focus S Plus 3D Laser Scanner - Swift 3D Laser Scanner - Focus Premium
Laser Scanner 3D Laser Scanner - Focus Core                  
Laser Tracker Laser Tracker - Vantage Laser Tracker - ION Laser Tracker - Vantage S Laser Tracker - Si Laser Tracker - X Laser Tracker - Xi Laser Tracker - Vantage E Laser Tracker - Vantage S6 Laser Tracker - Vantage E6  
Legacy Gage Legacy Gage - Bluetooth Legacy Gage - Plus Legacy Gage - Standard Legacy Gage - Power            
Legacy Software Legacy Software - CAM2 Gage Legacy Software - Gage Software Legacy Software - Insight              
Mobile Scanner Mobile Scanner - Orbis                  
PointSense PointSense - Basic PointSense - Pro PointSense - Building PointSense - Plant PointSense - Heritage PointSense - Revit CAD Plugin - TachyCAD Building CAD Plugin - TachyCAD Archeology CAD Plugin - TachyCAD Interior CAD Plugin - PhoToPlan Basic
PointSense CAD Plugin - PhoToPlan CAD Plugin - PhoToPlan Pro CAD Plugin - PhoToPlan Ultimate CAD Plugin - DisToPlan CAD Plugin - MonuMap CAD Plugin - hylasFM CAD Plugin - VirtuSurv      
RevEng RevEng - RevEng                  
ScanArm ScanArm - Design ScanArm 2.0 ScanArm - Design ScanArm ScanArm - Forensic ScanArm ScanArm - Design ScanArm 2.5C            
SCENE SCENE - Capture and Process SCENE - WebShare Server and 2Go SCENE - WebShare 2Go App SCENE - 2018 SCENE - 7.x SCENE - 6.x SCENE - 5.x SCENE - 4.x SCENE - LT SCENE - 2019
SCENE SCENE - 2go App SCENE - 2020 SCENE - 2021 SCENE - 2022 SCENE - 2023          
Serial FaroArm Serial FaroArm - Silver Serial FaroArm - Gold Serial FaroArm - Bronze              
Sphere FARO Sphere - Sphere                  
Visual Inspect Visual Inspect - App Visual Inspect - CAD Translator                
WebShare WebShare - Enterprise WebShare - WebShare Cloud                
FARO® Knowledge Base

Video/Graphic Card-Setting the Primary Graphics Card

Install Icon

Overview

Many computers have two graphics cards: one integrated and one dedicated. Graphics display problems can occur in FARO® software if the integrated card is not enabled/disabled as listed below.

For Cam2 2018.1 and later versions, both graphics cards should be enabled. 

For all other FARO software, disable the integrated Intel card and enable the NVIDIA graphics card.

Each card is listed in the Microsoft Windows Device Manager.
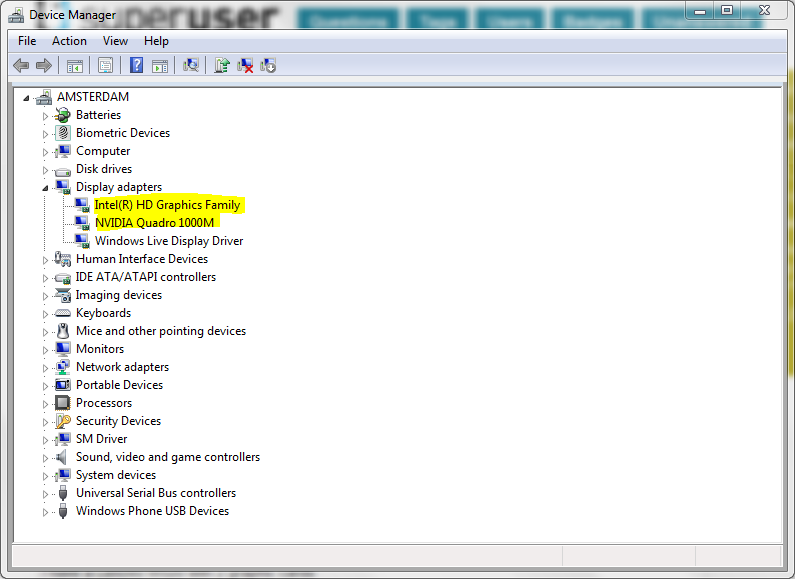
device_manager_2cards.png

In Windows 10 you can access the Device Manager by opening the Control Panel, clicking System and Security > System, and clicking Device Manager on the left side of the window.

GFXCard.png

There are two ways to specify that your computer should use a particular graphics card. 

  1. Specify the graphics card at the BIOS level, so the correct card can be accessed when the computer boots.
    OR
  2. Set the the preferred graphics card in the graphics card control panel.

Set the Graphics Card in the System BIOS

CAM2 Users: Disabling the integrated graphics card may cause issues with CAM2 2018.1 and later.

HP Laptops

Some HP laptops have different BIOS menus. Use the relevant method below to change the graphic card settings.

Disable Hybrid Graphics (G4 and G5)

  1. Restart the computer and hold the Escape key. (Note: The "entering startup" menu will be displayed at the bottom left of the screen)
  2. From the Startup Menu, press the F10 key to enter the BIOS setup utility.
  3. Click Advanced.
  4. Select Built-In Device Options.
  5. Select Graphics, and then select Discrete Graphics.
  6. Click Save, and, when prompted, click Save changes and exit BIOS.

Dell Laptops:

  1. Restart the computer.
  2. As the system logo is loading, press the F12 key to get to the system BIOS.
  3. Select BIOS Setup.
  4. From the BIOS screen, expand the Video group.
  5. Select Switchable Graphics.
  6. Un-check the Enable Switchable Graphics box on the right side of the screen.
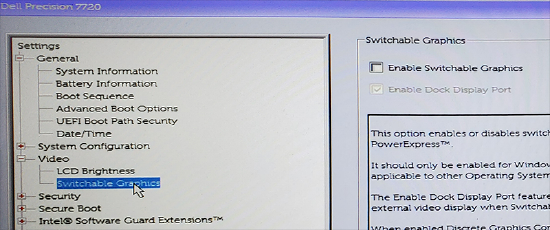
    GFXEnable1.png
  7. Select Apply at the bottom right.
  8. Select Exit at the bottom right.

Boot to Bios from Windows 10

If you are having problems accessing the BIOS while starting the PC, you can use this method to access BIOS settings from Windows 10.

  1. Click the Start Menu.
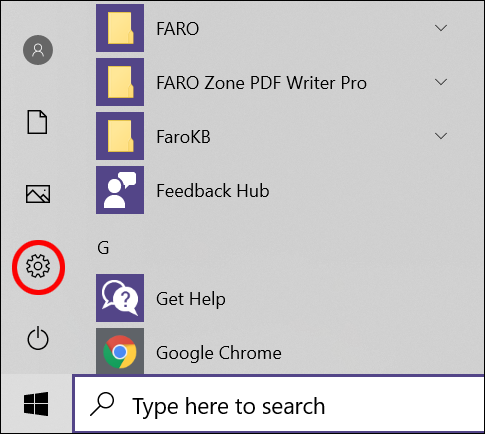
  2. Click Settings.
    GFXCard1.png
  3. Click Update and Security.
  4. Click Recovery.
  5. Under Advanced Startup, click Restart Now.
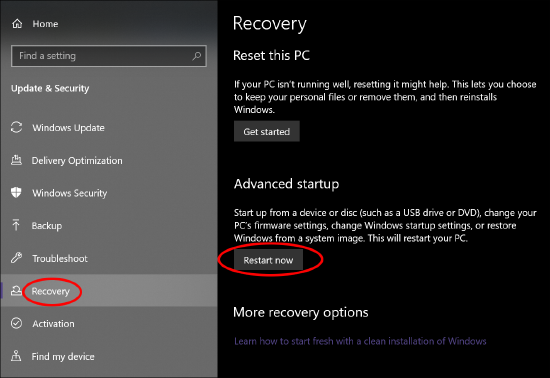
    GFXCard2.png
  6. Click Troubleshoot.
  7. Click Advanced Options.
  8. Click UEFI Firmware Settings.
  9. Click Restart.


Set the Graphics Card in the Graphics Card Control Panel

For the purposes of example, we use the NVIDIA graphics card. Substitute your graphics card name instead if you are using a different graphics card. You may have to look up instructions for your specific graphics cards online. Contact your computer vendor for more information about how to deactivate the integrated graphic card if you are not using a NVIDIA graphics card.

  1. Right-click on the desktop and choose NVIDIA Control Panel.
  2. On the left hand side, select 3D Settings > Manage 3D Settings (Drop-down menu only available if you use a Workstation Quadro Nvidia card, Gaming GeForce Nvidia card do not have this feature).
    • In the Global presets drop-down menu, select 3D App - Game Development.
    • In the Preferred graphic processor drop-down menu, select High-performance NVIDIA processor.
      NVIDIASettings.jpg
  3. On the left hand side, select 3D Settings > Set PhysX Configuration.
    • In the Select a PhysX processor drop-down menu, select your graphics card (it should not be set to “Auto-select” or “CPU”).
      NVIDIAPhysX.jpg

See Also


Keywords:

invisible geometries, display, graphic card problems, video card problems, no features, cad display, nvidia, dual video cards, dual graphics cards, multiple graphics cards, multiple video cards, 2 graphics cards, 2 video cards, 10, direct x, d3dx9_41.dll, dll error