Creating a Fly Through Video in SCENE

View Tab
- Quality Settings - A higher setting increases render time but provides better image quality while moving.
- Clear View Settings - Use clear view to to display points with a greater density brightly and points in a lower density with more transparency.
- Gap Filling - This fills gaps between scan points close to each other.
- Supersampling - This gives the point cloud a smoother visual appearance.
Layer Tab
Use this tab to make certain project layers invisible for movie rendering.
Extra Tab
- Objects - Turn off objects such as scan positions to declutter the scan project.
- Visibility - Designate the minimum and maximum distance for scan points to be displayed.
- Scan Objects - Display or hide the objects that are assigned to the scans in the view. You may display these objects only if the scan is loaded.
Additional Settings
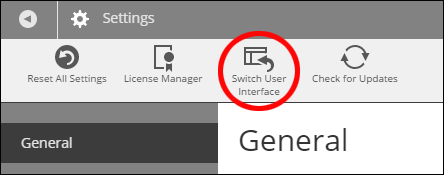
To view additional visibility settings, switch to the classic interface.
- Click the Settings icon
 on the far right of the window.
.png?revision=2)
- Click Switch User Interface.
- Click the Visibility Settings icon on the standard toolbar
 or right-click an unselected point in 3D, Planar, or Quick view and click Visibility Settings.
Creating Viewpoints
Videos are made by creating a path for the camera to follow through your scan project. This path will move through viewpoints you create and designate for the program to use. There are several ways to create viewpoints.
Manual Viewpoint
While you are exploring your project in 3D view, you can create a viewpoint by clicking Viewpoints in the Explore command ribbon and selecting Create. Note: Make sure you are facing the correct direction when you make your viewpoints. This will influence the video.

Enter a name for the viewpoint and click OK. Choose a naming convention that will make it easy for you to discern which viewpoints are which.
Create Path With View Along Path
This setting allows SCENE to automatically create a viewpoint at each scanner location in your project. A camera path is created along this path where the camera remains facing forward as it moves.
On the Apps command ribbon, click Video < Create video path with view along the path.
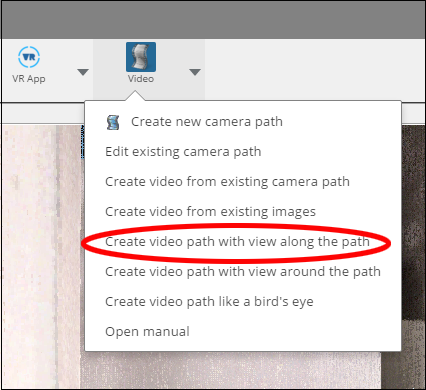
Clicking this option will open the Camera Path Settings window, allowing you to customize your camera path and preview your selections.
Create Path With View Around Path
This setting allows SCENE to automatically create a viewpoint at each scanner location in your project. A camera path is created along this path where the camera rotates to view the areas around the camera path as it moves.
On the Apps command ribbon, click Video < Create video path with view around the path.
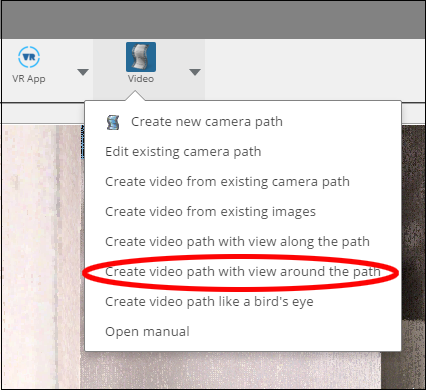
Clicking this option will open the Camera Path Settings window, allowing you to customize your camera path and preview your selections.
Create Path With Bird's Eye View
This setting allows SCENE to automatically create a viewpoint at each scanner location in your project. A camera path is created with viewpoints above your project and the camera looking down.
On the Apps command ribbon, click Video < Create video path like a bird's eye.
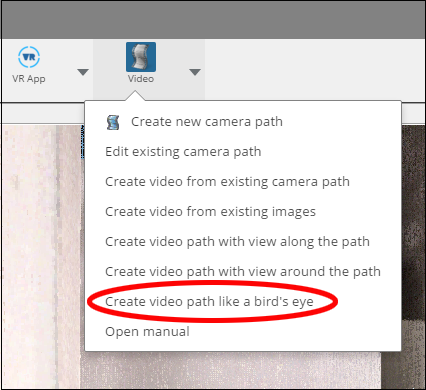
Clicking this option will open the Camera Path Settings window, allowing you to customize your camera path and preview your selections.
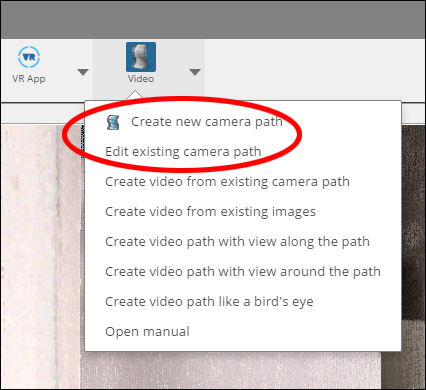
Camera Path Settings
After choosing an automated viewpoint creation option, you will see the Camera Path Settings window. You can also access a camera path by clicking the Video app icon in the Apps ribbon and selecting Create new camera path or Edit existing camera path.
All existing viewpoints for the project will be listed on the left side of the window. Select one or more viewpoints and click Add to move them into the camera path.

You can mix and match any combination of viewpoints and even use the same viewpoints multiple times. At the bottom of the window you can customize the path further, opting to loop the path or change how the path moves through scan positions.
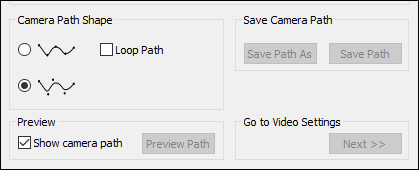
Note: When you preview your camera path, the red line indicates the camera path, and the yellow line is the field of view.
When you're finished creating a path, click Next >> under Go to Video Settings.
Creating the Video
The Video Settings window allows you to control your fly through settings, including quality, time, format, watermark. This is also where you will begin to render your video.
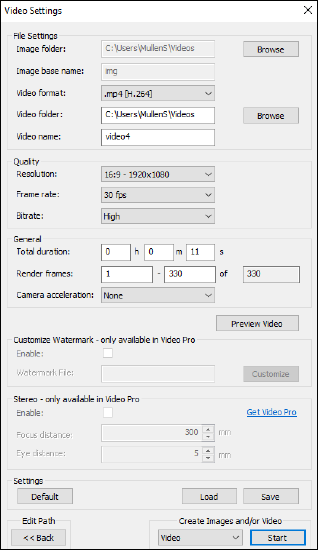
File Settings
- Image folder - If you are creating images, as well as a video, the image files will be saved in this location.
- Image base name - Create the base file name for the images created.
- Video format - Choose .WMV or .MP4.
- Video folder - Your video will be saved in this folder.
- Video name - Name your video.
Quality
- Resolution - Choose an image resolution and aspect ration based on your needs.
- Frame rate - Select the number of images displayed per second in your video. A higher number will mean a larger file size but smoother playback.
- Bitrate - This determines your video compression. A higher value means a larger file size and better quality.
General
- Total duration - Set your video playback time.
- Render frames - Use this to render a portion of your video. This is most useful if you are using multiple computers to render a video. You can also use this setting to render a small portion of the video to test video settings.
- Camera acceleration - Set camera acceleration at the beginning and end of the path.
- Customize Watermark - Video Pro users can add a custom image over the video. Click Enable and click Customize to select the watermark image. In the next window you will be able to resize your watermark and choose its location on the video screen.
- Stereo - Video Pro users can enable this setting to create a 3D fly through video. Note: This will increase rendering times.
- Focus distance - This is the distance where objects appear as they are in the plane of display. Objects closer than this value will appear closer in the 3D video.
- Eye distance - Increasing this value increases the sensation of depth in the video.
Once you have finalized your settings, click Start to create your video.