Creating a Project Point Cloud in SCENE

Overview
A project point cloud presents the project's scan data in an optimized spatial structure for fast visualization of large amounts of scan points. Scan points are loaded and visualized on demand based on the camera position and point visibility, allowing users to view all scans of a scan project at once.
Creating a Project Point Cloud
To create a project point cloud in SCENE, follow these steps:
- Open the project and click Explore.
- Click Project Point Cloud and click Create.

- Adjust the point cloud settings and click OK.
Note: A project point cloud will be two to four times the size of the source scan files. SCENE will also use temporary files up to seven times the size of the original scan files in the creation of the point cloud. Make sure the target hard drive and temporary folder have enough disk space for this operation.
Project Point Cloud Settings
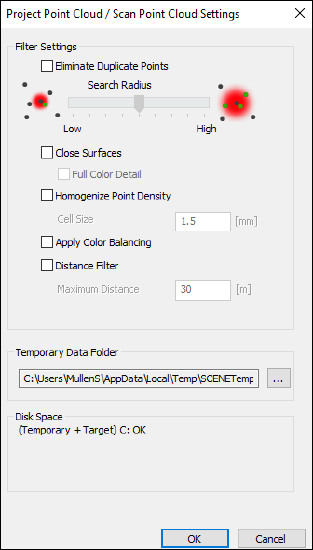
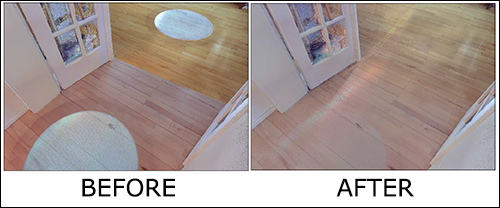
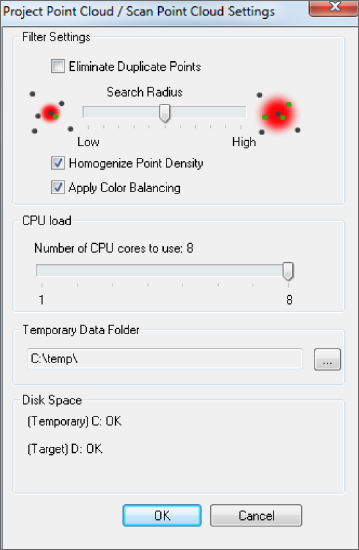
Eliminate Duplicate Points - This filter removes duplicate points that exist when points are recorded from overlapping scans. This filter will improve the visual quality of the point cloud and reduce the point count. Increasing the search radius removes a greater number of points.
Close Surfaces - This filter inserts points to create denser surfaces and improve image quality.
- Full Color Detail uses the high-resolution scanner images to obtain color data and provide better color details. By using the camera images, smearing effects are reduced and more color details are visible.
These options will increase file sizes and processing time.
Homogenize Point Density - This filter balances the density of points within the point cloud by reducing points in areas that exceed the target density.
- Cell Size can be used to alter the target density.
Note: Close Surfaces and Homogenize Point Density can not be used at the same time.
Apply Color Balancing - This filter minimizes the color contrast between scans to compensate for color temperature changes during the scanning process.
Distance Filter - This filter restricts the points used to make the project point cloud to those within a set distance from the associated scanner position. This allows you to eliminate excess scan data and reduce the overall file size.
CPU Load - This setting allocates the number of computer processing cores to be used creating the cloud. Using more cores will decrease point cloud creation time but will leave fewer resources for other programs running on the machine.
Temporary Data Folder - This setting designates the folder used for storing temporary files during the cloud creation. This data will be deleted when the cloud is finished. Depending on the settings listed above, this folder should have storage size equal to two to seven times the size of the source scans.
Disk Space - This information displays the amount of disk space available for the operation.
SCENE 5 and Earlier
- Open the project file and click the scan cloud
 in the top toolbar.
 - Use the point cloud window to define the cloud's settings.
- Eliminate Duplicate Points - This filter removes duplicate points that exist when points are recorded from overlapping scans. This filter will improve the visual quality of the point cloud and reduce the point count. Increasing the search radius removes a greater number of points.
- Homogenize Point Density - This filter balances the density of points within the point cloud by reducing points in areas that exceed the target density.
- Apply Color Balancing - This filter minimizes the color contrast between scans to compensate for color temperature changes during the scanning process.
- CPU Load - This setting allocates the number of computer processing cores to be used creating the cloud. Using more cores will decrease point cloud creation time but will leave fewer resources for other programs running on the machine.
- Temporary Data Folder - This setting designates the folder used for storing temporary files during the cloud creation. This data will be deleted when the cloud is finished. Depending on the settings listed above, this folder should have storage size equal to two to seven times the size of the source scans.
- Disk Space - This information displays the amount of disk space available for the operation.
- Click OK.
Keywords: Scene, Focus, 3D, point clouds