Using the Oculus Rift with SCENE
Quick Steps
- Connect headset and sensors to PC.
- Use Oculus app to calibrate headset.
- Open project in SCENE and click VR View on the Explore ribbon.
Overview
You can view a scan project with the Oculus Rift headset directly from SCENE. Follow these instructions to connect your Oculus Rift headset. In order to view a project you will need to download and install the Oculus Rift app, Steam, and Steam VR. You will also need to create a project point cloud for the project.
Prepare
Please review this table before you begin to ensure your success.
| Time to Complete | 30 minutes |
| Skills Needed |
|
| Prerequisites |
|
| Supported Hardware |
Oculus Rift |
Setting up the Oculus Rift Headset
- Download and install the Oculus Rift app.
- Plug the HDMI and USB 3.0 Oculus Rift headset cables into your computer.
Note: You will need a USB 3.0 port near the HDMI port. A USB 3.0 port has a blue interior.

- Plug the Oculus sensor cables into USB 3.0 ports, and place the sensors 3 to 6 ft. apart with the reflective side pointing at the play area.
Note: Make sure to remove the protective covering from the sensor lenses. - Open the Oculus app.
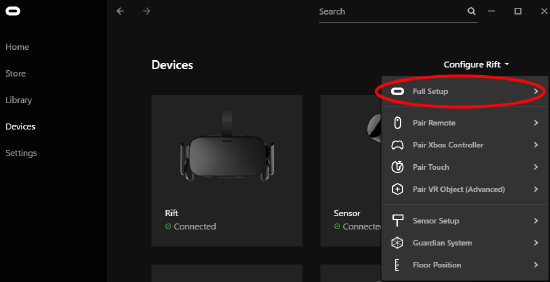
- If the calibration process doesn't begin automatically, click Devices in the left menu, and in the Configure Rift drop-down menu, click Full Setup.

- Follow the on-screen instructions to calibrate your controllers, headset, and sensors.
Note: If your Touch controllers are not added, turn on the controllers. Click Configure Rift and select Pair Touch. - Download and install Steam and Steam VR.
Oculus Rift App
- Open the Oculus Rift app.
- Click Settings > General > Turn on Unknown Sources. This will allow the use of SCENE with the headset.
- Open SCENE.

