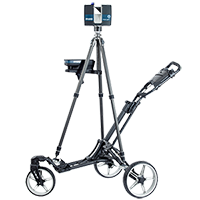
Getting Started with the FARO Swift
Overview
The FARO® Swift is a collection of features that makes it possible for a FARO Premium or FocusS laser scanner and a FARO ScanPlan to work together to complete scanning projects up to ten times faster than with the laser scanner alone. The software uses a simultaneous localization and mapping (SLAM) algorithm that enables you to scan while the scanner is in motion. This can significantly reduce the scanning time and the cost of large scanning projects.
Both the Focus and the ScanPlan are mounted onto a rolling trolley. You push the trolley around the area that you want to scan. The scanner continuously scans the area while receiving localization information from the ScanPlan and creates 360° mobile scan data. In addition to these mobile scans, you can add traditional, stationary color scans where dense and high-quality data is required. The completed FARO Swift scan can be imported into SCENE and used in the same way as other scans. The resolution and quality of mobile FARO Swift scans are not as high as stationary scans, but are sufficient for many applications. Use FARO Swift when speed is important, and add stationary scans when detail is important.
Components of the Swift System
 |
 |
 |
 |
|
Focus Premium Laser Scanner with:
-or-
|
ScanPlan (firmware 2020.0 or greater) ScanPlan Mounting Kit |
Swift Trolley | FARO Tripod (p/n ACCSS8032) |
Also required:
- SCENE software with Swift SCENE Plugin License.
- Version 2022.0 or later for Focus Premium | Version 2020.0 or later for FocusS
Hardware Setup
The following video outlines the setup and installation of the Swift hardware components.
Note: The following video depicts the ScanPlan Mounting Kit (810-000097-000), if you are using the ScanPlan Mounting Kit (ACCS-MNT-0016), please refer to the Swift User Manual for updated assembly instructions.
Cannot view the video? Click here to download this video.
Important:
- The FARO swift system was designed specifically to work with the FARO Tripod (p/n ACCSS8032). Use of other tripods can be dangerous and result in equipment damage or injury to the user.
- FARO-provided tripods are shipped with a short and a long center post. For conventional scanning, the short center post is recommended, but for FARO Swift scanning, the long center post is required. If your tripod is currently configured with the short center post, remove it and replace it with the long center post before proceeding. Download the User Manual for the FARO Tripod for more information.
Software/Firmware Setup
Before proceeding verify the following:
- Focus Premium or FocusS Laser Scanner with firmware version 6.6 or greater
- ScanPlan firmware is version 2020.0 or greater
- SCENE 2022 or greater is installed on your PC and is activated, (2020 or greater for FocusS)
Activating the Swift Focus Firmware License
Focus Premium models, see: Activating License Extensions for the Focus Premium Laser Scanner
FocusS models:
FARO Swift functions require a special firmware license. Once purchased, the license key will be sent to you via email. The license can only be applied to one Focus scanner, and it is not possible to move the license to a different scanner later.
- Start the Focus Laser Scanner.
- Tap or swipe right on Scanner home screen.
- Enter your Swift Firmware license key and tap OK. If the license key is correct, the Swift Scan Mode screen appears.

Activating the Swift SCENE Plug-in License
For SCENE to process Swift scans, you must first enter your license for the Swift SCENE Plug-in. You only need to do this once:
- Start SCENE.
- Click on the Gear
 icon in the top-right corner, then on the ribbon click License Manager.

- The License Manager appears. If all of the license options are not visible, click the More Options button on the bottom of the License Manager window.
- In the License Manager, click Add License.

- Enter the Product Key for the FARO Swift SCENE Plug-in and click Submit.

- A message appears indicating the license activated successfully. Click OK. Your copy of SCENE is now ready to process Swift scans.
Connect the Devices
Before you begin to scan, you need to connect the Focus scanner, ScanPlan, and phone or tablet to each other via WLAN.
- Switch on the ScanPlan. (Note: You do not need to connect the ScanPlan with a phone as you would when using the ScanPlan alone to make 2D floor plans.)
- Switch on the Focus scanner.
- Wait until both devices have booted, then proceed to the sections below.
1- Connect the Focus to the ScanPlan
|
Cannot view the video? Click here to download this video. |
2- Connect Your Phone/Tablet to the ScanPlan
|
Cannot view the video? Click here to download this video. |
Congratulations! Your FARO Swift system setup is now complete and you are ready to start scanning. Refer to the following resources for scanning procedures and best practices.

