Export a Project .lsproj File in SCENE
Quick Steps
- In FARO® SCENE, open the Project Point Cloud you want to export.
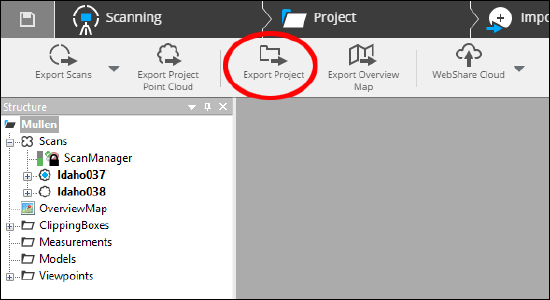
- Workflow Interface - On the Export ribbon, click Export Project, set the Format field to SCENE Project (*.lsproj), confirm you have the correct Project Name and Location, and click Export.
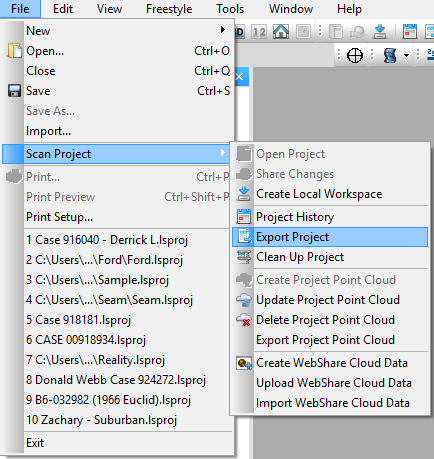
- Classic Interface - On the main menu, click File > Scan Project > Export Project, set the Format field to SCENE Project (*.lsproj), confirm you have the correct Project Name and Location, and click Export.
Overview
To open a project point cloud in applications other than SCENE, you must first export it from SCENE. Before you do, make sure you have updated the project with all the latest details. For information about doing this, see the User Manual for SCENE. The project point cloud file extension is .lsproj.
Prepare
Please review this table before you begin to ensure your success.
| Time to Complete | 15 minutes or less |
| Skills Needed |
|
| Prerequisites |
|
Workflow Interface
- Open a project. Click Export on the workflow bar.
- Click Export Project in the Export ribbon.

- In the Export Project window, set the Format field to SCENE Project (*.lsproj) and confirm you have the correct Project Name and Location. If not, enter a new name in the Project Name field, or click ... to change the Location.

- Click Export. Depending on the size of your project, this may take some time.
- The Export Project window with a progress bar and a status message appears. Click OK.
The exported project is now ready to be imported into other applications.
Note: The exported project only contain one revision and the RAW data folder will not be exported with that project.
Classic Interface
- Open a project. On the main menu, click File > Scan Project > Export Project.

- In the Export Project window, set the Format field to SCENE Project (*.lsproj) and confirm you have the correct Project Name and Location. If not, enter a new name in the Project Name field, or click ... to change the Location.

- Click Export. Depending on the size of your project, this may take some time.
- The Export Project window with a progress bar and a status message appears. Click OK.
The exported project is now ready to be imported into other applications.
See Also
- User Manual for SCENE
- Software Download and Release Notes for SCENE
- Importing and Exporting Ordered and Unordered Files in SCENE
Keywords:
export project files, complete project files, share files

