General Troubleshooting for SCENE

Overview
If you are experiencing frequent crashes or poor performance in SCENE, along with your IT department please follow the steps in this article.
Troubleshooting and Configuration Steps
1. System & Software Requirements
Make sure your system meets the minimum specifications: Computer System Requirements for SCENE
2. GPU Driver and Configuration
- Download and install the latest NVIDIA GPU driver from: https://www.nvidia.com/Download/index.aspx ("Studio" drivers are recommended).
- NVIDIA Control Panel Configuration:
- Right-click on an empty area of your desktop, and click NVIDIA Control Panel. Windows 11 users: Right-click on an empty area of your desktop, click "Show more options", and then click NVIDIA Control Panel.

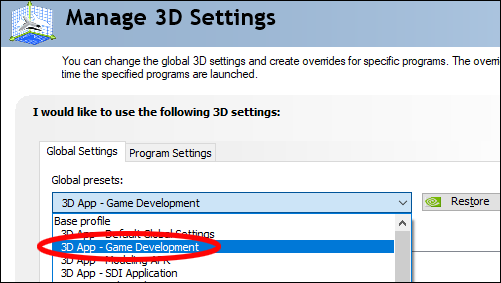
- On the left-hand side, under 3D Settings, select Manage 3D Settings. In the Global Settings tab, select 3D App – Game Development in the Global presets drop-down menu and click Apply. (Note: Gaming GeForce NVIDIA cards do not have this feature.)
- In the Set a PhysX processor menu, select your graphics card (it should not be set to “Auto-select” or “CPU”).

- Right-click on an empty area of your desktop, and click NVIDIA Control Panel. Windows 11 users: Right-click on an empty area of your desktop, click "Show more options", and then click NVIDIA Control Panel.
- Windows Settings:
- Under Settings → System → Display → Graphics. Add or find scene.exe, set the GPU preference to High Performance (it should not be set to “Power Saving” or “Let Windows decide”).

- Under Settings → System → Display → Graphics. Add or find scene.exe, set the GPU preference to High Performance (it should not be set to “Power Saving” or “Let Windows decide”).
3. Windows Power Optimization
- Desktop Users: Go to Control Panel → Power Options, set the Power Plan to High Performance
- Laptop Users: Plug in your laptop external power and go to Settings → Power & Battery. Under Power Mode, set to Best Performance
4. Antivirus / Security Software
Temporarily disable your antivirus or ask your IT team to add an exception for SCENE.exe. Antivirus software may interfere with file writing processes and could block or remove the .lsproj file.
5. File Location
- Avoid using network drives or synchronized folders (e.g., OneDrive, SharePoint), as synchronization or security policies may affect file integrity or performance
- We recommend working in a local directory (avoid: C:\Users\Username\OneDrive - Companyname...).
6. Reset SCENE Settings
You may also try resetting SCENE to its default settings:
- Open SCENE
- Click the cogwheel icon (top right)
- Select “Reset All Settings” (top left)
- Restart SCENE
7. Path Naming
Ensure that the project path contains only standard English (ASCII) characters, as special characters may cause issues.
8. Installation & Core Software Setup
Reinstall SCENE. The download and installation instructions can be found here: Software Download, Installation, and Release Notes for SCENE
If a "Clean Installation" is desired or necessary, the old installation and its dependencies must be removed manually.
- From the Windows Start menu, go to Control Panel → Programs and Features and uninstall the following:
- FARO LS
- SCENE
- All SCENE Redistributable Packages
- Next, go to: C:\Program Files\FARO and delete all SCENE XXXX.X entries.
- Reinstall SCENE as Administrator:
- Disable Antivirus or give the installation file an exception
- Right-click installation file and run as administrator
- Start SCENE once as Administrator when prompted, then close it. Then start SCENE normally.
9. Update to Latest C++ Redistributable
Install the latest x64 Microsoft Visual C++ v14 Redistributable version available at: https://learn.microsoft.com/en-us/cpp/windows/latest-supported-vc-redist
10. Disk Space & TEMP Requirements
- The "TEMP" folder location must be local, e.g. C:\Users\UserName\AppData\Local\Temp\SCENETemp
- Note: Some export formats require greater than 7 times the drive space as the SCENE project size.
11. Update Your Operating System
- From the Windows Start menu, go to Settings → Update and Security.
- Click Check for Updates and install all of them. Repeat until no updates are available.
In the Event of a Crash
After a crash or an unexpected SCENE closure:
If the Crash Report Dialogue opens:
Example of the Crash Report Dialog
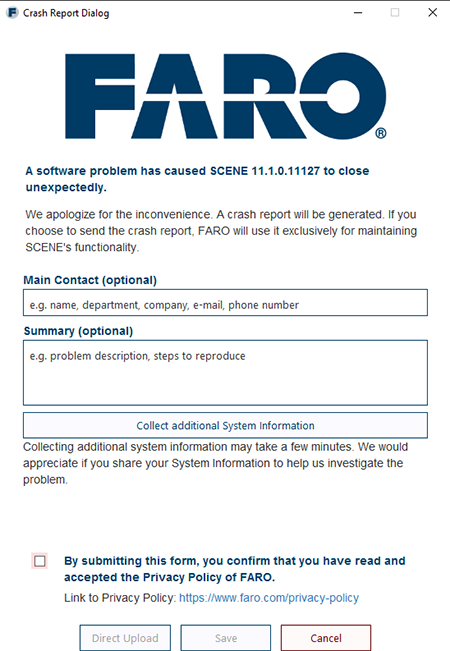
- Click the Collect additional System Information
- Accept the Privacy Policy of FARO
- Save the file on your Desktop
- Send the file to FARO Support
If the Crash Report Dialogue does not open, send us the following:
- APPLICATION and SYSTEM Event Log
- For more information on how to save application and system event logs, see: https://learn.microsoft.com/en-gb/host-integration-server/core/how-to-save-event-logs1
- Provide the time when SCENE crashed
- Log files
- Open SCENE and go to Settings (cogwheel, top right of screen)
- Under Log Files, ensure "Enable Logging" is activated
- Close SCENE
- Go to the folder: C:\Users\Username\AppData\Local\Temp\SCENELogs
- Delete all files
- Reproduce the issue in SCENE
- Close SCENE
- Go back to the "SCENELogs" folder location
- Select all files and zip them into a single file
- Send the .zip file to FARO Support
Additional Information, if possible send us the following:
- The project via a download link from a file transfer service such as https://www.swisstransfer.com
- A screen video recording showing how to reproduce the issue. These can made with a free https://obsproject.com/. Open Broadcaster Software is a free, open-source software project that provides powerful tools for live streaming and video recording.