Setting Up and Using the RPC Server with BuildIT Metrology

Overview
This article presents a high-level overview of the RPC server capabilities. It also details how to enable the functionality, and provides typical use cases as well as an example client using WebSocket. A Python API is available for developing client applications in Python. This API is documented under the Python API Overview section in the internal documentation.
Accessing Internal Documentation
This article and additional information is available within BuildIT under Help > Python Interface.

RPC Server
The RPC (Remote Procedure Call) server allows client systems and applications to drive BuildIT and coordinate the execution of automated processes and measurements commands.
Capabilities include:
- Exchanging serializable data with BuildIT (strings, floats, integers, etc.)
- Retrieving real-time device information such as probe coordinates, 3D deviations, device status, etc.
- Launching automated processes and triggering measurements
- Displaying instructions and feedback in the BuildIT viewport
- Activating projection layers, and navigating the projection plan
It also enables using the BuildIT remote control, a browser-based application that offers an interface for conducting inspection and projection workflows. More information on the remote control can be found here.
Client applications can communicate with the RPC server over WebSocket directly, or use an API. Both a Python API and a JavaScript API are available. The RPC server setup and usage overview is documented below.
Communicating with External Systems via the RPC Server
Clients can communicate with the RPC server using various methods:
- Using WebSocket: The most direct communication channel with the RPC server. If the client can communicate over WebSocket, it can communicate directly with the RPC server. For more information, refer to the WebSocket Interface section in the internal documentation.
- Using the Python API: A Python API is available for writing client applications. For more information, refer to the Python API Overview page in the internal documentation.
- Using the JavaScript API. A JavaScript API is available for writing client applications. Reach out to support@builditsoftware.com for additional information
- If the client cannot communicate over WebSocket or use the APIs, we suggest setting up a “broker” or “proxy” application that would translate the inputs from the client, and send back the responses from the RPC server
Enabling the RPC server
By default, the RPC server functionality is deactivated. It needs to be activated manually once, and will remain activated whenever launching BuildIT afterwards. To activate the RPC server:
- Open “File: Setting”
- Go to the “Interface” category
- In the “HTTP Server” section, tick the “External Access” option
- Click “OK”

- Set the appropriate permissions for the network on which you will communicate with the RPC server.

The RPC service
Once the RPC server has been enabled, a lightweight service will automatically be launched when opening BuildIT. The service will keep running after closing BuildIT. It can also be launched as a standalone application. When the service is running, an icon will be displayed in the system tray:

The service keeps track of the active instances of BuildIT and can return the list of active instances as well as launch new instances. The port number of the service is always the lowest number in the range defined in the settings.
- Info on the active instances of BuildIT can be visualized via http://localhost:34203/api/info
- A new instance of BuildIT can be launched by the service via http://localhost:34203/api/launch
This documentation assumes that the service is running.
Accessing the RPC Server Documentation
For the list of WebSocket calls:
- In a web browser, go to http://localhost:34203/rpc_test.html (if needed, replace the digits with the port number defined in the settings).
- Prior to 2021, the address is http://localhost:34203/html/rpc_test.html
- Prior to 2020.7, the address is: http://localhost:34203/html/apidoc.html.
- Hit the “Connect” button to connect to the WebSocket server.
- All commands are available from this page and can be tested through this interface.
- The full list of commands can be printed using the “rpc.dir()” command.

Typical usage
In general, the RPC server’s available functions and mechanisms encourage designs where the external system controls BuildIT, and BuildIT performs the requested actions and commands, and provides handshakes and feedback.
Example: Robot Path Validation with the Laser Tracker
In this application, the external controller (robot controller) and BuildIT need to coordinate and go through a robot path validation workflow. The robot starts at an arbitrary position, and BuildIT acquires data while the robot is moving. BuildIT then performs an analysis. The two systems need to exchange some information before and after the robot movement, and coordinate when to start and stop the acquisition.
During the execution of the process, the controller coordinates the necessary steps with BuildIT through calls to the RPC server.
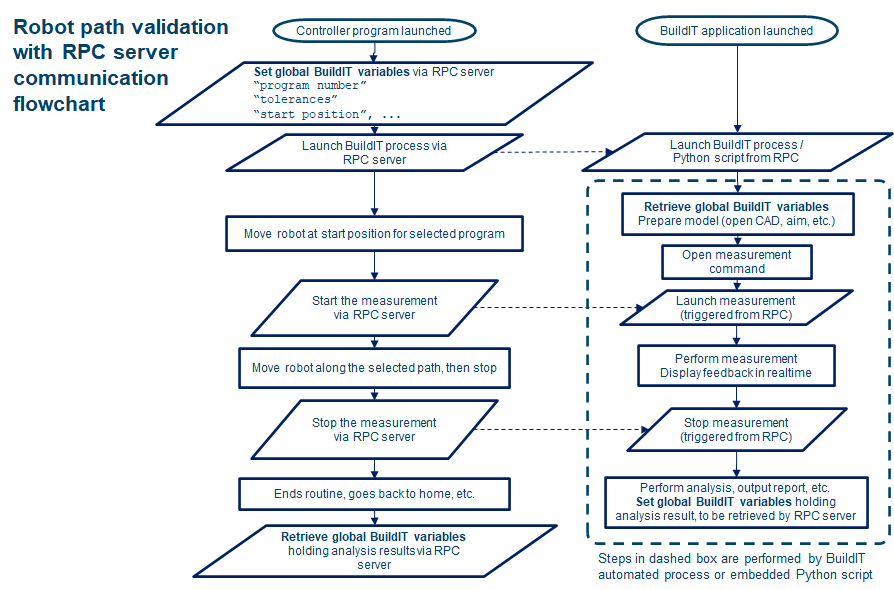
In this example, the robot controller performs essentially 5 calls to the RPC server:
- Set global BuildIT variables to be retrieved and used by the process
- Available in BuildIT 2021 - In older versions, the exchange needs to be done via other means
- Launch the process corresponding to the job to be performed
- Launch the measurement when both the robot and BuildIT are ready
- Stop and accept the measurement when the robot has completed its path
- Retrieve the global BuildIT variables set by the process
- Available in BuildIT 2021
For ensuring that BuildIT is ready to be issued those 5 calls (i.e. validating there is no process already running, knowing when the measurement command is ready, or confirm it has started, validating the process has finished, etc.) the robot controller can poll the BuildIT RPC server for getting the relevant measurement and process status.
Example: Projection Workflow
In this application, the external controller activates the projection layers pre-defined in the projection plan. Before starting the projection, the controller and BuildIT need to coordinate on a few preliminary steps.
The whole workflow consists of essentially 4 separate calls to the RPC server:
- Opening the model.
- This model contains the layers to be projected.
- Connecting to the projectors in plan.
- Aligning the projectors to retro-targets.
- Those retro-targets are listed in the projection plan and their nominal positions are defined in the BuildIT model.
- Activating the projection layers. This step would generally consist of a loop on the controller’s side. The BuildIT application does not require running any automated process for receiving those calls.

In cases where the projector or the part would be moving using an actuator, performing a dynamic relocation would require calling an automated BuildIT process for moving the projectors to the desired position in the BuildIT model. This step could be called via the RPC server at any point, just like the other steps in the workflow.
WebSocket Interface
Client applications can interface with the RPC server via a WebSocket connection.
Expected Syntax when using WebSocket Interface
The RPC server expects a json string over WebSocket. This string should be comprised of the following properties:
- method: Name of the method to run - this name can be obtained via the documentation
- params: Arguments passed to the method * The definition of arguments can be obtained via the documentation * Methods that do not expect an argument should be passed the “null” parameter
- id: the id sent along with the request will be sent back with the response
That page lists the methods available in the API. Those RPC calls can be tested independently of Python in a web browser, via http://localhost:34203/rpc_test.html.
- Info on the active instances of BuildIT can also be visualized via http://localhost:34203/api/info
- A new instance of BuildIT can be launched by the service via http://localhost:34203/api/launch
Example WebSocket Client (written in Python)
Note: If writing the client application using Python, we strongly recommend using the Python API. The example below is meant to illustrate a typical WebSocket communication with the RPC server, and not for providing an example on writing a client application in Python.
Information on the Python API can be found in the internal documentation.
import json

import asyncio

import websockets
uri = "ws://localhost:34203/ws/buildit"
commands = [

    {

        'method' : 'buildit.getProfileName',

        'params' : None,

        'id'     :  1

        },

    {

        'method' : 'buildit.messageBarOutput',

        'params' : ['Sending a message via RPC server', 'normal'],

        'id'     :  2

        },

    {

        'method' : 'buildit.getProcessInfo',

        'params' : None,

        'id'     :  3

        }

    ]
async def send_messages():

    try:

        async with websockets.connect(uri) as websocket:

            for command in commands:

                message = json.dumps(command)

                await websocket.send(message)

                print(f"> {message}")

                response = await websocket.recv()

                print(f"< {response}")

    except OSError:

        print(f'Make sure BuildIT is connected and RPC server is running and listening at address {uri}')
asyncio.get_event_loop().run_until_complete(send_messages())
"""

Output:

> {"method": "buildit.getProfileName", "params": null, "id": 1}

< {"id":1,"result":"Metrology"}

> {"method": "buildit.messageBarOutput", "params": ["Sending a message via RPC server", "normal"], "id": 2}

< {"id":2,"result":null}

> {"method": "buildit.getProcessInfo", "params": null, "id": 3}

< {"id":3,"result":{"name":"","path":"","status":"STOP"}}

"""