Project Point Cloud Creation in SCENE with the New Interface
Overview
The project point cloud consists of the points in all scans within your scan project. Creating a project point cloud enables you to interactively view and manipulate all the scan data in one place. If you plan to export your scan data to other applications, it is recommended that you use the project point cloud so that all your scan data is exported at once.
Before you create a project point cloud make sure that you have successfully processed and registered all the scans in your project. After you have created a project point cloud, you can open the project in SCENE's 3D view and update the scan data. There is only one project point cloud for each scan project. As you can imagine, this file can be quite large, so make sure you have plenty of available space on your computer's hard drive. The project point cloud file extension is .lsproj.
Check if Your Project is Ready to be a Project Point Cloud
- In SCENE on the Project Overview window, click the image for the scan project you want to work with.

- The Project Details window appears.
.png?revision=2&size=bestfit&width=542&height=285)
- At the bottom of the window, check the color bars at the top of the status tiles. The bars indicate how much of the workflow is or is not complete. A green bar indicates complete. When you create a project point cloud all bars, except the last one for the Project Point Cloud tile, should be green. If they are not, refer to the User Manual for SCENE to correctly process and register the scan data files before continuing.
- If the bar for the Project Point Cloud tile is green, you already have a Project Point Cloud and can skip the remainder of this article.
- If the bar for the Project Point Cloud tile is not green, continue to the next section and create a project point cloud.
For details about status tiles and color bars, see the User Manual for SCENE.
Create a Project Point Cloud
- In SCENE on the workflow bar, click Explore.
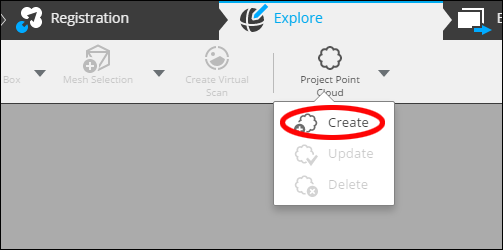
- On the toolbar, click Project Point Cloud > Create.

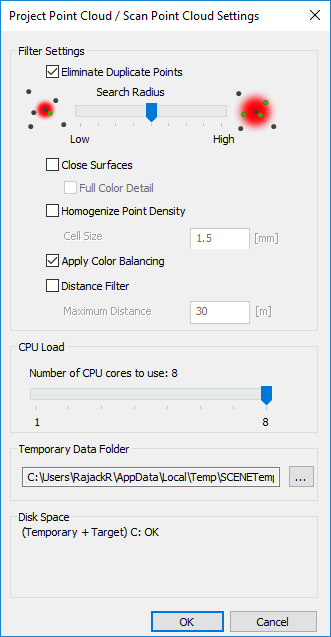
- The Project Point Cloud / Scan Point Cloud Settings window appears. Here you select settings for your project. For details about each setting, see the User Manual for SCENE and search for Creation Settings. If you plan to export this project point cloud, you may want to accept the default setting to keep the file size minimal. Settings that fill in holes in scan data or balance density tend to increase the project point cloud file size beyond what some applications can easily accommodate.

- Click OK to create the Project Point Cloud. The Creating Project Pont Cloud window appears to show progress. Depending on the number of scans in your project, this may take some time.

- When the Project Point Cloud has been created successfully a status message appears. Click OK.

- On the Workflow Bar, click Project to see the Project Details. See that the color bar for the Project Point Cloud status tile is now green.
The Project Point Cloud is now ready to use. You can update this project or export it at any time. For details see the User Manual for SCENE and search for Update Point Cloud.
See Also
Keywords:
export project files, complete project files

