As-Built As-Built - Revit As-Built - AutoCAD VirtuSurv - VirtuSurv 2018 As-Built - Modeler VirtuSurv - VirtuSurv 2019          
BuildIT BuildIT - Projector BuildIT - Construction BuildIT - Metrology              
CAM2 CAM2 - SmartInspect CAM2 - 2024 CAM2 - 2023 CAM2 - 2018 CAM2 - Measure 10 CAM2 - Measure Q CAM2 - Measure X CAM2 - Measure 3/4 CAM2 - AnthroCAM CAM2 - 2019
CAM2 CAM2 - 2020 CAM2 - 2021                
Cobalt 3D Imager 3D Imager - Cobalt                  
Cobalt Design Cobalt Design - M Cobalt Design - S Cobalt Design - Dual              
Computers Computers - All Computers                  
FARO Aras 360 & CAD Zone FARO CAD Zone - Fire & Insurance FARO CAD Zone - Crime & Crash FARO CAD Zone - CZ Point Cloud FARO CAD Zone - First Look Pro FARO 360 - Reality FARO 360 - HD FARO 360 - Blitz FARO 360 - Genius    
FARO Connect FARO Connect - Connect                  
FARO Zone present4D - present4D                  
FARO Zone 2D FARO Zone 2D - 2018 FARO Zone 2D - 2019 FARO Zone 2D - 2020 FARO Zone 2D - 2021 FARO Zone 2D - 2022 FARO Zone 2D - 2023 FARO Zone 2D - 2024      
FARO Zone 3D FARO Zone 3D - 2018 FARO Zone 3D - 2019 FARO Zone 3D - 2020 FARO Zone 3D - 2021 FARO Zone 3D - 2022 FARO Zone 3D - 2023 FARO Zone 3D - 2024      
FARO Zone 3D Advanced FARO Zone 3D Advanced - 2018 FARO Zone 3D Advanced - 2019 FARO Zone 3D Advanced - 2020 FARO Zone 3D Advanced - 2021 FARO Zone 3D Advanced - 2022          
FaroArm/ScanArm FaroArm/ScanArm - Quantum S FaroArm/ScanArm - Quantum M FaroArm/ScanArm - Quantum E FaroArm/ScanArm - Edge FaroArm/ScanArm - Fusion FaroArm/ScanArm - Prime FaroArm/ScanArm - Platinum FaroArm/ScanArm - Legacy Quantum FaroArm/ScanArm - Titanium FaroArm/ScanArm - Advantage
FaroArm/ScanArm FaroArm/ScanArm - Digital Template FaroArm/ScanArm - Gage FaroArm/ScanArm - Quantum S Max FaroArm/ScanArm - Quantum M Max FaroArm/ScanArm - Quantum E Max FaroArm/ScanArm - Gage Max FaroArm/ScanArm - Quantum X.S FaroArm/ScanArm - Quantum X.M FaroArm/ScanArm - Quantum X.E  
GeoSLAM Software GeoSLAM Software - Connect GeoSLAM Software - Draw GeoSLAM Software - Hub GeoSLAM Software - Volumes            
GeoSLAM ZEB GeoSLAM ZEB - Horizon GeoSLAM ZEB - Horizon RT GeoSLAM ZEB - Revo GeoSLAM ZEB - Revo RT GeoSLAM ZEB - Go          
Hand Held Scanner 2D Hand Held Scanner - ScanPlan 3D Hand Held Scanner - Freestyle3D 3D Hand Held Scanner - Freestyle3D X 3D Hand Held Scanner - Freestyle3D Objects 3D Hand Held Scanner - Freestyle 2          
Language Quality HT MT AT NT INT - Internal Sales - Internal Resources Sales - Order and Quote Sales - Product Info Sales - Sales Readiness Sales - Training
Language Quality Sales - Product Launch Sales - Promotions CS - Quote to Invoice CS - Phone System CS - New Hire Training CS - General CS - Product Info CS - Licensing CS - Onboarding CS - Procedures General
Language Quality CS - Procedures Salesforce CS - Procedures Loaner CS - Procedures SAP              
Languages Language - English Language - Japanese Language - German Language - Chinese Language - Spanish Language - Italian Language - Portuguese Language - French Language - Korean  
Laser Projector RayTracer - RayTracer Laser Projector - Tracer M Laser Projector - Tracer SI              
Laser Radar Imaging Laser Radar - VectorRI                  
Laser Scanner 3D Laser Scanner - Focus S 3D Laser Scanner - Focus M 3D Laser Scanner - Focus3D 3D Laser Scanner - Focus3D X 3D Laser Scanner - Focus3D X HDR 3D Laser Scanner - Focus3D S 3D Laser Scanner - Photon 3D Laser Scanner - Focus S Plus 3D Laser Scanner - Swift 3D Laser Scanner - Focus Premium
Laser Scanner 3D Laser Scanner - Focus Core 3D Laser Scanner - Focus Premium Max                
Laser Tracker Laser Tracker - Vantage Laser Tracker - ION Laser Tracker - Vantage S Laser Tracker - Si Laser Tracker - X Laser Tracker - Xi Laser Tracker - Vantage E Laser Tracker - Vantage S6 Laser Tracker - Vantage E6  
Legacy Gage Legacy Gage - Bluetooth Legacy Gage - Plus Legacy Gage - Standard Legacy Gage - Power            
Legacy Software Legacy Software - CAM2 Gage Legacy Software - Gage Software Legacy Software - Insight              
Mobile Scanner Mobile Scanner - Orbis                  
PointSense PointSense - Basic PointSense - Pro PointSense - Building PointSense - Plant PointSense - Heritage PointSense - Revit CAD Plugin - TachyCAD Building CAD Plugin - TachyCAD Archeology CAD Plugin - TachyCAD Interior CAD Plugin - PhoToPlan Basic
PointSense CAD Plugin - PhoToPlan CAD Plugin - PhoToPlan Pro CAD Plugin - PhoToPlan Ultimate CAD Plugin - DisToPlan CAD Plugin - MonuMap CAD Plugin - hylasFM CAD Plugin - VirtuSurv      
RevEng RevEng - RevEng                  
ScanArm ScanArm - Design ScanArm 2.0 ScanArm - Design ScanArm ScanArm - Forensic ScanArm ScanArm - Design ScanArm 2.5C            
SCENE SCENE - Capture and Process SCENE - WebShare Server and 2Go SCENE - WebShare 2Go App SCENE - 2024 SCENE - 2018 SCENE - 7.x SCENE - 6.x SCENE - 5.x SCENE - 4.x SCENE - LT
SCENE SCENE - 2019 SCENE - 2go App SCENE - 2020 SCENE - 2021 SCENE - 2022 SCENE - 2023        
Serial FaroArm Serial FaroArm - Silver Serial FaroArm - Gold Serial FaroArm - Bronze              
Sphere FARO Sphere - Sphere                  
Visual Inspect Visual Inspect - App Visual Inspect - CAD Translator                
WebShare WebShare - Enterprise WebShare - WebShare Cloud                

3D Imager

Cobalt

FARO® Knowledge Base

Interface Utility for Cobalt 3D Imager

Cobalt Imager Icon

Quick Steps

Click the link in this table to download the latest FARO®Cobalt 3D Image Interface on the computer you use with your Cobalt.

Date Version  
June 2018 1.4.0.22  Cobalt Interface Utility

Overview

The FARO® 3D Imager Interface Utility enables you to make updates and adjustments to the FARO Cobalt 3D Imager without having to install metrology software, such as CAM2, Measure 10, BuildIT, or other third-party software. 

Here is what you get with the Interface Utility.

  • Diagnostic window provides access to these features
    • Device Manager so you can connect a computer to the Cobalt
    • System information and Update for the SDK Server
    • Diagnostic tab, Log Files tab, Last Compensation Statistics tab, and the Dot Plate Check tab
  • Compensation window to guide you through the process of compensating (making accuracy adjustments) to the Cobalt

Prepare

Time to Complete 30 minutes
Skills Needed
  • Knowledge of Windows at the operating system level
  • General computer skills
Prerequisites
  • Internet connection
  • Computer you use with the Cobalt
  • Dot Plate you use to compensate the Cobalt

Install the Interface Utility on a Computer

  1. Attach the Cobalt to the computer with a Cross Over Ethernet cable.
  2. Turn on the Cobalt using the toggle switch on the power brick next to the power plug.
  3. Click here to download the latest Interface Utility to the computer you use with your Cobalt.
  4. Once the Interface Utility is downloaded, locate the CobaltInterface-ml-1.4.0.22-Full.exe file in your browser's download folder. Double-click the .exe to run it.
  5. Follow the prompts until the installation is complete. Click Finish.

Check the Network Connection Type

The network connection type on the computer should be Local Area Connection > Internet Protocol Version 4 (TCP/IPv4) > Obtain an IP address automatically.
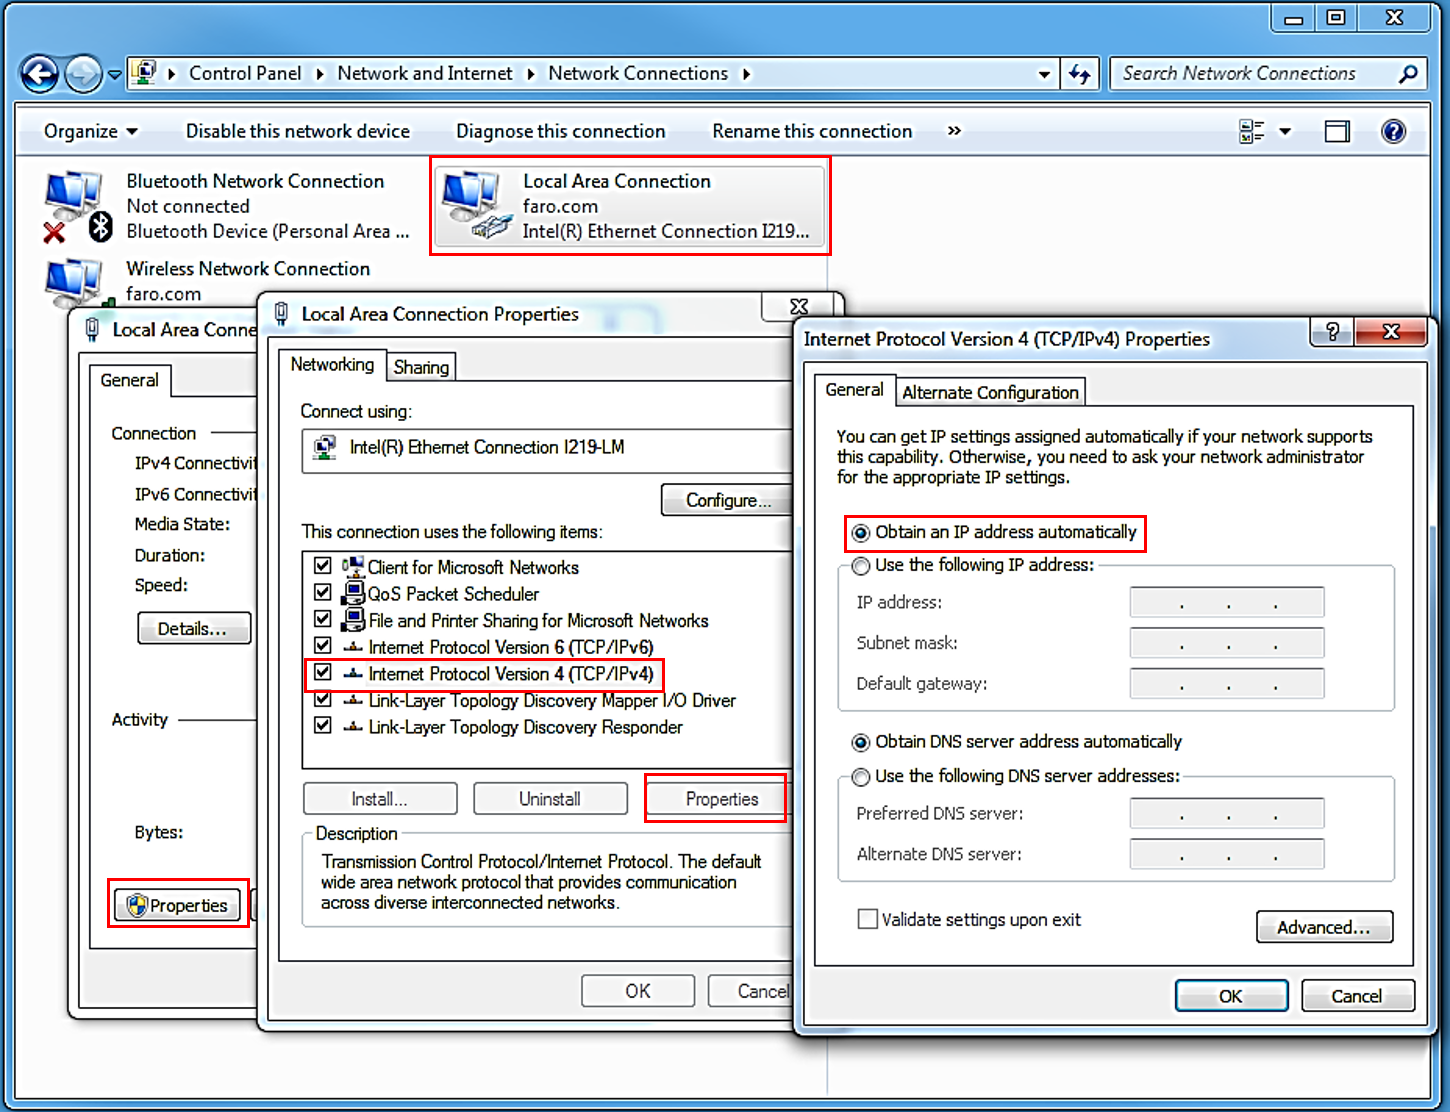
CobaltNetworkConnectionType.PNG

  1. From the Windows Start menu, in the Search field type Network Sharing Center
  2. In the left panel, click Change adapter settings and in the window double-click Local Area Connection.
  3. Click Properties and click Internet Protocol Version 4 (TCP/IPv4).
  4. Click Properties and confirm that Obtain an IP address automatically is selectedIf not, select it and click OK
  5. Close all other windows. 

Connect the Computer to a Cobalt

  1. Open the Windows File Explorer, navigate to C:\Program Files\FARO\Cobalt Interface\DefaultControl and double-click 3D Imager Diagnostic.exe.
  2. Follow the prompts until the Device Manager windows appears.
    GenericCobaltDeviceManager.PNG
  3. Click on the serial number of the Cobalt to which you want to connect and click Connect
  4. The 3D Imager Diagnostic window appears.
    GenericCoboltDiagnostics.PNG

Use the Diagnostic Window

The 3D Imager Diagnostic window has many tabs. The first is the Diagnostic tab. 

  • Click the Diagnostic tab to check the SDK Server version number and when you last compensated the Cobalt.
    Click here to see the latest version of the SDK Server.
    Click here for details about compensating the Cobalt. 
  • You can also review the Cobalt system health. Green means the system is functioning properly; red means it is not. If you see red, in some cases you can help yourself by taking actions that will reduct the Cobalt temperature, making sure the Cobalt mounting is stable and without vibration, or performing a compensation. If you still see red, contact FARO Support.  
  • See the following sections for information about the other tabs and menu items in this window. 

Get Log Files

  1. Click the Log Files tab, then click on a log file name to create a text-based .log file. 
    CobaltLogFileTab.PNG
  2. Navigate to where you want to save the file and click Save
  3. Open the file in any text editor to view it.
    CobaltLogTextFile.PNG 

Review Compensation Statistics

  • Click the Last Compensation Statistics tab to view the compensation results.
    CobaltCompensationStatistics.PNG 
  • The User Manual for the Cobalt 3D Imager contains detailed information and instructions about compensation. 

Check the Dot Plate

  • You can run a check of the compensation dot plate. 
    CobaltDotPlateCheck.PNG

Update the SDK Server

  • Click here and follow the step-by-step instructions to upgrade the SDK Server. But, instead of using BuildIT, CAM2, or Measure 10 use the Cobalt Interface Utility and its 3D Imager Diagnostic window. 
  • On the 3D Imager Diagnostic window menu, click System > Update and continue with the instructions. 
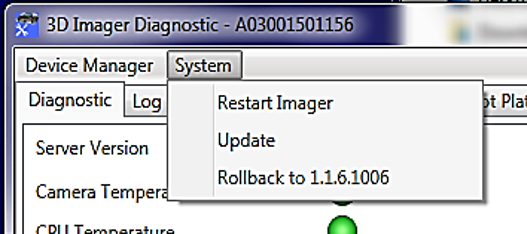
    CobaltDiagnosticSystemMenu.png

Use the Compensation Window

This guided wizard steps you through the Cobalt compensation process. You will need the dot plate that goes with the Cobalt to perform the compensation process. The User Manual for the Cobalt 3D Imager contains detailed instructions about compensating the Cobalt. 

  1. Open the Windows File Explorer, navigate to C:\Program Files\FARO\Cobalt Interface\DefaultControl and double-click FARO 3D Imager Compensation.exe. The FARO 3D Imager Compensation windows appears.
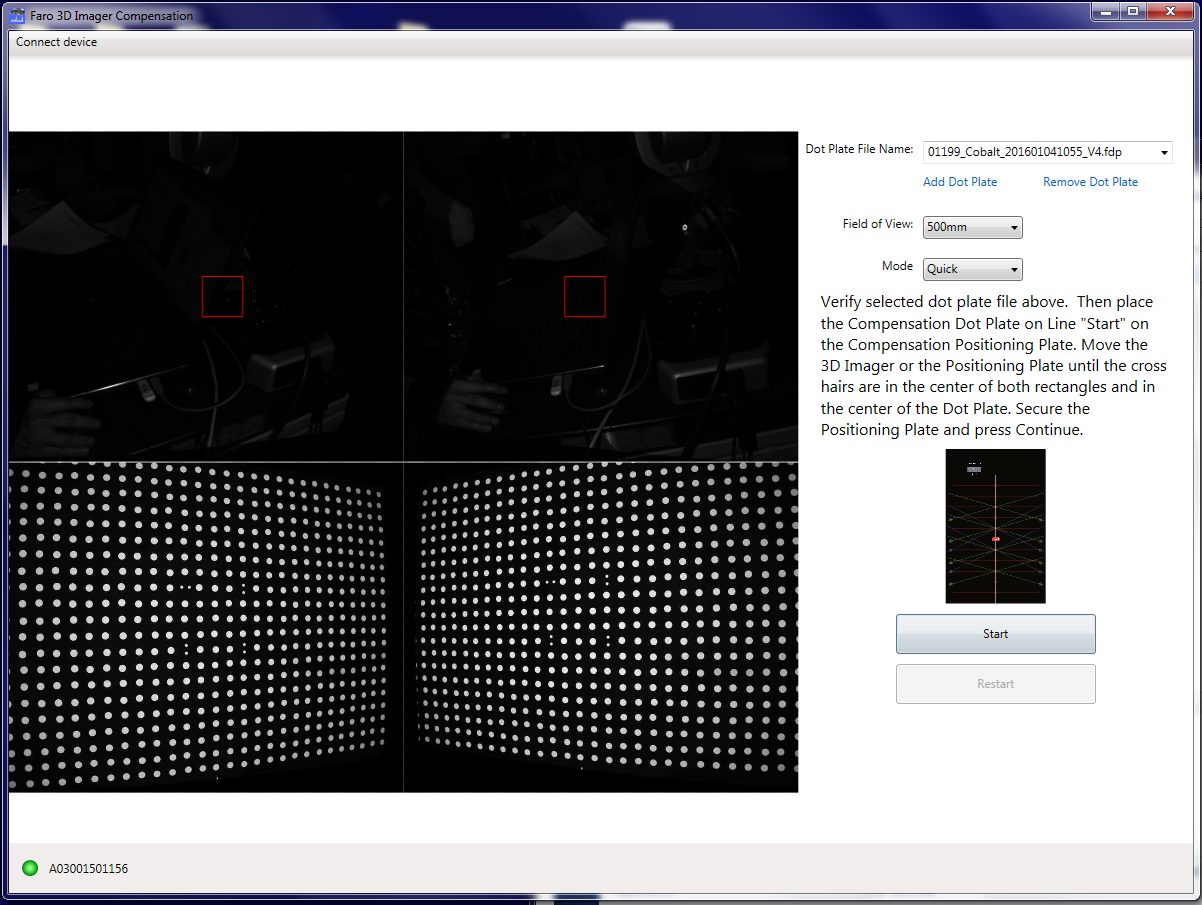
    GenericCobaltCompensation.png
  2. Using the panel on the right, follow the guided instructions to perform the Cobalt compensation.